Google Drive Setup with OAuth & Transfers
Google Drive is Google's cloud storage and file synchronization service. Blober connects to it using OAuth 2.0.
Capabilities
Section titled "Capabilities"- ✅ Browse folders and files
- ✅ Upload files
- ✅ Download files
- ✅ Create folders
- ✅ Delete files/folders
- ✅ Search files
- ✅ View file metadata
- 🚧 Move files (in progress)
- 🚧 Copy files (in progress)
Prerequisites
Section titled "Prerequisites"- A personal Google account (
@gmail.com) or Google Workspace account - That's it, the steps below walk you through everything else
Setup (Google Cloud Console)
Section titled "Setup (Google Cloud Console)"This guide shows you how to create and download a Google OAuth client credentials JSON file. The whole process takes about 5 minutes.
1. Create a Google Cloud Project
Section titled "1. Create a Google Cloud Project"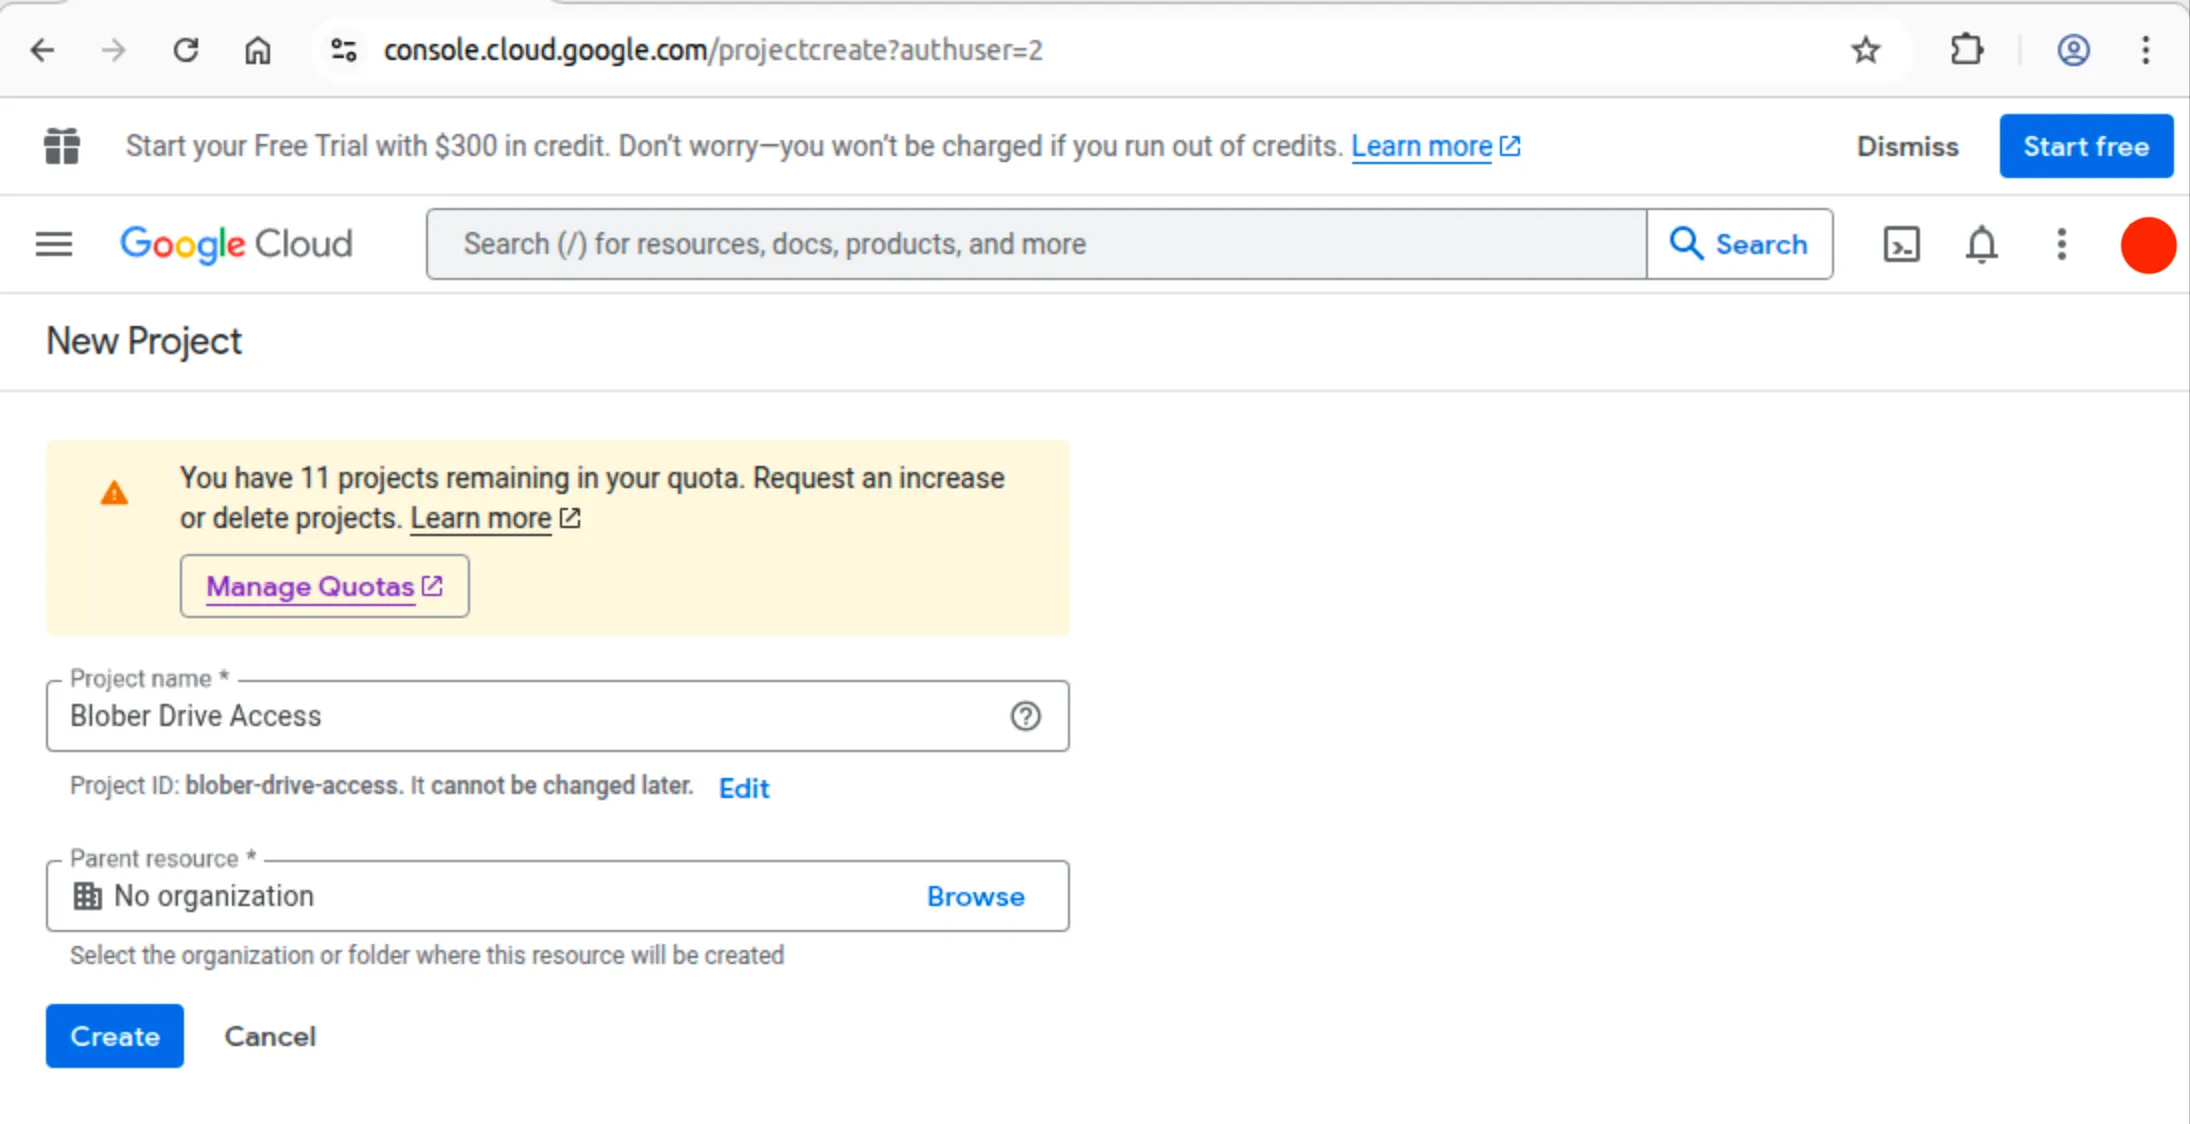
- If prompted, sign in with your Google account. Otherwise, you can switch accounts at the top right corner of the page
- In the Project name field, enter a name (e.g.,
Blober Drive Access)- Google will auto-generate a Project ID below the name field. You don't need to change it
- Leave Parent resource empty (unless you're in an organization)
- Click Create
- Wait a few seconds. You'll see a notification at the top-right confirming the project was created. Click Select Project in the notification to switch to it
2. Enable the Google Drive API
Section titled "2. Enable the Google Drive API"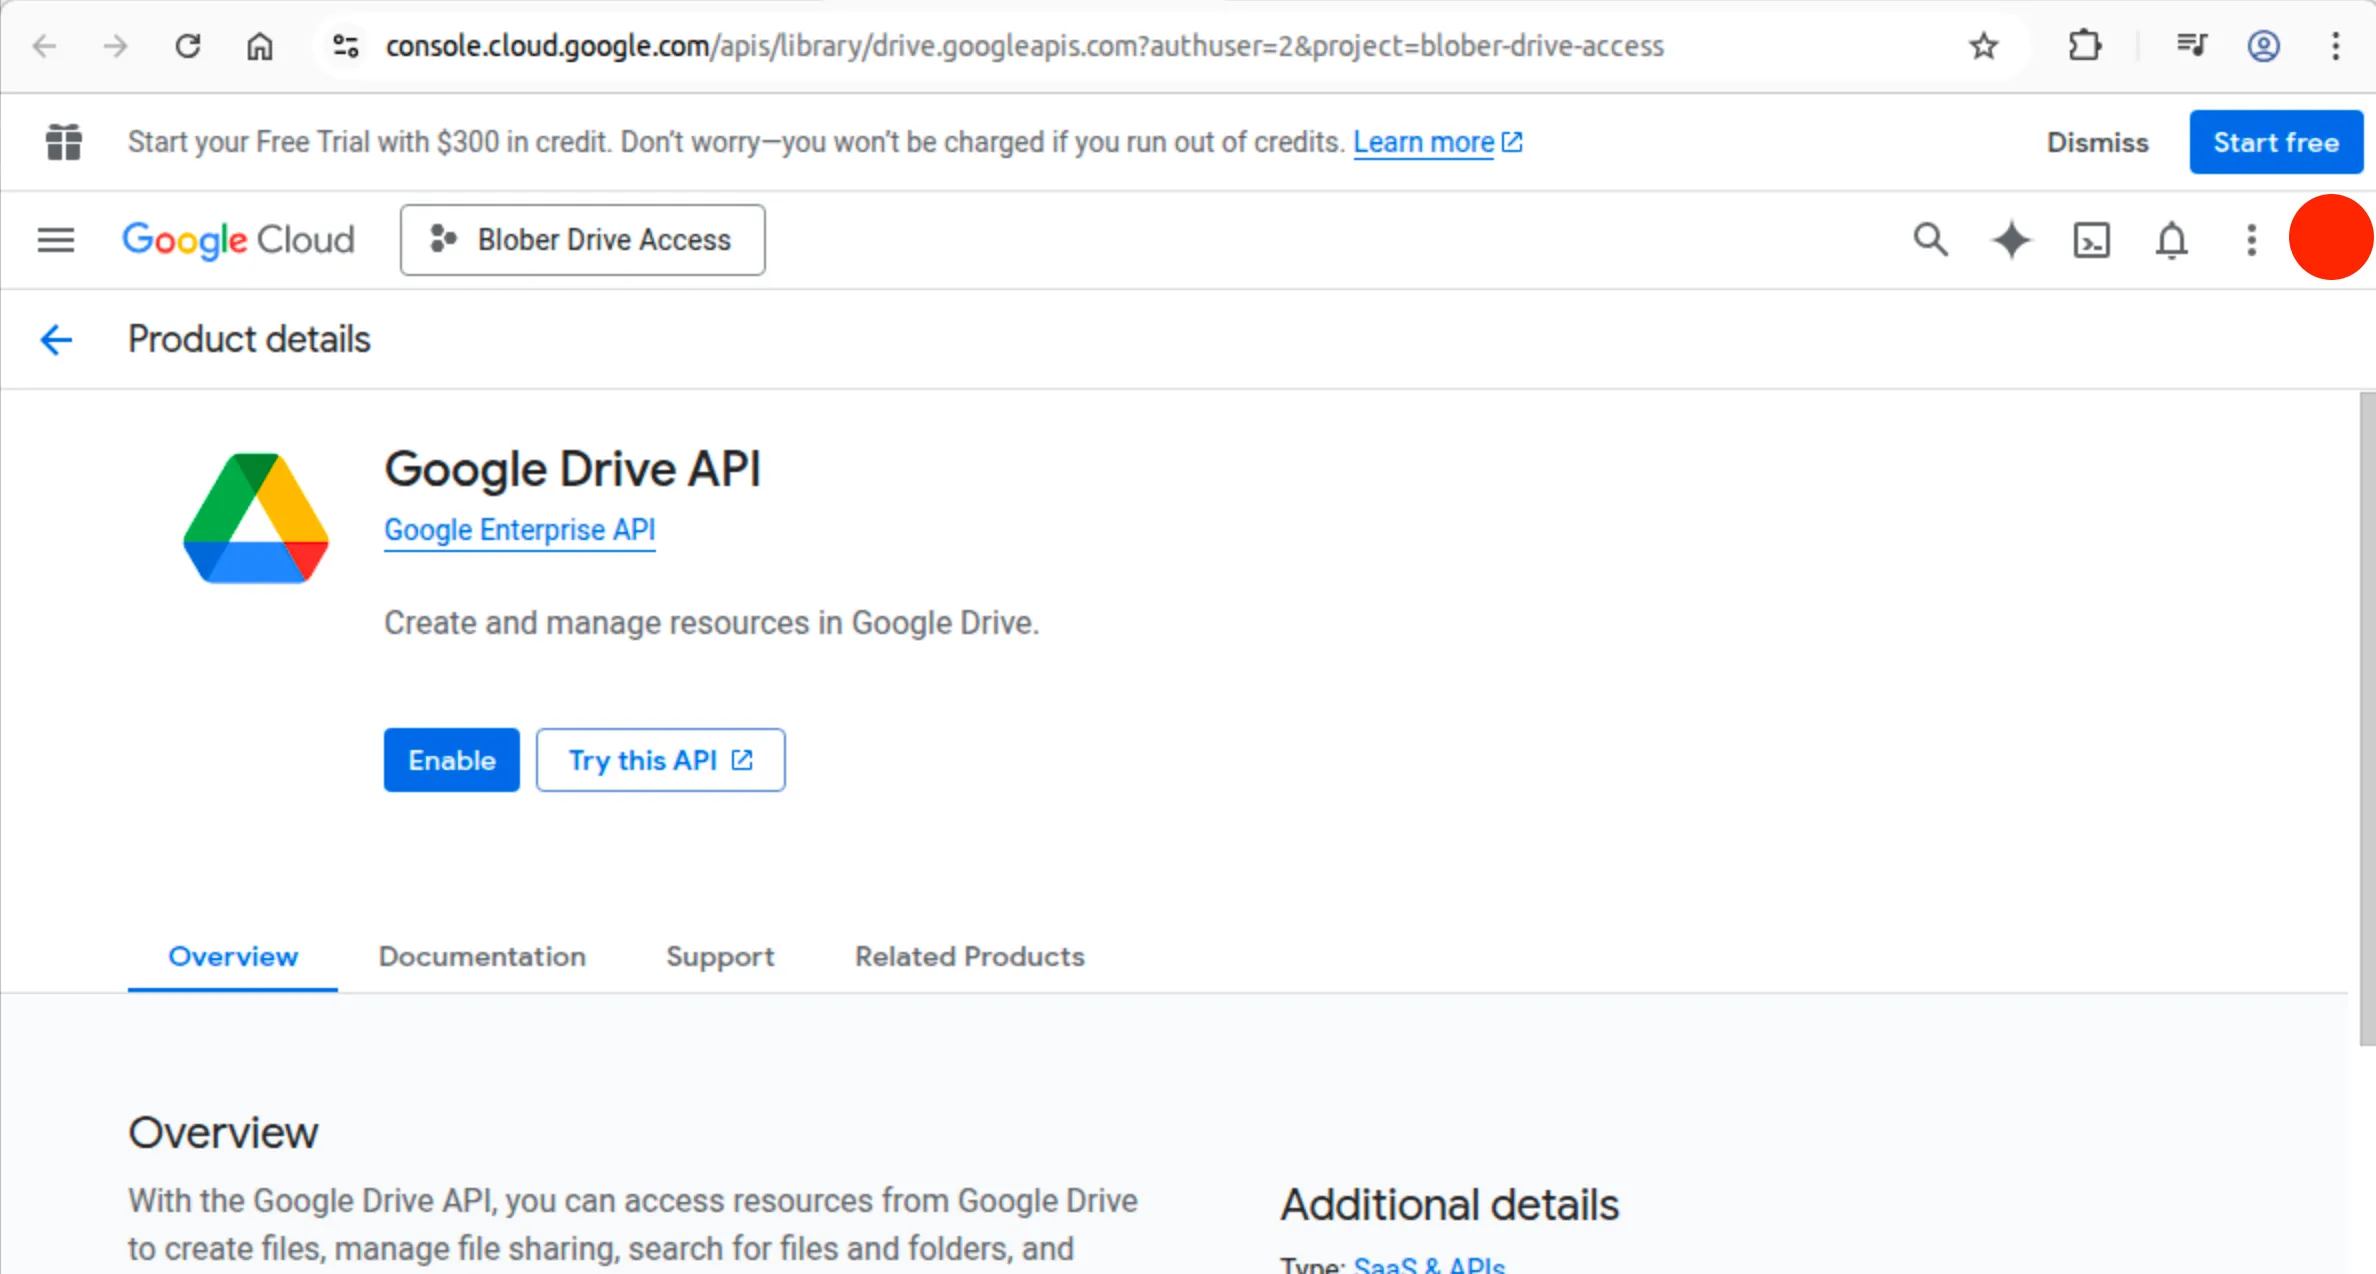
- Go directly to the Drive API page (make sure your new project is selected in the top-left)
- Click the blue Enable button
- You'll be redirected to the API overview page. That means it worked
3. Configure the Google Auth Platform (OAuth Consent Screen)
Section titled "3. Configure the Google Auth Platform (OAuth Consent Screen)"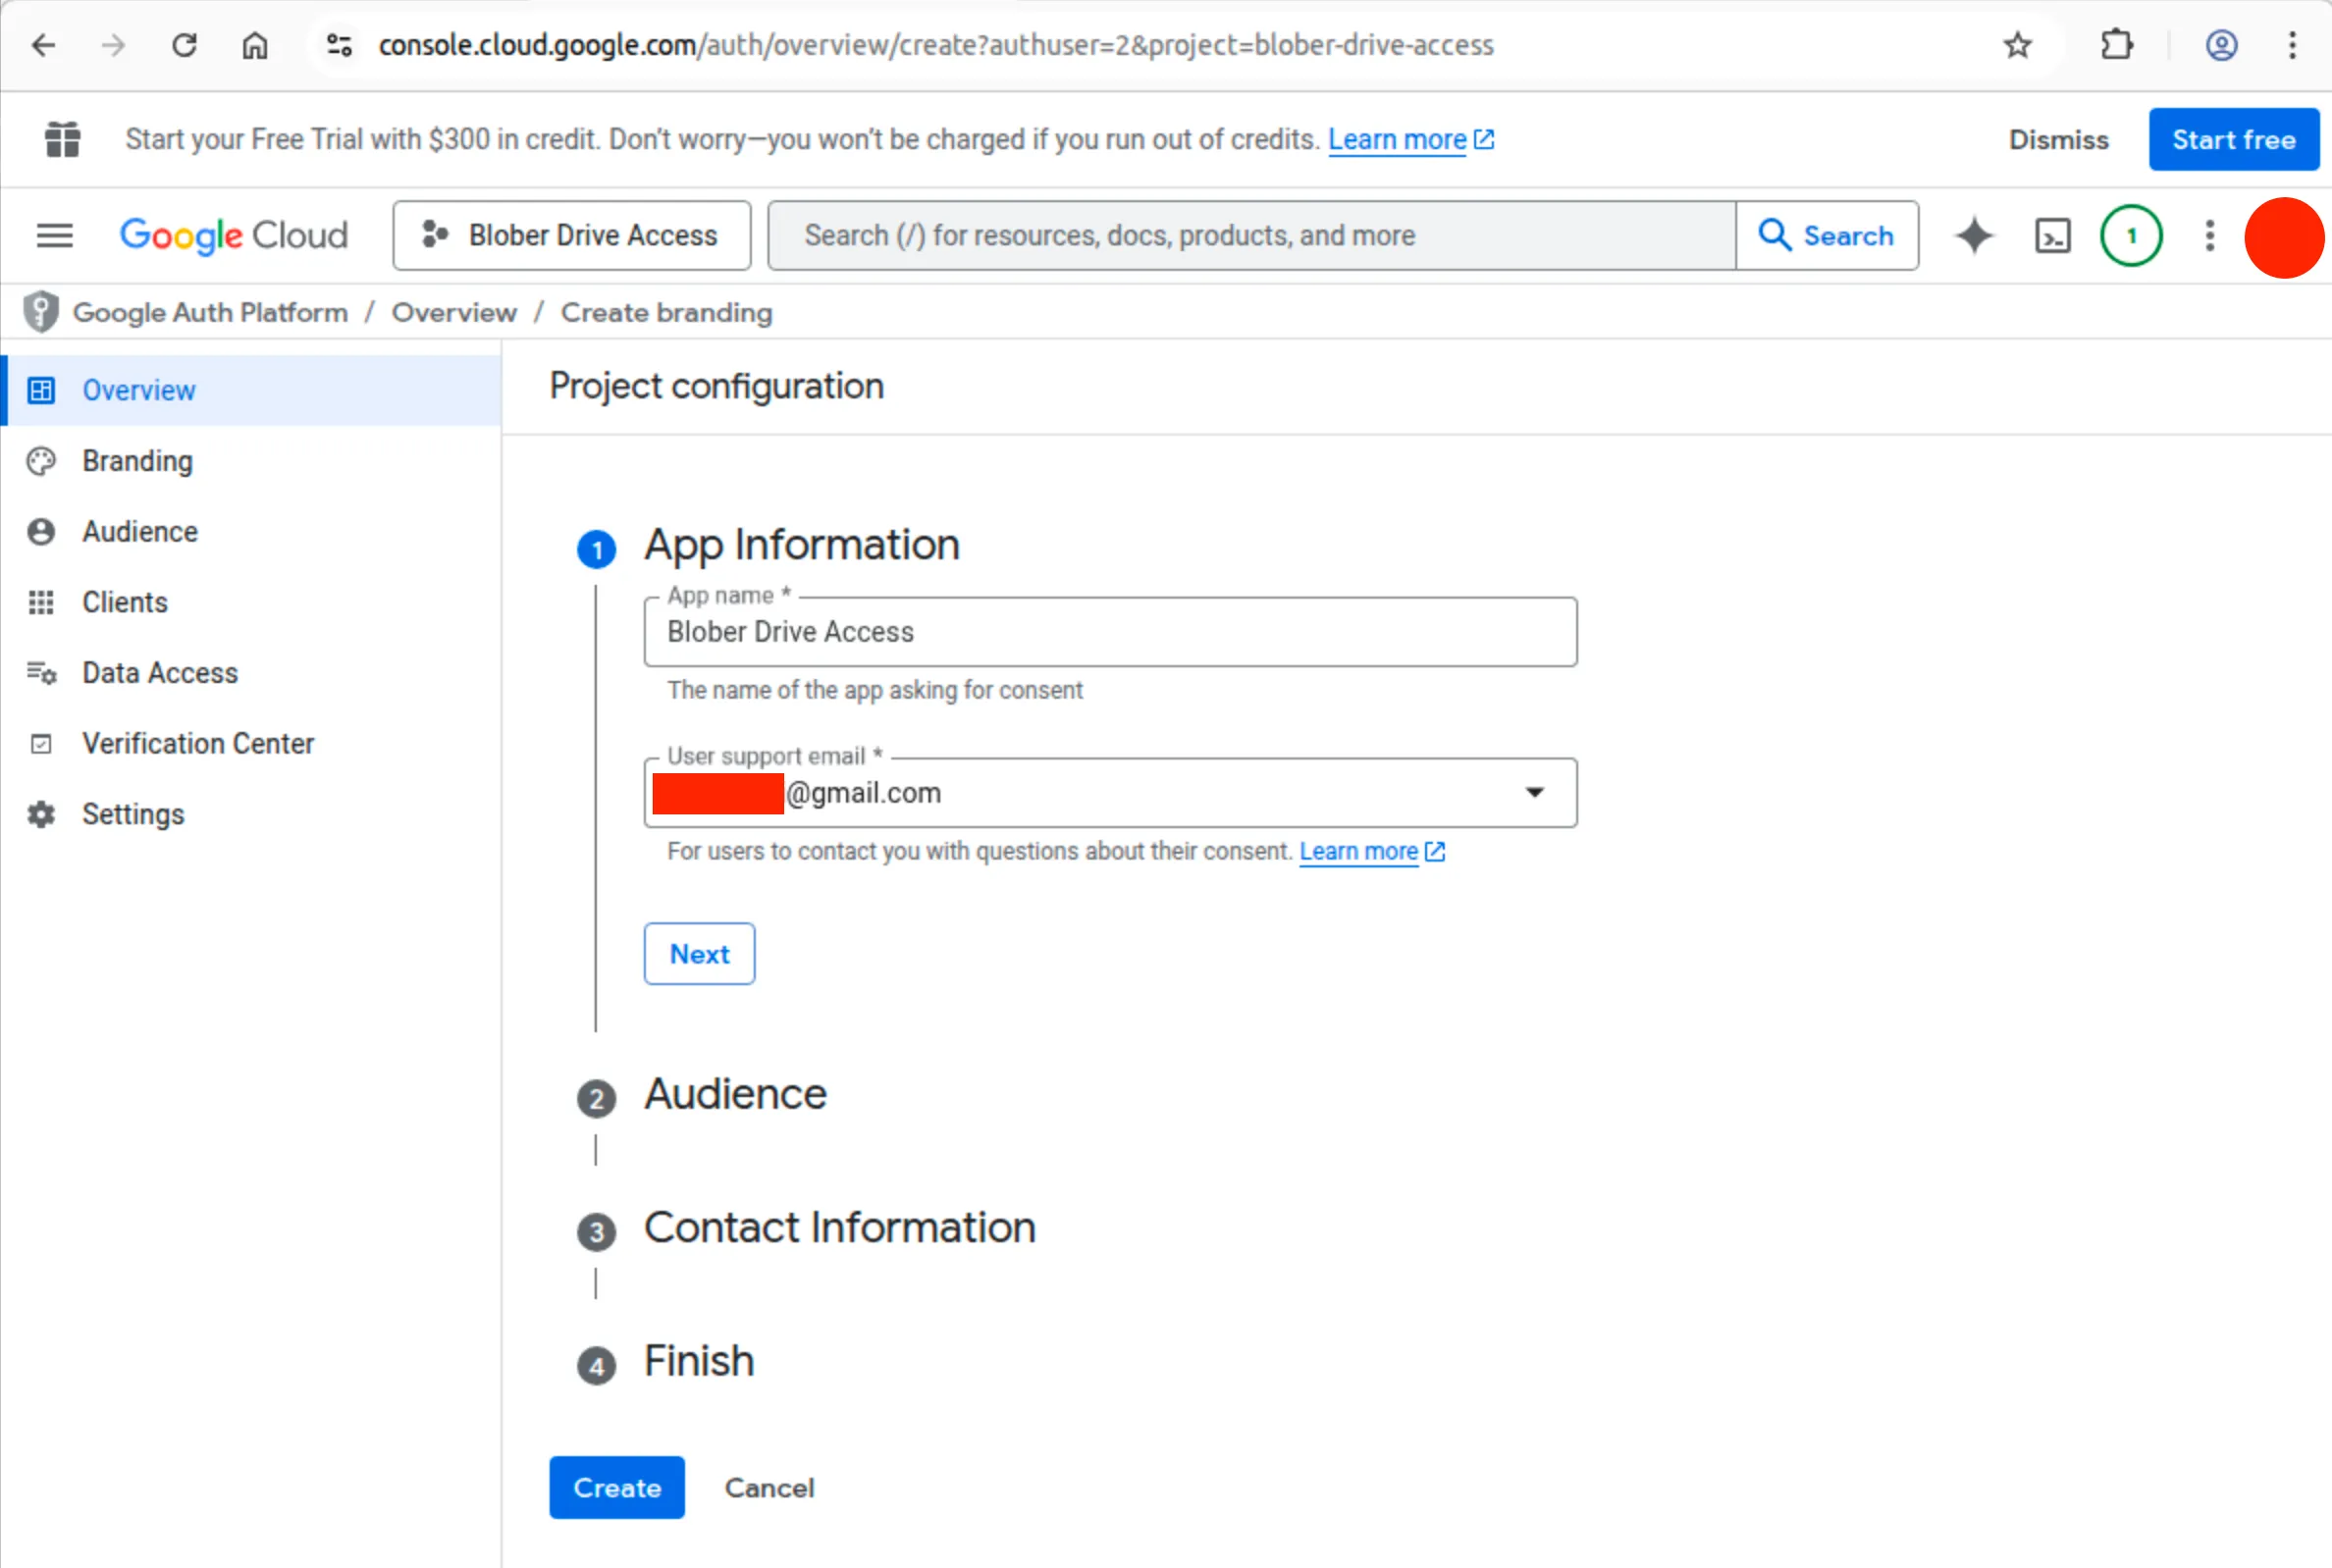
Google requires you to configure an "app identity" before you can create OAuth credentials.
- Go to Google Auth Platform Overview
- You'll see a page saying "Google Auth Platform not configured yet" with a Get started button. Click it
- This opens a 4-step wizard called "Project configuration":
Step 1: App Information
Section titled "Step 1: App Information"- App name: Enter any name (e.g.,
Blober Drive Access). This shows on the consent screen when you authorize - User support email: Click the dropdown and select your Gmail address
- Click Next
Step 2: Audience
Section titled "Step 2: Audience"- You'll see two options: Internal and External
- If you're using a personal
@gmail.comaccount, Internal is disabled. Select External - If you're on Google Workspace, you can choose either
- Click Next
Step 3: Contact Information
Section titled "Step 3: Contact Information"- Enter your email as the Developer contact email (your personal
@gmail.comaccount) - Click Next
Step 4: Finish
Section titled "Step 4: Finish"- Review the summary
- Click Create/Finish
You'll be redirected to the Google Auth Platform overview. The left sidebar items (Branding, Audience, Clients, Data Access) are now accessible.
4. Add Yourself as a Test User
Section titled "4. Add Yourself as a Test User"Because your app is in Testing mode, only explicitly added test users can authorize. If you skip this step, you'll get a "403 Access Denied" or "App not verified" error.
- In the left sidebar, click Audience
- Scroll down to Test users
- Click Add users
- Enter the exact Gmail address you'll use with Blober
- Click Save
5. (IMPORTANT!) Add the Drive Scope
Section titled "5. (IMPORTANT!) Add the Drive Scope"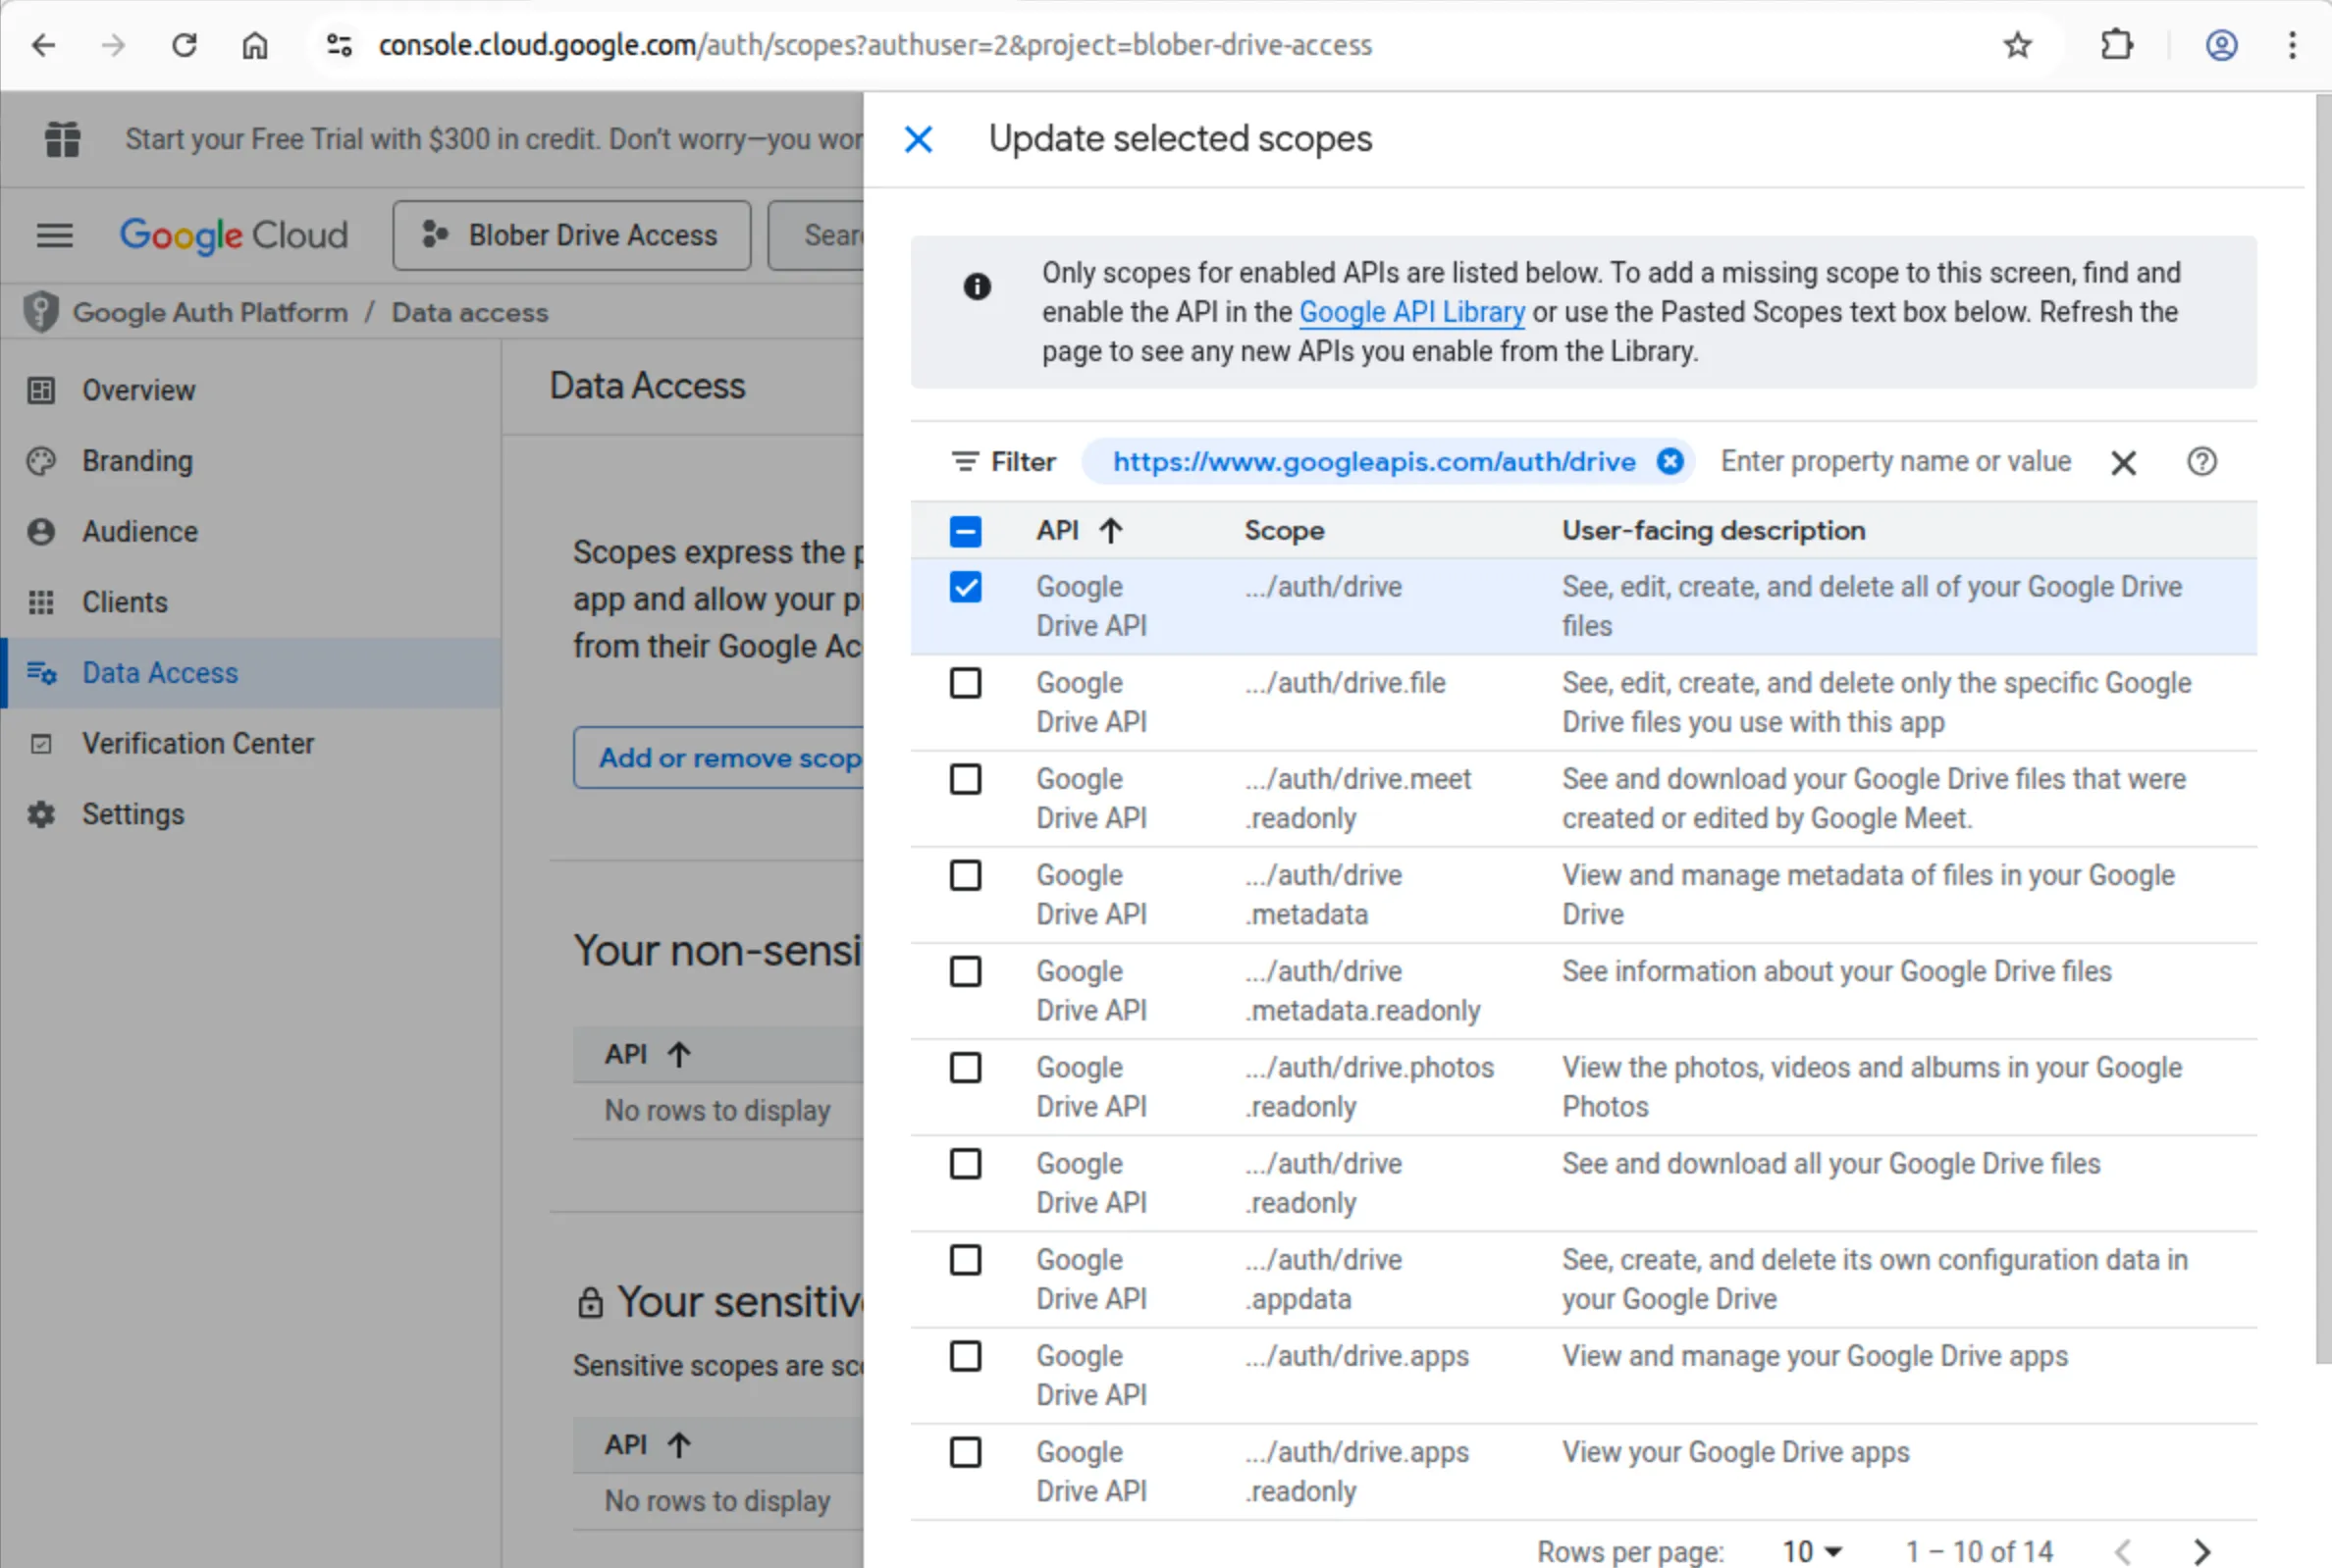
Blober requests scopes automatically during authorization, so this step is optional. But if you want to pre-configure them:
- In the left sidebar, click Data Access
- Click Add or remove scopes
- Search for
driveand checkhttps://www.googleapis.com/auth/drive(Full access) - Click Update, then Save
6. Create Web Credentials
Section titled "6. Create Web Credentials"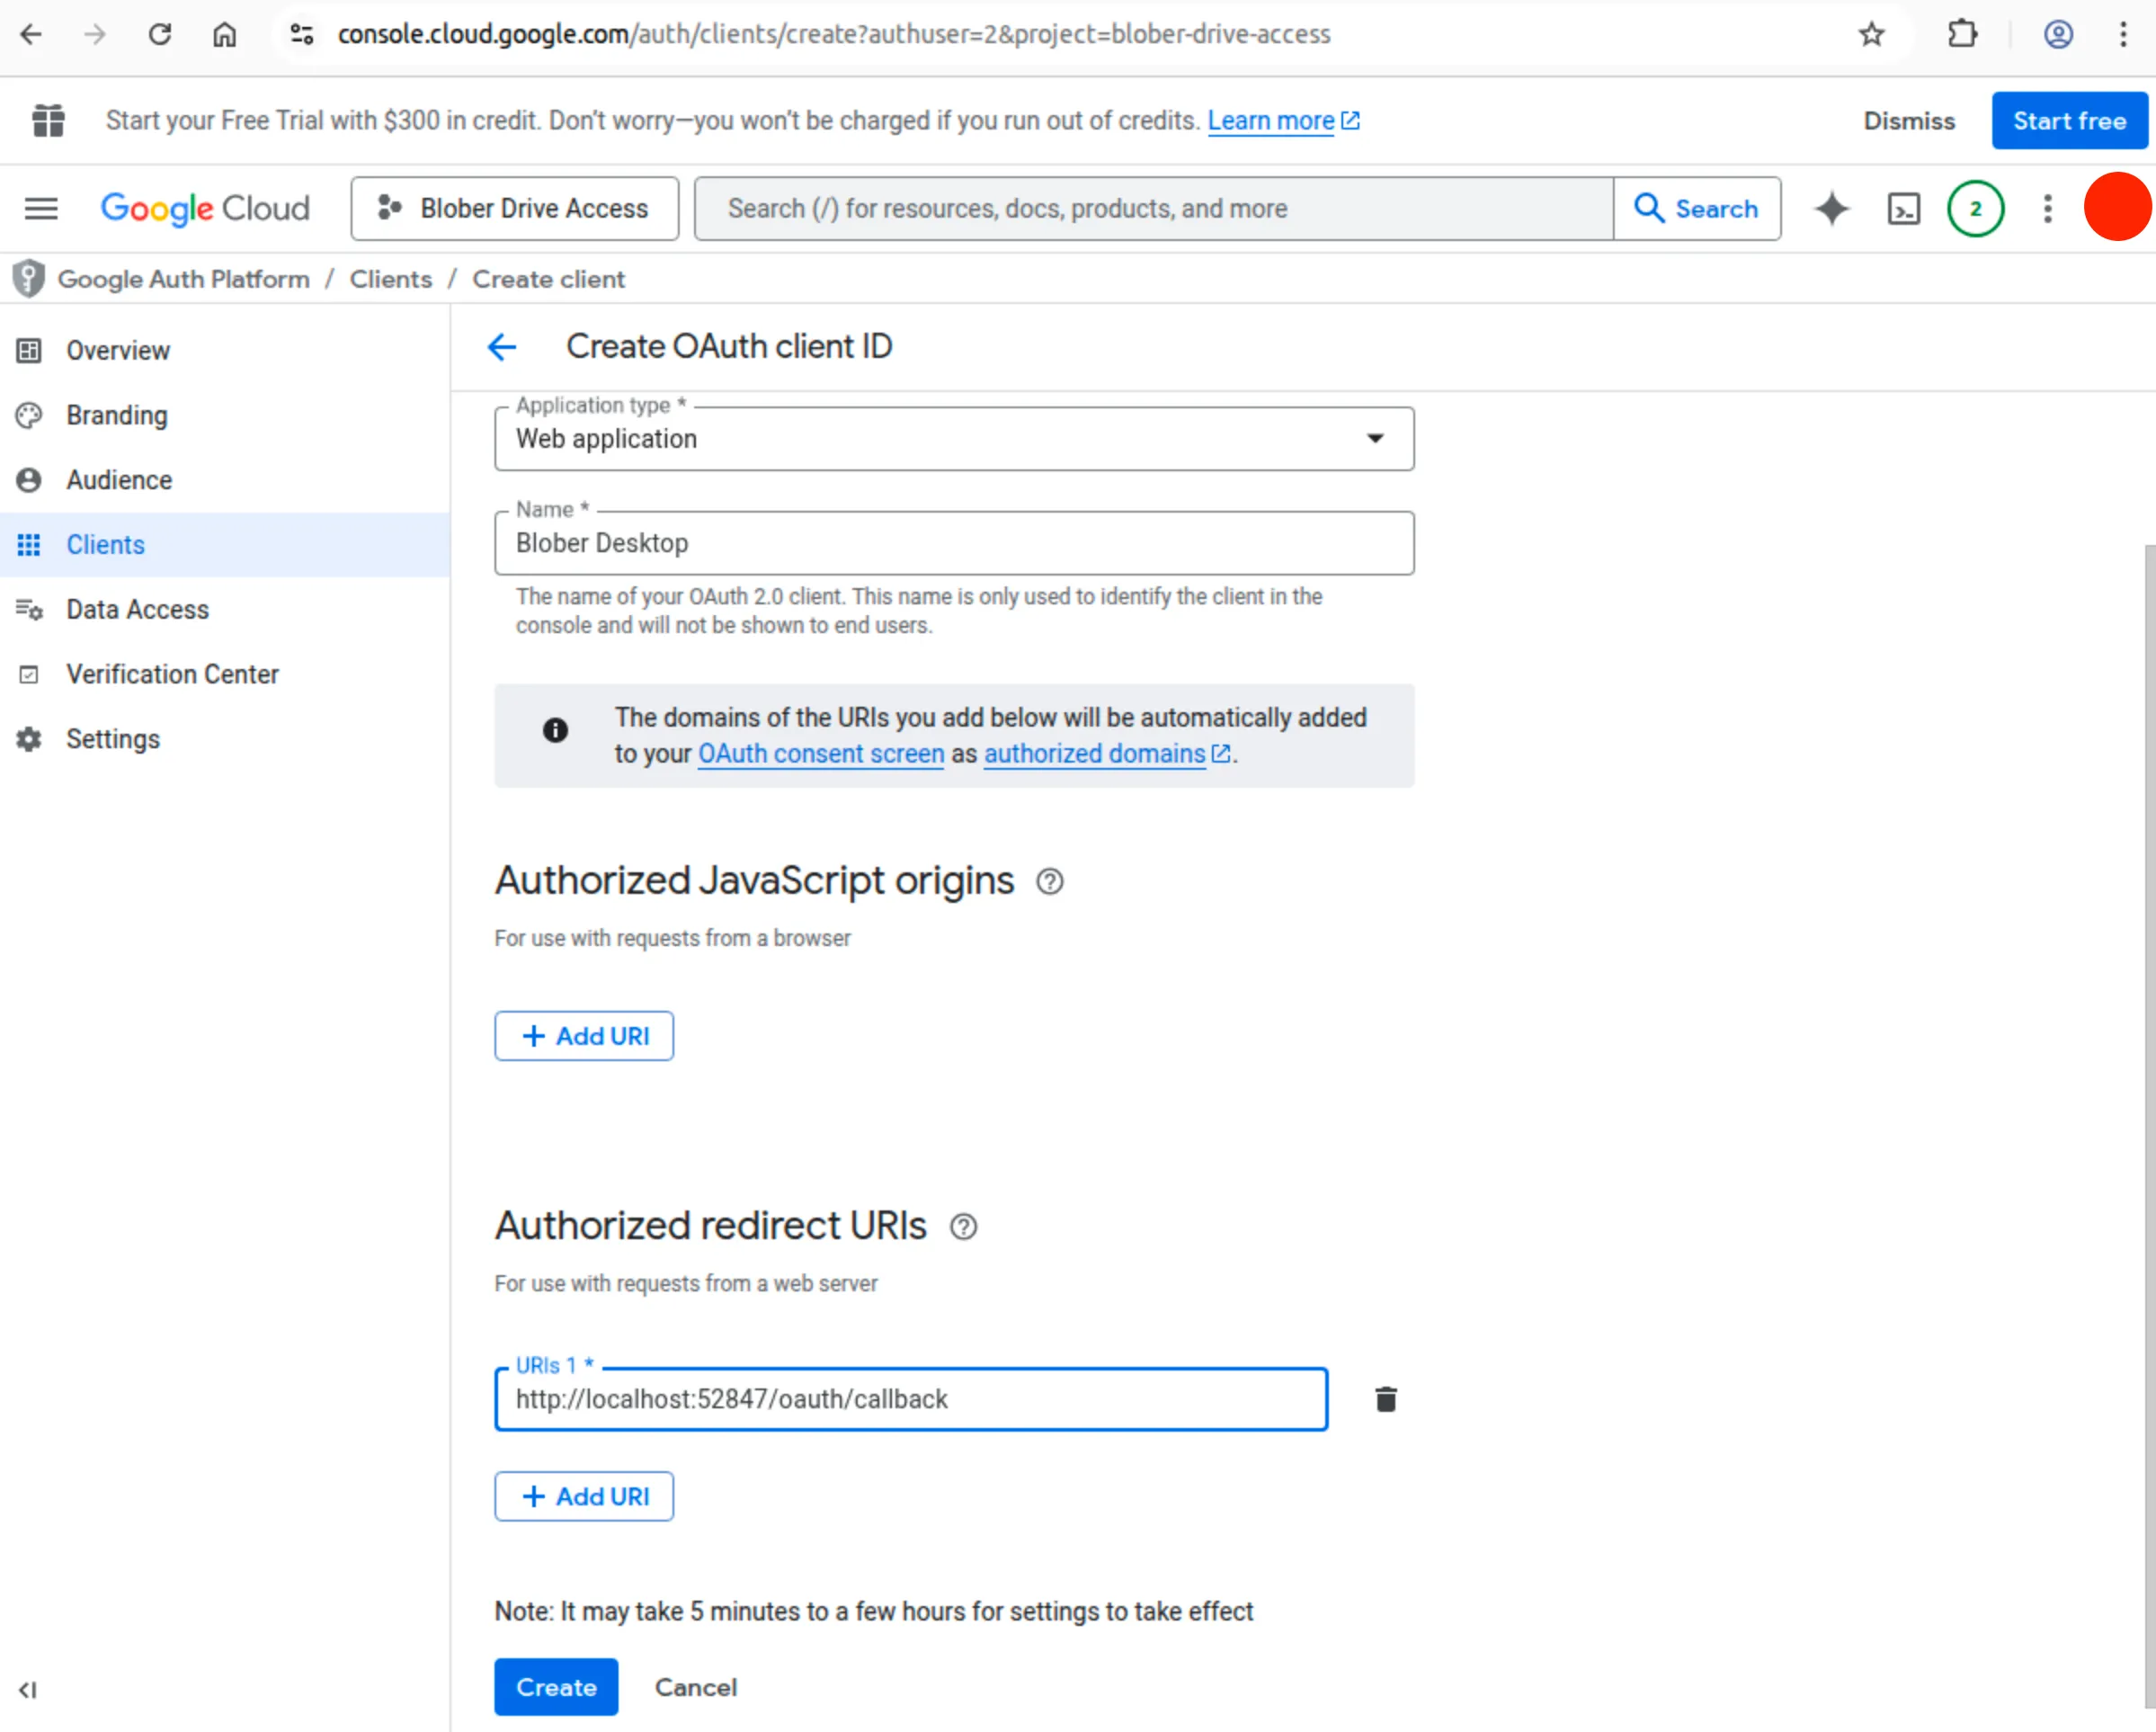
- In the left sidebar, click Clients
- Click Create Client (or go directly to Create OAuth client)
- For Application type, select Web Application
- Enter a name (e.g.,
Blober Desktop) - Under Authorized redirect URIs, add:
- Click Create
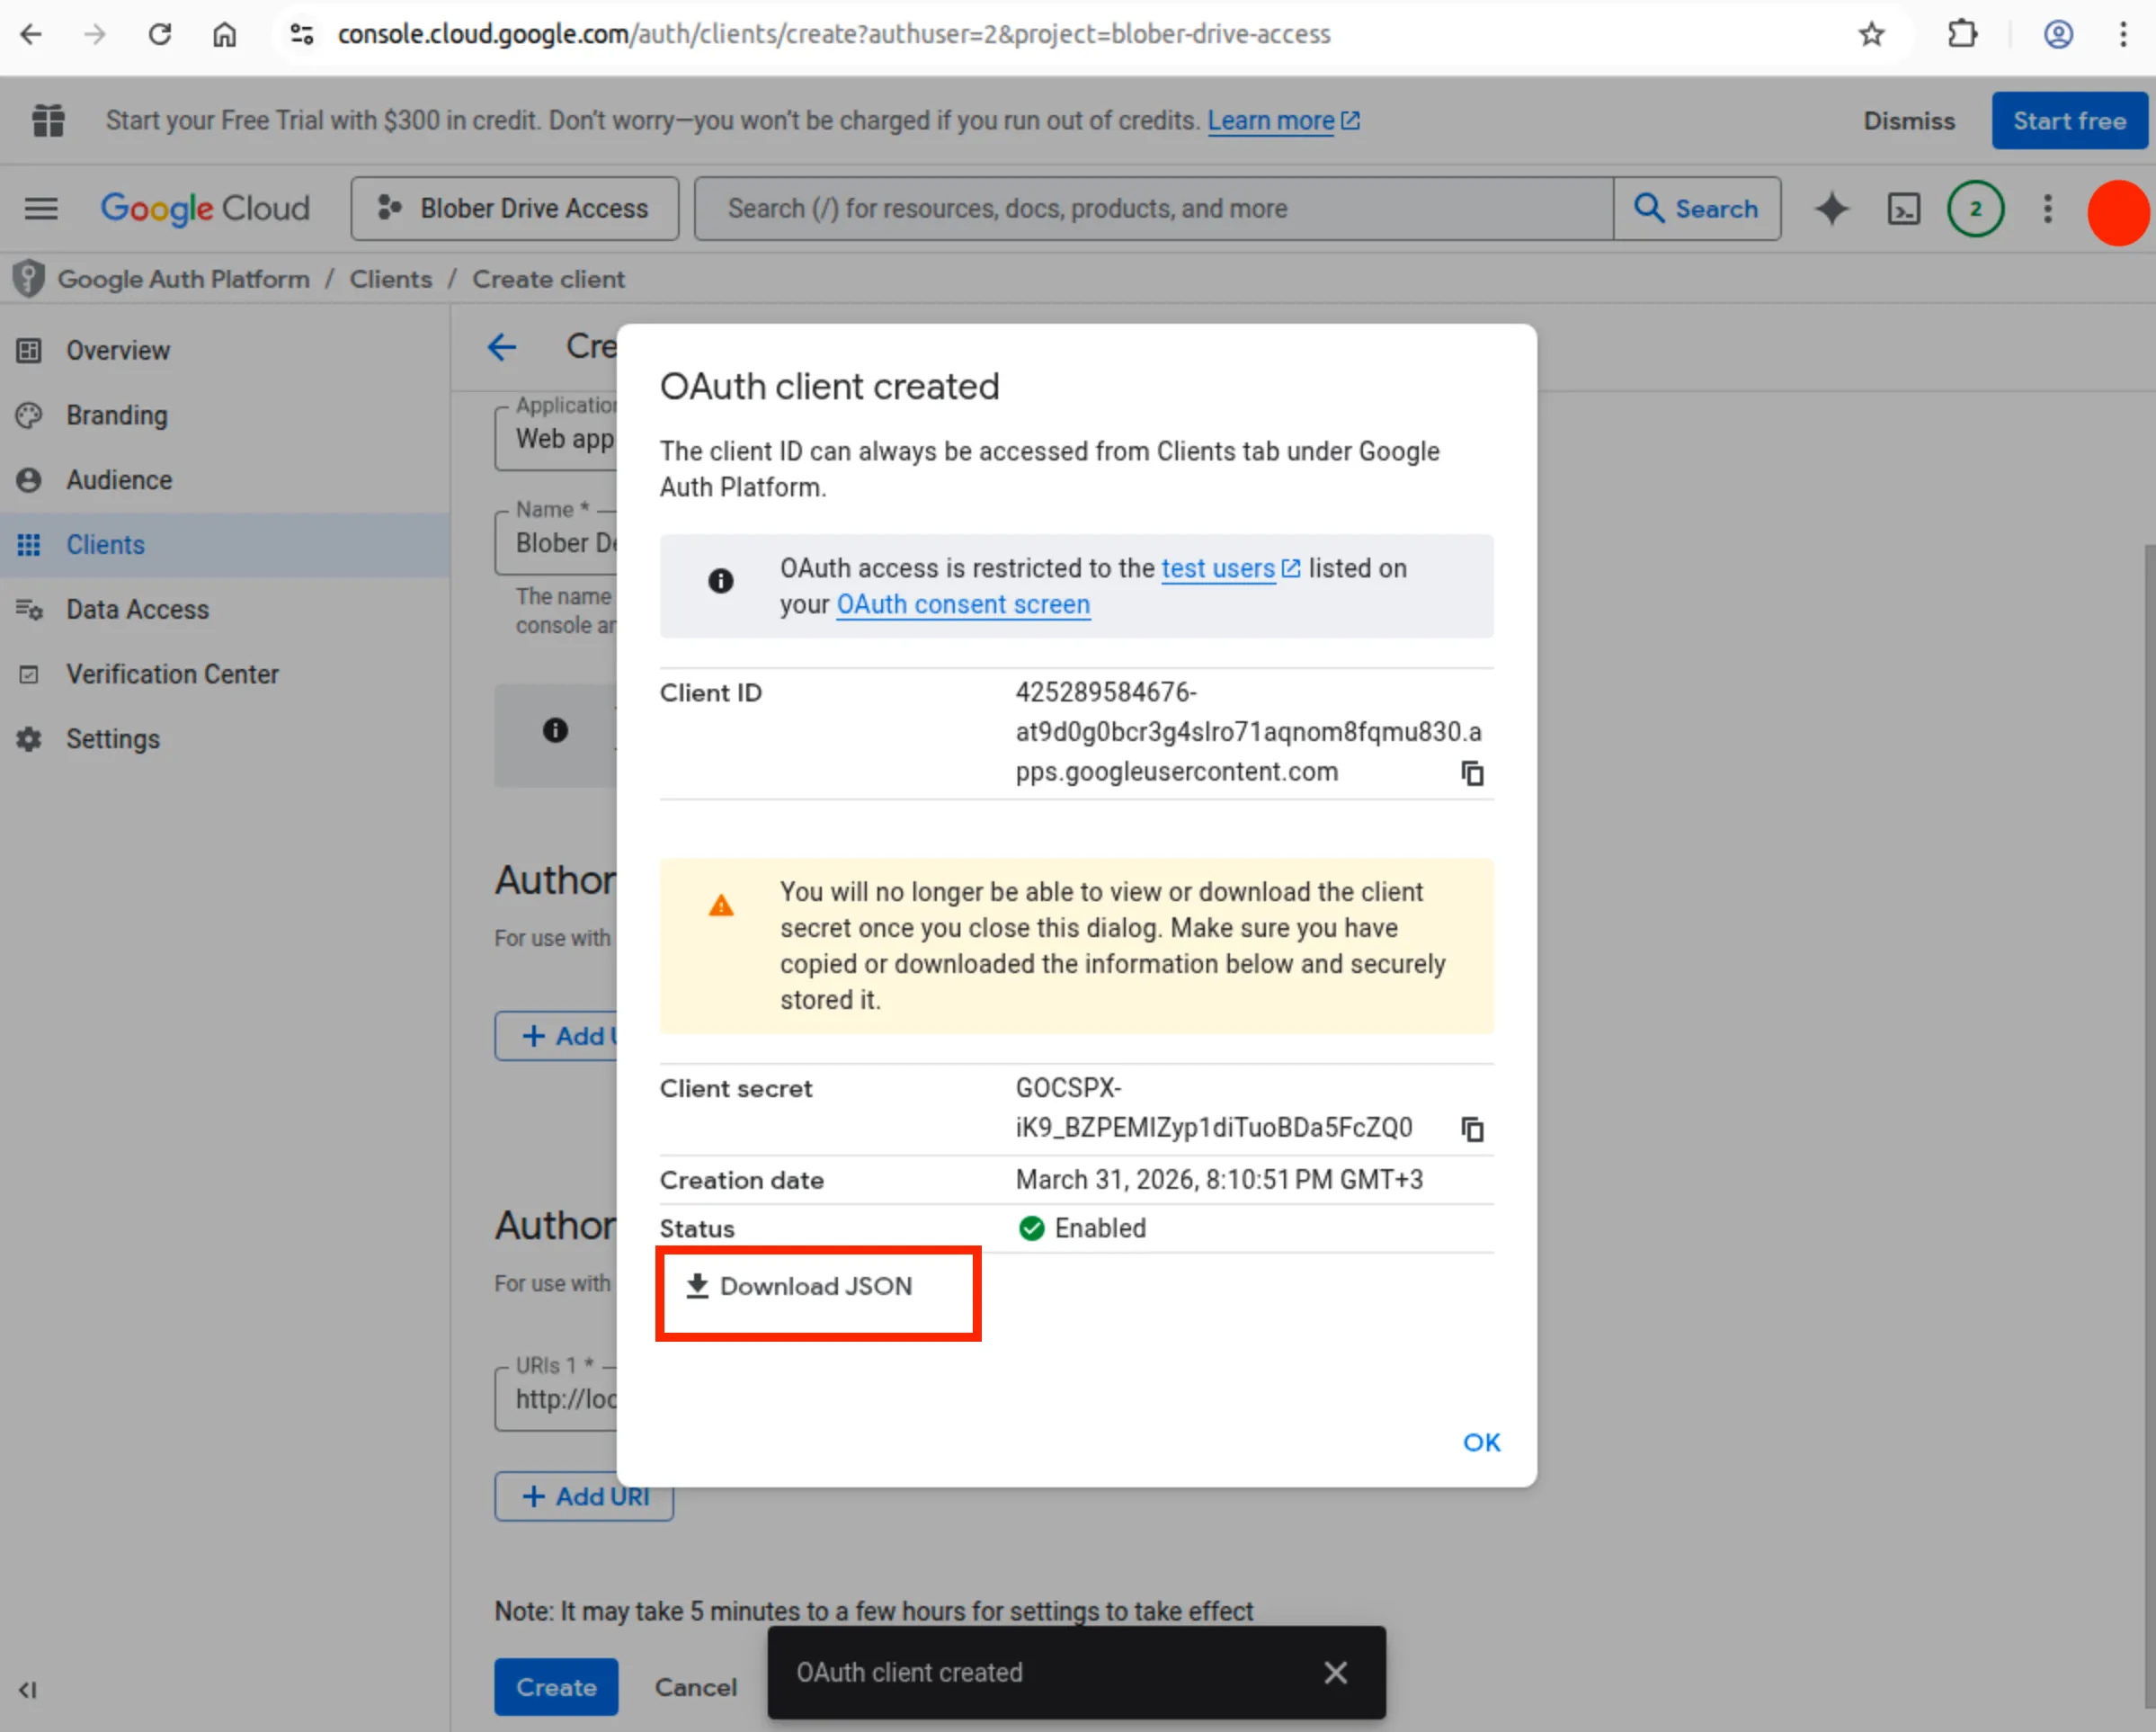
- A dialog appears showing your Client ID and Client Secret
- Click the Download JSON button (⬇️) to save the credentials file
7. Configure in Blober
Section titled "7. Configure in Blober"- In Blober, go to Workflows > New Workflow
- Select Google Drive as source or destination
- Upload the JSON credentials file you downloaded
- Click Authorize Google Drive Access
- A browser window opens. Sign in with the same Google account you added as a test user
- You'll see a warning: "Google hasn't verified this app". This is expected for test apps
- Click Advanced, then click Go to [App Name] (unsafe)
- Grant the requested permissions
- Return to Blober. You should now see your Google Drive files
File Types
Section titled "File Types"Google Drive handles these file types:
| Type | Description | Export Format |
|---|---|---|
| Regular files | Documents, images, videos | As-is |
| Google Docs | Google Docs documents | .docx |
| Google Sheets | Google Sheets spreadsheets | .xlsx |
| Google Slides | Google Slides presentations | .pptx |
| Google Forms | Form definitions | Not downloadable |
Permissions & Privacy
Section titled "Permissions & Privacy"When you connect Google Drive, Blober requests these permissions:
- View files: Read file names and metadata
- Download files: Download file contents
- Upload files: Create new files
- Delete files: Remove files you own
Blober will never:
- Access files from other apps without permission
- Modify files without your explicit action
- Share your data with third parties
The Authorization Screen
Section titled "The Authorization Screen"When you first connect, your browser will show Google's consent flow:
- Sign in with the Google account you added as a test user
- "Google hasn't verified this app" warning: click Advanced, then Go to [App Name] (unsafe)
- Permission grant: review the permissions and click Allow
This warning is normal for apps in Testing mode and does not mean anything is wrong.
Common Issues
Section titled "Common Issues""Google hasn't verified this app" (blocked, can't proceed)
Section titled ""Google hasn't verified this app" (blocked, can't proceed)"- Make sure you click Advanced at the bottom of the warning screen, then click the small link Go to [App Name] (unsafe)
- If you don't see the "Advanced" link, you may be signed into the wrong Google account
"403 Access Denied" or "Error 403: access_denied"
Section titled ""403 Access Denied" or "Error 403: access_denied""- You forgot to add yourself as a test user. Go to Google Auth Platform > Audience > Test users, add your exact Gmail address
- Make sure you're signing in with the same email you added as a test user
"redirect_uri_mismatch"
Section titled ""redirect_uri_mismatch""- The redirect URI your app is sending doesn't match what's configured. For Desktop app credentials, this is handled automatically, so you shouldn't see this error
- If you do, make sure your credential type is Desktop app (not "Web application")
"Authentication Failed"
Section titled ""Authentication Failed""- Try disconnecting and reconnecting in Blober
- Clear browser cookies for
accounts.google.com - Check you're signing into the correct Google account
"Permission Denied" on files
Section titled ""Permission Denied" on files"- Re-authorize to refresh permissions
- Check if files are owned by you or shared with you
- Verify the Drive API is enabled for your project
"Files Not Showing"
Section titled ""Files Not Showing""- Refresh the file list
- Check you're in the correct folder
- Verify files aren't in Trash
Console shows "You need additional access"
Section titled "Console shows "You need additional access""- You're viewing a project you don't own. Click the project picker in the top-left and select the correct project
- This also happens if the project name in the URL doesn't match your actual project ID
Limitations
Section titled "Limitations"Storage
Section titled "Storage"- Free tier: 15 GB (shared with Gmail and Google Photos)
- Maximum file size: 5 TB per file
- Daily upload limit: 750 GB
API Quotas
Section titled "API Quotas"- Google imposes rate limits on API requests
- Blober handles rate limiting automatically
- Large operations may take longer due to throttling
Google Workspace Files
Section titled "Google Workspace Files"- Google Docs/Sheets/Slides are exported to Microsoft Office formats
- Some formatting may differ after export
- Google Forms cannot be downloaded
Best Practices
Section titled "Best Practices"Security
Section titled "Security"- Never share your OAuth credentials JSON file with anyone
- Don't commit the JSON file to version control (add it to
.gitignore) - Periodically review connected apps in Google Account settings
- Revoke access for apps you no longer use
Search Syntax
Section titled "Search Syntax"You can use Google Drive's search from within Blober:
| Query | Description |
|---|---|
filename:report | Files with "report" in the name |
type:pdf | PDF files only |
owner:me | Files you own |
modified:last7days | Recently modified |
External References
Section titled "External References"- Google Auth Platform Overview: configure OAuth consent
- Google Drive API Library Page: enable the Drive API
- OAuth for Desktop Apps: how OAuth works for desktop apps
- Google Drive API Documentation
- Google Cloud Console