This is the full developer documentation for Blober
# Lost in Space?
> That page doesn't exist. Let's get you back to the docs.
# Back Up Your GoPro Cloud to Backblaze B2, AWS S3, or Local Storage
> Blober is the only tool that connects to GoPro Cloud. Move your GoPro footage to affordable, long-term storage before it's too late.
### The Problem
[Section titled “The Problem”](#the-problem)
GoPro’s cloud storage (GoPro Plus / GoPro Premium) offers unlimited storage for GoPro camera media. It’s a great perk - until you want your footage somewhere else.
The reality for most GoPro users:
* **Painfully limited batch download** - GoPro’s web portal caps batch downloads at 25 files at a time, bundled into a ZIP. Large batches frequently fail or time out, and metadata like GPS data may be stripped during compression
* **No third-party tool support** - rclone, MultCloud, Flexify, and every other transfer tool do *not* support GoPro Cloud
* **Subscription dependency** - cancel GoPro Plus and your cloud access disappears. Your footage remains hostage to a recurring charge
* **No “Download All” option** - if you have hundreds or thousands of files, you’re stuck doing dozens of 25-file batch downloads manually, hoping none fail
GoPro community forums are filled with users asking the same question: *“How do I download all my GoPro Cloud content at once?”* - and the practical answer is: not without hours of manual work and frequent failures.
[**Blober**](https://blober.io/) changes that.
***
### Blober: The Only Tool That Connects to GoPro Cloud
[Section titled “Blober: The Only Tool That Connects to GoPro Cloud”](#blober-the-only-tool-that-connects-to-gopro-cloud)
[**Blober**](https://blober.io/) is the **only** desktop application that integrates with GoPro’s cloud storage. No other migration tool - free or paid - supports GoPro Cloud as a source or destination.
With Blober, you can:
* **Browse all your GoPro Cloud media** - photos and videos, organized by date, camera, and type
* **Download everything at once** to your local drive, NAS, or external HDD
* **Transfer directly** to Backblaze B2, AWS S3, Wasabi, Cloudflare R2, Azure Blob Storage, or DigitalOcean Spaces
* **Use metadata-based path templates** to auto-organize files (e.g., by camera model, capture date, resolution)
* **Resume interrupted transfers** - no need to start over if your connection drops
***
### Why Back Up GoPro Cloud?
[Section titled “Why Back Up GoPro Cloud?”](#why-back-up-gopro-cloud)
#### 1. Subscription Lock-In
[Section titled “1. Subscription Lock-In”](#1-subscription-lock-in)
GoPro Plus costs \~$49.99/year. As long as you pay, your footage stays accessible. The moment you cancel, your cloud media goes offline. For years of footage, that’s a dangerous bet on a single subscription.
#### 2. No Redundancy
[Section titled “2. No Redundancy”](#2-no-redundancy)
GoPro Cloud is your only copy in the cloud. There is no built-in backup, no versioning, no geographic replication. If GoPro ever changes their terms, shuts down the service, or experiences data loss - your footage is gone.
#### 3. Cost Optimization
[Section titled “3. Cost Optimization”](#3-cost-optimization)
Long-term archival storage costs a fraction of ongoing subscriptions:
| Storage Option | Cost for 1 TB/year | Egress Fees |
| ----------------- | --------------------------- | ----------------------- |
| GoPro Plus | \~$49.99/year (ongoing) | N/A (limited downloads) |
| Backblaze B2 | \~$72/year ($6/TB/mo) | Free up to 3x stored |
| Wasabi | \~$83.88/year ($6.99/TB/mo) | Free |
| AWS S3 (Standard) | \~$276/year | $0.09/GB |
| Local NAS | One-time HDD cost | Free |
For most GoPro users, Backblaze B2 or Wasabi combined with a Blober one-time license is the most cost-effective long-term strategy.
#### 4. You Own Your Footage
[Section titled “4. You Own Your Footage”](#4-you-own-your-footage)
Your GoPro footage is yours. Keeping it locked behind a single provider’s subscription model is not ownership - it’s rental. Backing it up to storage you control gives you true data sovereignty.
***
### How It Works
[Section titled “How It Works”](#how-it-works)
#### Step 1: Connect GoPro Cloud in Blober
[Section titled “Step 1: Connect GoPro Cloud in Blober”](#step-1-connect-gopro-cloud-in-blober)
1. Open [**Blober**](https://blober.io/) and create a new workflow
2. Select **GoPro** as the source
3. Click **Open GoPro Login** - a browser window opens
4. Sign in with your GoPro account
5. Blober captures your session automatically
#### Step 2: Choose Your Destination
[Section titled “Step 2: Choose Your Destination”](#step-2-choose-your-destination)
Select where you want your footage to go:
* **Local disk** - your SSD, HDD, NAS, or external drive
* **Backblaze B2** - affordable, S3-compatible, free egress
* **AWS S3** - enterprise-grade, global availability
* **Wasabi** - hot storage with no egress fees
* **Cloudflare R2** - zero egress, fast edge delivery
* **Any other Blober-supported provider**
#### Step 3: Configure Path Templates (Optional)
[Section titled “Step 3: Configure Path Templates (Optional)”](#step-3-configure-path-templates-optional)
Use Blober’s metadata-based path templates to auto-organize files as they transfer:
```plaintext
/{camera_model}/{capture_date}/{filename}
```
This turns a flat GoPro dump into a clean archive:
```plaintext
/HERO13 Black/2026-01-23/GX015742.MP4
/HERO13 Black/2026-01-23/gorp0001.JPG
/HERO12 Black/2025-12-15/GX014521.MP4
```
#### Step 4: Run and Monitor
[Section titled “Step 4: Run and Monitor”](#step-4-run-and-monitor)
Click **Start** and Blober handles the rest:
* Parallel downloads for maximum throughput
* Real-time progress tracking
* Automatic resume on interruption
* Full task history logged for every file
***
### Supported GoPro Media
[Section titled “Supported GoPro Media”](#supported-gopro-media)
| Type | Extensions |
| ------ | ------------------------------ |
| Videos | `.mp4`, `.mov`, `.avi`, `.mkv` |
| Photos | `.jpg`, `.png`, `.raw`, `.dng` |
Blober downloads the **highest available quality** - no compression, no re-encoding.
***
### Metadata Available
[Section titled “Metadata Available”](#metadata-available)
Each GoPro file includes rich metadata that Blober can use for organization:
| Field | Example |
| ------------ | ------------- |
| Camera model | HERO13 Black |
| Capture date | 2026-01-23 |
| Resolution | 5312 × 2988 |
| File size | 142.5 MB |
| Duration | 0:32 (videos) |
***
### Frequently Asked Questions
[Section titled “Frequently Asked Questions”](#frequently-asked-questions)
**Can I upload to GoPro Cloud with Blober?** Yes. Blober supports uploads to GoPro Cloud (up to 5 TB per file) with multipart upload and progress tracking.
**Does Blober store my GoPro credentials?** No. Blober uses a browser-based login flow. Your session lasts approximately 20 hours, after which Blober prompts you to sign in again. Credentials are never stored or transmitted to any server.
**Can rclone, MultCloud, or Flexify do this?** No. As of February 2026, Blober is the only transfer tool that supports GoPro Cloud. rclone (70+ providers), MultCloud (30+ services), and Flexify (\~25 clouds) do not include GoPro Cloud integration.
**What if my transfer is interrupted?** Blober saves progress and resumes from the last successfully transferred file. No need to re-download everything.
***
### Take Control of Your GoPro Footage
[Section titled “Take Control of Your GoPro Footage”](#take-control-of-your-gopro-footage)
Your footage is irreplaceable - years of adventures, events, and memories sitting in a cloud you can only access through a subscription. [**Blober**](https://blober.io/) gives you a way out: move it all to storage you own and control, in the highest quality, organized exactly how you want.
[Get started with Blober →](https://blober.io/)
# Back Up Cloud Storage Directly to Your NAS
> Transfer files from GoPro Cloud, Dropbox, Google Drive, or S3 straight to your Synology, QNAP, or any network drive — no double-copy, no CLI, no subscription.
## The Problem
[Section titled “The Problem”](#the-problem)
You have files in the cloud — GoPro footage, Dropbox archives, Google Drive projects, S3 buckets — and you want them on your NAS. Simple enough in theory. In practice, the available options are all some flavor of painful.
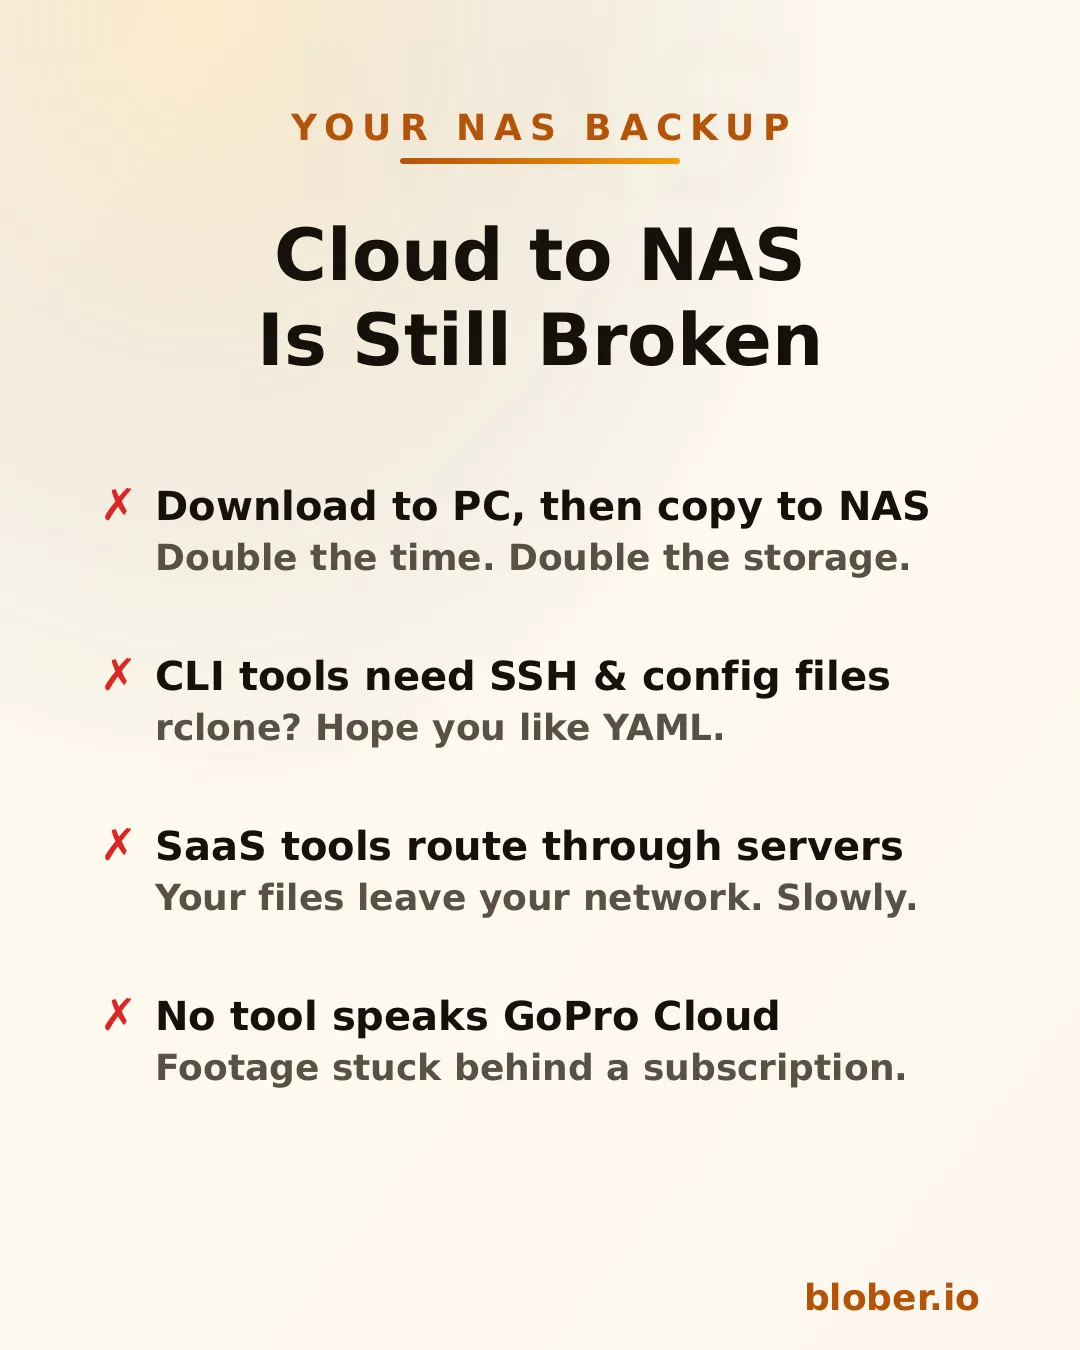
**Download then copy** is the default workflow. Download everything from the cloud to your PC, then manually copy it to the NAS. You need enough free space on your PC for the entire dataset, you do every byte twice, and if the NAS connection drops mid-copy you start over.
**CLI tools like rclone** can mount cloud storage or sync directly, but you need to configure remotes, write YAML, manage credentials, and troubleshoot provider-specific flags. It works — eventually. It’s not something most people reach for on a Saturday afternoon.
**SaaS migration services** like MultCloud or Cloudsfer route your files through their servers. Your data leaves your network, passes through a third party, then comes back down to your NAS. It’s slower, it’s a privacy concern, and it costs a monthly subscription — usually with transfer caps.
**GoPro Cloud has no solution at all.** No migration tool supports it. rclone doesn’t. MultCloud doesn’t. You’re stuck batch-downloading 25 files at a time through a web browser, manually.
***
## Blober Streams Directly to Your NAS
[Section titled “Blober Streams Directly to Your NAS”](#blober-streams-directly-to-your-nas)
[**Blober**](https://blober.io/) is a desktop app that connects to 10 cloud providers and transfers files to any local or network destination — including NAS drives.
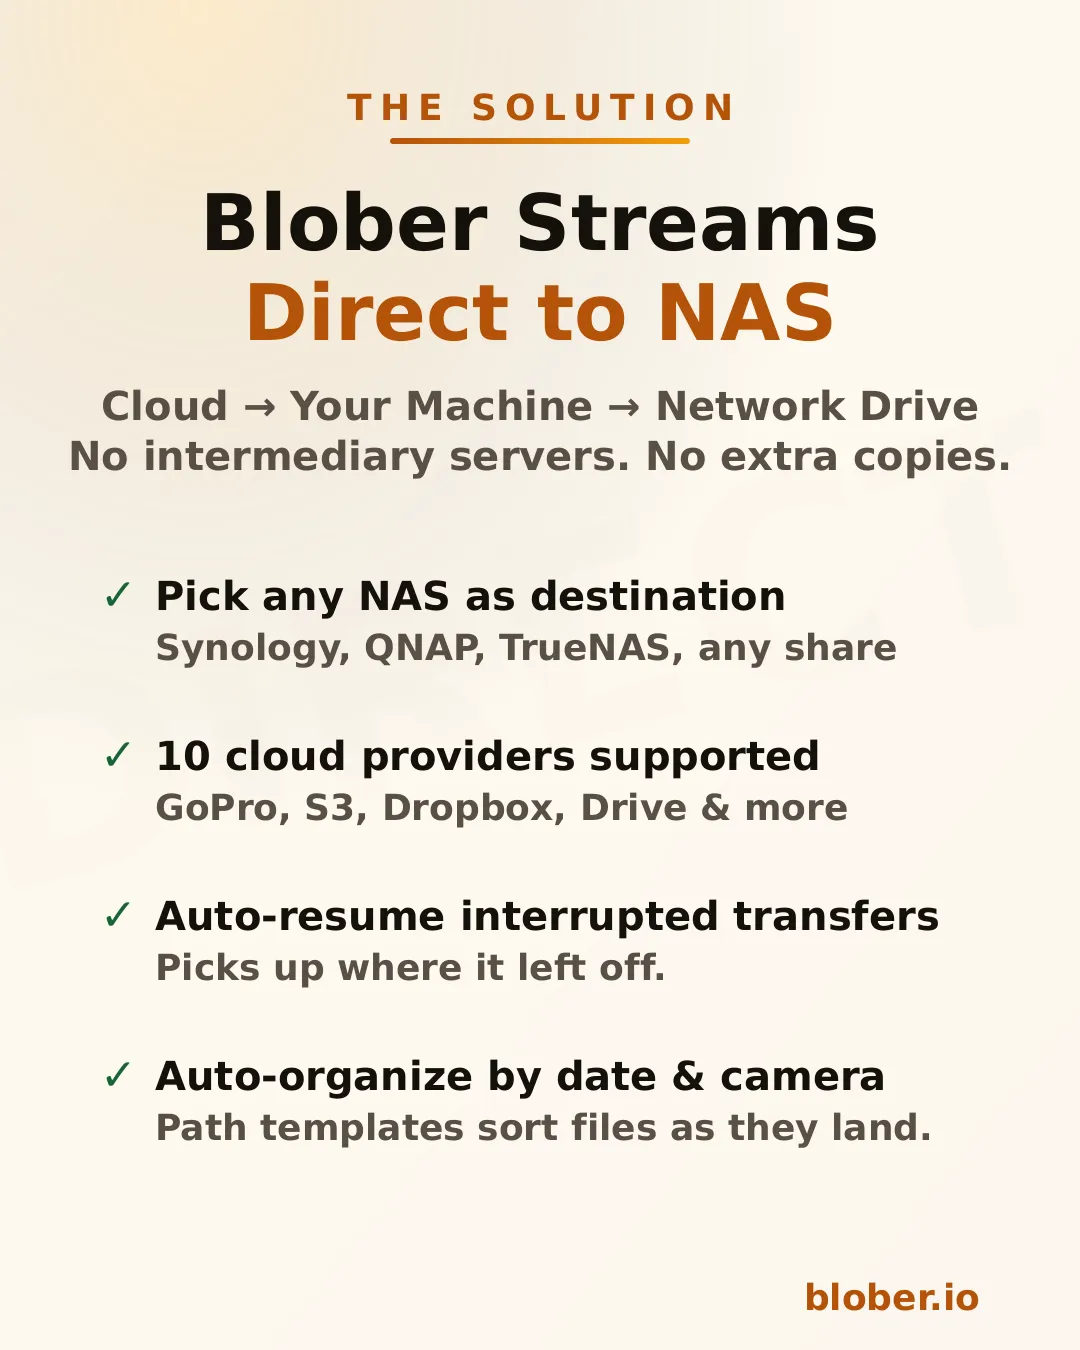
The architecture is straightforward: Blober runs on your computer, pulls data from the cloud API, and writes it to whatever destination you select in the file picker. If that destination is a mapped network drive (`\\SYNOLOGY\backup` or `/Volumes/NAS/media`), the files go there.
No intermediate server. No extra copy on your local disk. No subscription.
### Supported NAS systems
[Section titled “Supported NAS systems”](#supported-nas-systems)
Blober works with **any NAS that your OS can see as a folder**:
* **Synology DiskStation** — map via SMB/CIFS (\synology\shared) or mount via NFS
* **QNAP** — same: SMB share or NFS mount
* **TrueNAS / FreeNAS** — SMB, NFS, or iSCSI-backed mount points
* **Unraid** — SMB shares show up as network folders
* **Western Digital My Cloud** — maps as a standard network drive
* **Any SMB/NFS share** — if your OS can browse it, Blober can write to it
There’s nothing NAS-specific to configure in Blober. You just pick the folder.
***
## How It Works
[Section titled “How It Works”](#how-it-works)
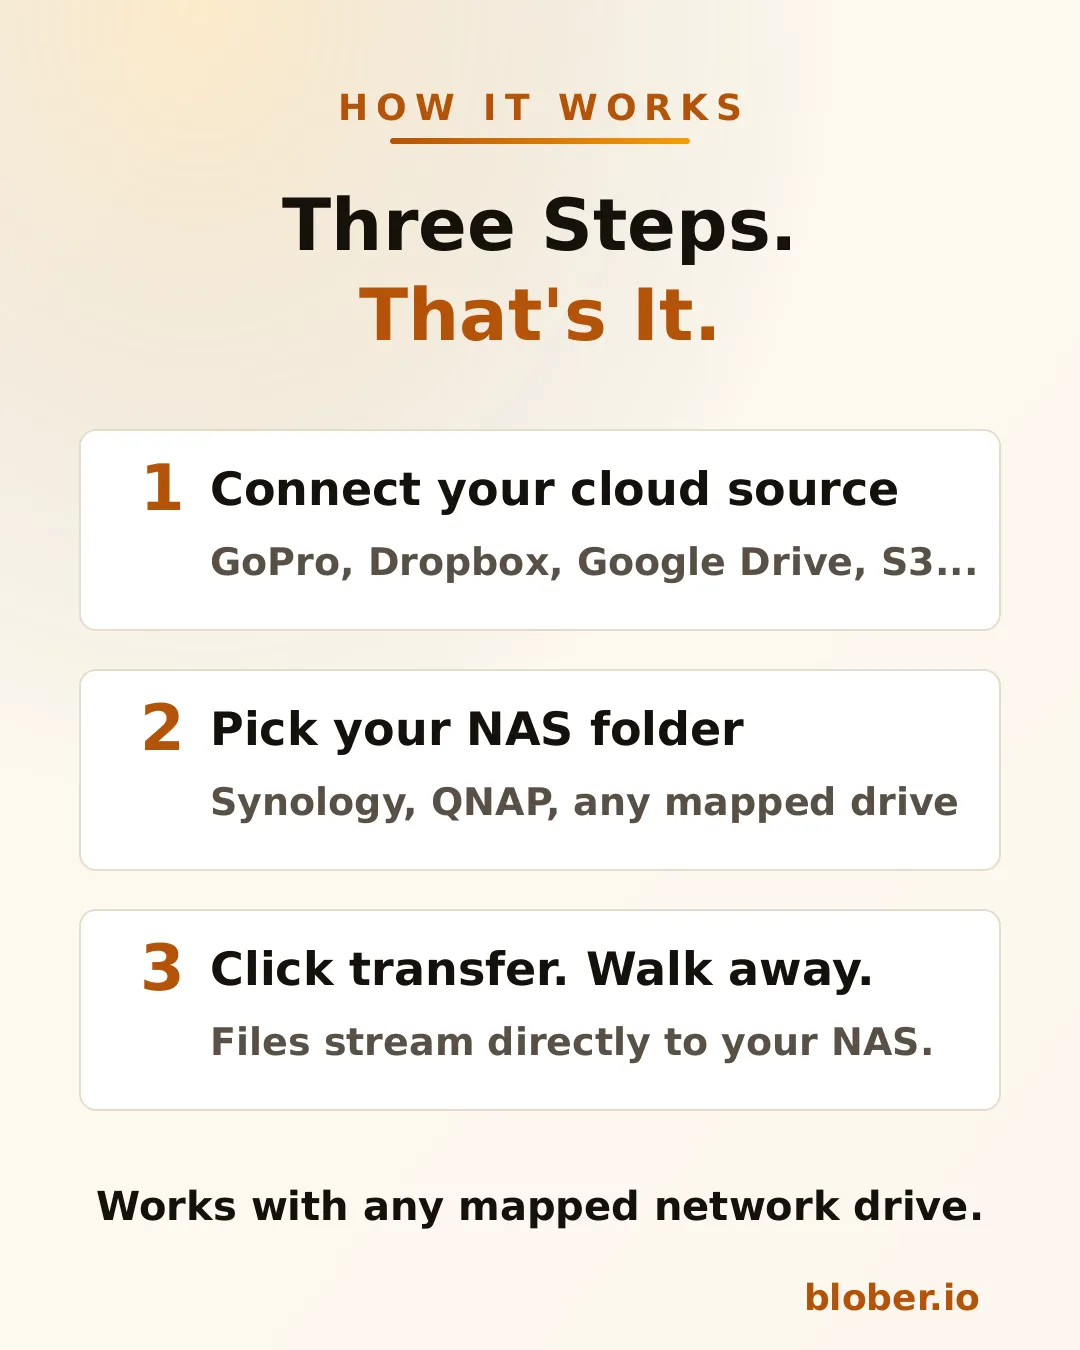
1. **Connect your cloud source.** Blober supports GoPro Cloud, Dropbox, Google Drive, AWS S3, Azure Blob, Backblaze B2, Cloudflare R2, Wasabi, and DigitalOcean Spaces. Authenticate once.
2. **Pick your NAS folder.** The standard OS folder picker shows your mapped network drives. Select the target directory on your NAS.
3. **Transfer.** Blober streams the files and writes them directly to the network path. If your connection drops or the NAS goes to sleep, the transfer resumes from where it stopped.
### Auto-organize with path templates
[Section titled “Auto-organize with path templates”](#auto-organize-with-path-templates)
Blober supports path templates that sort files as they arrive:
```plaintext
{file_created_date}/{camera_model}/{media_type}/{filename}
```
This turns a flat cloud dump into an organized library:
```plaintext
2024-12-15/HERO12 Black/videos/GH010432.MP4
2024-12-15/HERO12 Black/photos/GOPR0900.JPG
2025-01-03/HERO7 Black/videos/GH010904.MP4
```
The template runs before the file is written — files land on your NAS already organized.
***
## Why NAS Users Specifically Benefit
[Section titled “Why NAS Users Specifically Benefit”](#why-nas-users-specifically-benefit)
NAS owners tend to be people who care about data ownership, long-term archival, and not paying recurring fees for storage they already bought. Blober aligns with all three.
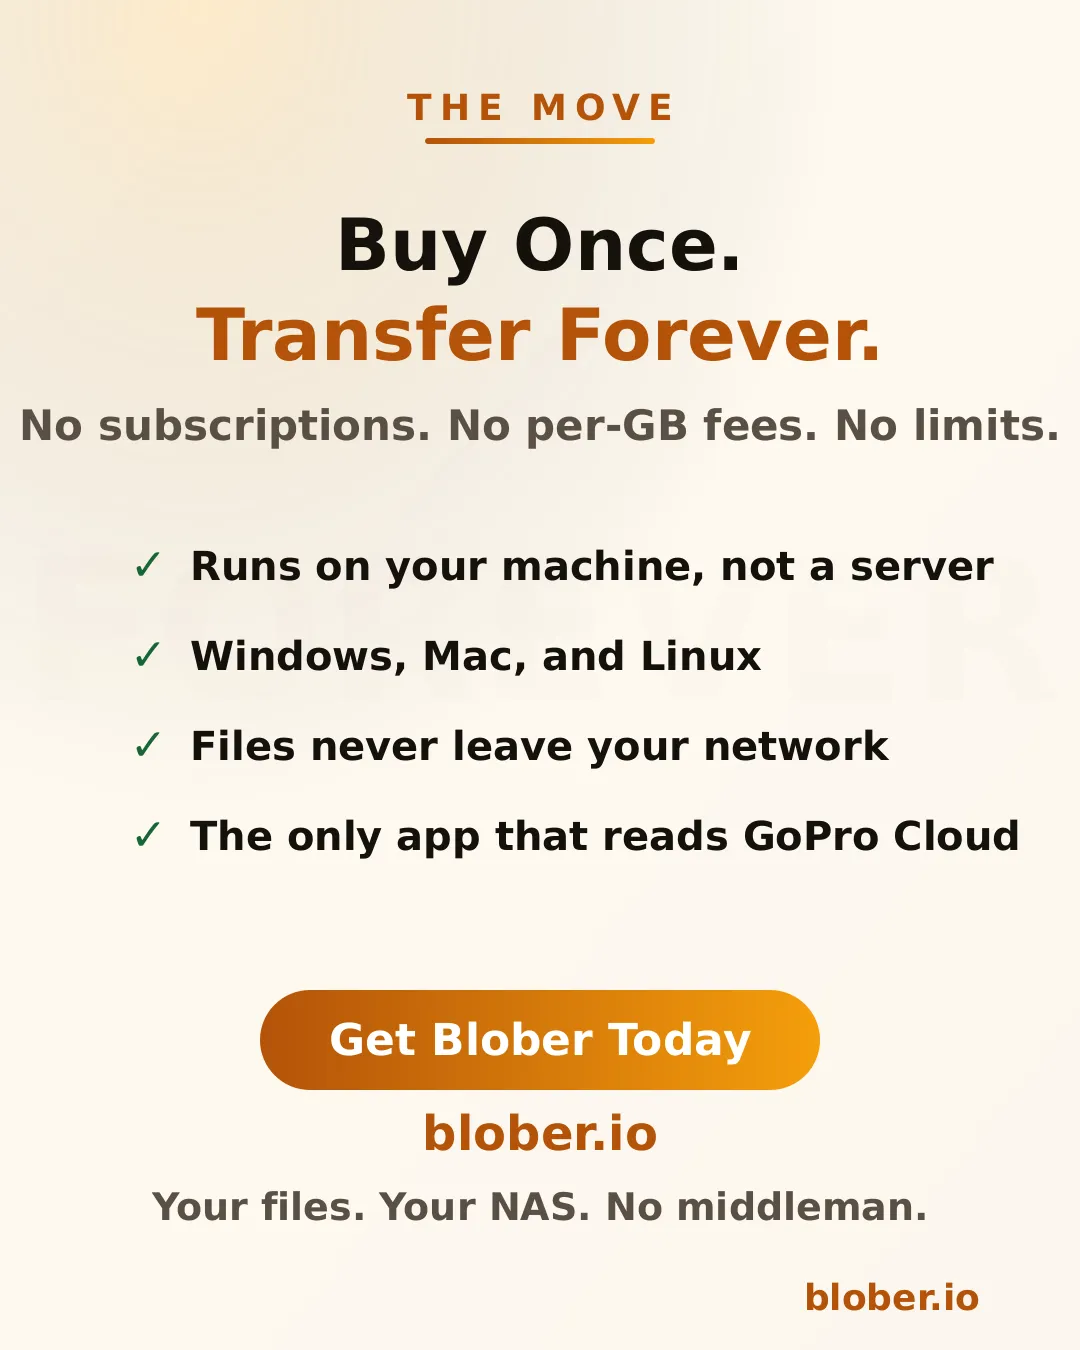
**Your files stay on your network.** Unlike SaaS tools that route data through external servers, Blober pulls from the cloud API and writes locally. For NAS users who chose a NAS precisely to keep data under their control, this matters.
**One-time payment.** NAS users already rejected the subscription model when they bought hardware instead of renting cloud storage. Blober follows the same philosophy: pay once, use forever.
**Scale doesn’t matter.** Whether you’re backing up 50 GoPro clips or migrating 10 TB from S3, there are no transfer caps, no per-GB fees, and no throttling.
***
## Common NAS Backup Scenarios
[Section titled “Common NAS Backup Scenarios”](#common-nas-backup-scenarios)
| Scenario | Source | NAS destination |
| --------------------------- | ---------------------- | ----------------------------- |
| GoPro footage archive | GoPro Cloud | `\\NAS\media\gopro\` |
| Photo library consolidation | Google Drive + Dropbox | `\\NAS\photos\` |
| S3 cold storage migration | AWS S3 | `\\NAS\archive\s3-backup\` |
| Shared family photo vault | Dropbox | `\\SYNOLOGY\family-photos\` |
| Video production offload | Backblaze B2 | `\\NAS\projects\raw-footage\` |
Each of these is a single task in Blober. Set source, set destination, transfer.
***
## Who Is This For?
[Section titled “Who Is This For?”](#who-is-this-for)
* **NAS owners** who want cloud backups on hardware they control
* **GoPro users** who need their footage off GoPro Cloud (Blober is the only tool that connects)
* **Photographers and videographers** archiving years of work to local network storage
* **Home lab users** consolidating data from multiple cloud services onto one NAS
* **Small businesses** migrating away from cloud storage subscriptions to on-premise drives
***
## Get Blober
[Section titled “Get Blober”](#get-blober)
One app. Ten cloud providers. Any NAS.
**[Download Blober at blober.io](https://blober.io)**
# Blober vs Flexify
> Predictable pricing, local execution, and full credential ownership for serious cloud transfers
### Overview
[Section titled “Overview”](#overview)
Both [**Blober**](https://blober.io/) and **Flexify.io** solve the same core problem: moving large volumes of data between cloud storage providers. They approach the problem from fundamentally different architectural and economic philosophies.
Flexify.io (founded 2015, Tampa FL) is a managed, cloud-based migration and virtualization platform built for enterprises moving tens or hundreds of terabytes in controlled, one-time projects. [**Blober**](https://blober.io/) is a local-first desktop workflow engine designed for continuous, repeatable transfers - no subscriptions, no per-GB fees, and no third-party servers touching your data.
***
### Architectural Philosophy
[Section titled “Architectural Philosophy”](#architectural-philosophy)
**Flexify.io**
* Cloud-hosted migration engines deployed on Flexify-managed infrastructure
* Data routes through Flexify servers (or, for managed 10 TB+ migrations, direct cloud-to-cloud)
* Usage-based pricing - you pay per GiB transferred
* Emphasis on API virtualization: translates Amazon S3 API to Azure Blob Storage on-the-fly
* Supports \~25 object-storage providers (S3-compatible, Azure, GCS, Alibaba, etc.)
[**Blober**](https://blober.io/)
* Runs entirely on your local machine (Windows, macOS, Linux)
* Transfers go directly between your machine and each storage provider - **no intermediary servers**
* All credentials stored locally and never transmitted to a third party
* Supports unique providers like **GoPro Cloud** that no other migration tool covers
This distinction matters for users who care about cost predictability, credential ownership, data sovereignty, and ongoing workflows rather than one-time migrations.
***
### Pricing Model Comparison
[Section titled “Pricing Model Comparison”](#pricing-model-comparison)
| Aspect | [**Blober**](https://blober.io/) | Flexify.io |
| -------------- | -------------------------------- | ----------------------------------------------------------- |
| Pricing style | ✅ One-time license | Usage-based (per GiB) |
| Current cost | Discounted beta pricing | \~$0.03/GiB Flexify fee + provider egress ($0.05–$0.09/GiB) |
| Subscription | ✅ None | Sign-up required ($20 free credit) |
| Long-term cost | ✅ Fixed forever | Grows with every transfer |
| 1 TB migration | ✅ One-time price | \~$80 – $120+ in fees |
For a single 1 TB migration from AWS S3 to Google Cloud Storage, Flexify’s self-service rate is approximately $0.08–$0.12 per GiB - translating to **$80–$120+** for that one job. With [**Blober**](https://blober.io/), only your provider’s standard egress fees apply; there is no Blober per-GB charge.
***
### Feature Comparison
[Section titled “Feature Comparison”](#feature-comparison)
| Feature | [**Blober**](https://blober.io/) | Flexify.io |
| ------------------------------ | -------------------------------- | ----------------------- |
| Cloud-to-cloud transfer | ✅ Yes | Yes |
| Local filesystem integration | ✅ Yes | Limited |
| GoPro Cloud support | ✅ Yes | ❌ No |
| Metadata-based path templating | ✅ Yes | No |
| Persistent task history | ✅ Yes | Managed dashboard |
| Workflow reuse | ✅ Yes | Limited |
| Resumable workflows | ✅ Yes | Yes |
| API access | No | Yes |
| Virtual S3 endpoint | No | Yes |
| Credential storage | ✅ Local only | Cloud-managed |
| Data path | ✅ Direct | Through Flexify servers |
***
### Data Sovereignty and Privacy
[Section titled “Data Sovereignty and Privacy”](#data-sovereignty-and-privacy)
With Flexify, your storage credentials are stored on their servers and your data may transit through Flexify-managed infrastructure. For regulated industries, sensitive media archives, or personal data - this introduces a third-party dependency and potential compliance exposure.
[**Blober**](https://blober.io/) eliminates this concern entirely:
* **Credentials never leave your machine** - no third-party vault, no OAuth token stored in a SaaS dashboard
* **Data flows directly** between your local machine and each cloud provider
* **No account required** - Blober works offline with a one-time license
* Full control over when, where, and how your data moves
***
### Unique Provider Coverage
[Section titled “Unique Provider Coverage”](#unique-provider-coverage)
[**Blober**](https://blober.io/) is the only migration tool that supports **GoPro Cloud** - allowing GoPro users to back up or transfer their media archives to any supported provider (AWS S3, Backblaze B2, Wasabi, local disk, etc.). Neither Flexify, rclone, nor MultCloud offer GoPro Cloud integration.
This makes [**Blober**](https://blober.io/) the go-to choice for photographers, videographers, and agencies managing GoPro footage across storage tiers.
***
### Maturity and Risk Tradeoff
[Section titled “Maturity and Risk Tradeoff”](#maturity-and-risk-tradeoff)
Flexify.io is a mature enterprise platform (since 2015) with production-scale deployments and petabytes migrated. [**Blober**](https://blober.io/) is newer and currently in beta, with faster iteration and less operational overhead.
[**Blober**](https://blober.io/) offsets its maturity gap with:
* Aggressive beta pricing - lock in your license before prices go up
* Rapid feature development with direct community influence on the roadmap
* No lock-in to ongoing fees - one purchase, unlimited use
* Desktop-native architecture that is inherently simpler and more predictable
***
### When [**Blober**](https://blober.io/) Makes More Sense
[Section titled “When Blober Makes More Sense”](#when-blober-makes-more-sense)
Choose [**Blober**](https://blober.io/) if you:
* Transfer data regularly, not just once
* Want full control over credentials and data flow
* Need GoPro Cloud support (only Blober has it)
* Prefer a native desktop UI over enterprise SaaS dashboards
* Want predictable lifetime pricing with no per-GB surprises
* Care about data sovereignty - no third-party servers touching your files
# Blober vs Flexify vs rclone
> Three tools, three philosophies, one decision. Compare Blober.io, Flexify.io, and rclone to find the best fit for your cloud data transfer needs in 2026.
### Overview
[Section titled “Overview”](#overview)
Three tools dominate cloud data transfer in 2026 - each solving the problem from a completely different angle. Here’s how they compare.
***
### High-Level Comparison Table
[Section titled “High-Level Comparison Table”](#high-level-comparison-table)
| Dimension | [**Blober**](https://blober.io/) | Flexify.io | rclone |
| ----------------------- | -------------------------------- | ---------------------------------------- | --------------------- |
| Architecture | ✅ Local-first desktop | Managed SaaS | CLI utility |
| Pricing | ✅ One-time license | Usage-based (\~$0.03–$0.04/GiB + egress) | Free |
| Ease of use | ✅ High (native GUI) | Medium (web dashboard) | Low (terminal only) |
| Provider count | 9+ and growing | \~25 (object storage) | 70+ |
| GoPro Cloud support | ✅ **Yes (exclusive)** | ❌ No | ❌ No |
| Credential control | ✅ Local only | Cloud-managed | Local config file |
| Data path | ✅ Direct (no middleman) | Through Flexify servers | Direct (local) |
| Workflow persistence | ✅ Built-in | Dashboard-based | None (manual scripts) |
| Task history & resume | ✅ Built-in | Dashboard-based | Logs only |
| Metadata path templates | ✅ Yes | No | Manual scripting |
| Automation | Limited | High | Very high |
| API virtualization | No | Yes (S3-to-Azure gateway) | No |
| Enterprise scale | High | High | High |
| Open source | No | No | Yes |
| Best for | Agencies, creators, engineers | Enterprises (petabyte migrations) | Engineers, sysadmins |
***
### Pricing at a Glance
[Section titled “Pricing at a Glance”](#pricing-at-a-glance)
| Scenario | [**Blober**](https://blober.io/) | Flexify.io | rclone |
| ----------------- | -------------------------------- | ------------------- | ------ |
| 100 GB migration | ✅ One-time | \~$8 – $12 | Free |
| 1 TB migration | ✅ One-time | \~$80 – $120+ | Free |
| 10 TB migration | ✅ One-time | \~$800 – $1,200+ | Free |
| Recurring monthly | ✅ $0 | Compounds every run | Free |
Flexify charges per GiB transferred plus cloud provider egress fees. Costs add up fast for recurring workflows. rclone is free but demands engineering time. [**Blober**](https://blober.io/) sits in the sweet spot: pay once, transfer forever.
***
### Data Sovereignty
[Section titled “Data Sovereignty”](#data-sovereignty)
| Concern | [**Blober**](https://blober.io/) | Flexify.io | rclone |
| ----------------------- | -------------------------------- | ------------------- | ----------------- |
| Credentials stored | ✅ Local only | Flexify servers | Local config file |
| Data transits 3rd party | ✅ No | Yes (Flexify infra) | No |
| Account required | ✅ No | Yes | No |
| Offline operation | ✅ Yes | No | Yes |
For regulated industries, sensitive media archives, or personal data - avoiding third-party intermediaries is not a preference, it is a requirement. Both [**Blober**](https://blober.io/) and rclone keep your data path clean. Flexify introduces a managed middleman.
***
### The GoPro Factor
[Section titled “The GoPro Factor”](#the-gopro-factor)
[**Blober**](https://blober.io/) is the **only** transfer tool that supports **GoPro Cloud**. Neither Flexify nor rclone can access GoPro’s storage. If you manage GoPro footage - whether as a creator, agency, or production house - Blober is the only option for migrating that media to professional storage like Backblaze B2, AWS S3, or your local NAS.
***
### Summary
[Section titled “Summary”](#summary)
* **rclone** is the most powerful tool if you are deeply technical, automation-driven, and comfortable with terminal workflows. It is free and supports 70+ providers.
* **Flexify.io** is ideal for enterprises running massive one-time migrations under strict SLAs, especially when virtual S3 endpoints or managed infrastructure are required. Budget accordingly - costs scale with data volume.
* [**Blober**](https://blober.io/) fills the gap between them: professional-grade transfers with a native desktop GUI, local credential control, visual workflows, predictable one-time pricing, and exclusive GoPro Cloud support.
[**Blober**](https://blober.io/)’s beta pricing locks in a lifetime license at a fraction of the cost competitors charge for a single large migration. For users who value simplicity, sovereignty, and long-term savings - Blober is the clear choice.
# Blober vs MultCloud
> One-time pricing and local control versus subscription-based cloud transfer with data caps
### Overview
[Section titled “Overview”](#overview)
[MultCloud](https://www.multcloud.com/) (founded 2012, Hong Kong) is a web-based platform for transferring, syncing, and managing files across 30+ cloud services. It is subscription-based and routes all data through MultCloud’s servers.
[**Blober**](https://blober.io/) is a local-first desktop application that transfers data directly between your machine and cloud providers - no middleman, no subscription, no data caps.
Both tools target non-technical users who want cloud-to-cloud transfers without writing scripts. The difference lies in architecture, pricing, and trust.
***
### Architectural Difference
[Section titled “Architectural Difference”](#architectural-difference)
**MultCloud**
* Web-based SaaS - runs entirely in your browser
* All data routes through MultCloud’s servers in Hong Kong
* Requires an account and OAuth access to your cloud accounts
* Subscription required for meaningful use (free tier: 5 GB/month)
[**Blober**](https://blober.io/)
* Native desktop application (Windows, macOS, Linux)
* Data flows directly between your machine and each cloud provider
* **No intermediary servers** - your files never touch a third party
* Credentials stored locally, never transmitted
***
### Pricing Model Comparison
[Section titled “Pricing Model Comparison”](#pricing-model-comparison)
| Aspect | [**Blober**](https://blober.io/) | MultCloud |
| ------------------- | -------------------------------- | -------------------------------------- |
| Pricing style | ✅ One-time license | Subscription (annual) |
| Free tier | N/A (beta pricing) | 5 GB/month, 2 transfer threads |
| Mid-tier plan | - | **$59.99/year** - 1,200 GB/year |
| Top-tier plan | - | **$99.98/year** - 2,400 GB/year |
| Transfer threads | Automatic parallelism | Free: 2 threads, Paid: 10 threads |
| Data cap | ✅ **None** | Capped per plan (5 GB – 2,400 GB/year) |
| Long-term cost (3y) | ✅ One-time purchase | $180 – $300+ |
MultCloud’s data traffic limits are a hard ceiling. Once you exhaust your annual quota, transfers stop until you renew. [**Blober**](https://blober.io/) has **no transfer caps** - move as much data as your bandwidth allows.
***
### Feature Comparison
[Section titled “Feature Comparison”](#feature-comparison)
| Feature | [**Blober**](https://blober.io/) | MultCloud |
| ---------------------------- | -------------------------------- | ------------------------- |
| Cloud-to-cloud transfer | ✅ Yes | Yes |
| Local filesystem integration | ✅ Yes | No (web-only) |
| GoPro Cloud support | ✅ **Yes (exclusive)** | ❌ No |
| Storage-optimized transfers | ✅ Yes | Generic |
| Workflow persistence | ✅ Yes | Scheduled tasks |
| Task history and logs | ✅ Yes | Basic dashboard |
| Metadata path templates | ✅ Yes | No |
| Resumable transfers | ✅ Yes | Limited |
| Sync (two-way) | Planned | Yes |
| Email-to-cloud (PDF) | No | Yes |
| Credential storage | ✅ Local only | MultCloud servers (OAuth) |
| Data path | ✅ Direct | Through MultCloud servers |
***
### Data Sovereignty and Privacy
[Section titled “Data Sovereignty and Privacy”](#data-sovereignty-and-privacy)
This is where the difference is starkest. MultCloud requires OAuth access to your cloud accounts and routes all transferred data through its own servers. Their privacy page states data is “temporarily cached” during operations.
[**Blober**](https://blober.io/) takes the opposite approach:
* **Credentials never leave your machine** - no OAuth tokens stored on third-party servers
* **Data flows directly** between your local machine and each cloud provider
* **No account needed** - Blober works with a license key, offline
* **No data caching** - nothing is stored, buffered, or logged on remote servers
For users transferring personal photos, sensitive business documents, or media archives - the question is simple: do you want your data flowing through servers in Hong Kong, or directly from your machine to your cloud provider?
***
### GoPro Cloud: Only on Blober
[Section titled “GoPro Cloud: Only on Blober”](#gopro-cloud-only-on-blober)
MultCloud supports 30+ consumer cloud services (Google Drive, Dropbox, OneDrive, etc.) but does **not** support GoPro Cloud. If you need to move GoPro footage to professional storage like Backblaze B2, AWS S3, or Wasabi, MultCloud cannot help.
[**Blober**](https://blober.io/) is the only transfer tool with native GoPro Cloud integration - making it essential for photographers, videographers, and agencies managing action camera footage.
***
### When [**Blober**](https://blober.io/) is the Sharper Tool
[Section titled “When Blober is the Sharper Tool”](#when-blober-is-the-sharper-tool)
Choose [**Blober**](https://blober.io/) if you:
* Need to move large volumes of data without annual caps
* Want predictable, one-time pricing - not $60–$100/year forever
* Prefer local execution over web-based SaaS
* Require data sovereignty - no files routing through third-party servers
* Need GoPro Cloud support (only Blober has it)
* Value detailed task history, resumable workflows, and metadata-based organization
* Care about credential security - no OAuth tokens stored in the cloud
# Blober vs rclone
> rclone's raw power, without the scripts, flags, or fragile workflows
### Overview
[Section titled “Overview”](#overview)
rclone is the industry-standard CLI tool for cloud storage automation among developers and sysadmins. It is extremely powerful, supports over 70 storage providers, and is completely free and open-source. Its tradeoff is complexity - every job requires flags, config files, and terminal expertise.
[**Blober**](https://blober.io/) is built for users who want rclone-level capability without managing flags, scripts, or terminal state. It replaces stateless CLI execution with persistent, visual workflows that anyone can set up and repeat.
***
### Interface and Usability
[Section titled “Interface and Usability”](#interface-and-usability)
**rclone**
* Command-line only (experimental web GUI exists, but limited)
* Configuration files and flags - every job requires manual setup
* Excellent for scripting and cron-based automation
* Steep learning curve for non-technical users
* No built-in workflow persistence - you must manage your own scripts
[**Blober**](https://blober.io/)
* Native desktop GUI (Windows, macOS, Linux)
* Visual setup of sources, destinations, and filters
* Saved workflows with one-click execution
* Built-in task history with resumable state
* Designed for repeatability and clarity - no terminal required
***
### Feature Comparison
[Section titled “Feature Comparison”](#feature-comparison)
| Feature | [**Blober**](https://blober.io/) | rclone |
| ----------------------- | -------------------------------- | ------------------- |
| Interface | ✅ GUI | CLI |
| Provider count | Growing (9+) | 70+ |
| GoPro Cloud support | ✅ Yes | ❌ No |
| Local filesystem | ✅ Yes | Yes |
| Cloud-to-cloud | ✅ Yes | Yes |
| Workflow persistence | ✅ Yes | No (manual scripts) |
| Metadata path templates | ✅ Yes | Manual scripting |
| Task history & resume | ✅ Yes | Logs only |
| Encryption | Planned | Built-in |
| Automation | Limited | Extensive |
| Open source | No | Yes |
| Data path | ✅ Direct | Direct (local) |
***
### GoPro Cloud: A Blober Exclusive
[Section titled “GoPro Cloud: A Blober Exclusive”](#gopro-cloud-a-blober-exclusive)
rclone supports over 70 providers - but **GoPro Cloud is not one of them**. If you shoot with GoPro cameras and want to move your media from GoPro’s cloud to Backblaze B2, AWS S3, Wasabi, or your local NAS, rclone simply cannot help.
[**Blober**](https://blober.io/) is the only transfer tool with native GoPro Cloud integration, making it the obvious choice for photographers, videographers, action sports creators, and agencies managing GoPro media libraries.
***
### Workflow Example
[Section titled “Workflow Example”](#workflow-example)
**rclone** requires upfront configuration, careful flag selection, and scripting discipline to safely repeat jobs:
```bash
rclone copy remote:bucket/path dest:bucket/path \
--transfers 4 --checkers 8 --retries 3 \
--filter-from filters.txt --log-file transfer.log
```
Forget a flag? Change a path? The job silently behaves differently. There is no built-in history of what ran, when, or whether it succeeded.
[**Blober**](https://blober.io/) stores each workflow as a durable configuration with immutable execution history. If a transfer is interrupted, Blober resumes based on stored state rather than re-running a stateless command.
This difference becomes critical for:
* Long-running transfers over unreliable connections
* Media archives with thousands of files
* Users who run transfers infrequently and forget the exact flags
* Teams where multiple people need to trigger the same workflow
***
### Data Sovereignty
[Section titled “Data Sovereignty”](#data-sovereignty)
Both rclone and [**Blober**](https://blober.io/) are local-first tools - your credentials stay on your machine. This is a shared advantage over SaaS competitors like Flexify and MultCloud where credentials and potentially data flow through third-party servers.
Where [**Blober**](https://blober.io/) adds value over rclone:
* **No terminal exposure** - credentials are managed in a secured desktop app, not plaintext config files
* **Encrypted credential storage** - not a `~/.config/rclone/rclone.conf` file on disk
* **Visual audit trail** - every transfer logged with timestamps, file counts, and status
***
### Cost and Support
[Section titled “Cost and Support”](#cost-and-support)
| Aspect | [**Blober**](https://blober.io/) | rclone |
| ----------- | -------------------------------- | -------------------- |
| Cost | One-time license | Free |
| Support | Product support | Community forums |
| Updates | Included with license | Community-driven |
| Target user | Creators, agencies, engineers | Engineers, sysadmins |
rclone being free is a genuine advantage. [**Blober**](https://blober.io/) earns its price by saving time, reducing errors, and opening cloud transfers to users who would never touch a terminal.
***
### When [**Blober**](https://blober.io/) Makes More Sense
[Section titled “When Blober Makes More Sense”](#when-blober-makes-more-sense)
Choose [**Blober**](https://blober.io/) if you:
* Prefer visual tools over terminal commands
* Want repeatable workflows without writing scripts
* Need GoPro Cloud support (only Blober has it)
* Need clarity, task history, and one-click resumption
* Transfer data occasionally but need it to work reliably every time
* Value convenience and productivity over maximum flexibility
* Want credentials stored securely - not in a plaintext config file
# Data Holders: How Blober Fits Your Workflow
> Managing terabytes across multiple clouds is the norm for data holders. Learn how Blober centralizes, migrates, and backs up your data without per-GB fees.
### Who Are Data Holders?
[Section titled “Who Are Data Holders?”](#who-are-data-holders)
Data holders are individuals and organizations that accumulate, manage, and preserve large volumes of digital files as a core part of their work. They aren’t just storing files — they’re responsible for keeping data accessible, organized, and safe across years and even decades.
Data holders include:
* **Photographers and videographers** with terabytes of RAW footage and project archives
* **Researchers and academics** maintaining datasets, papers, and experimental outputs
* **Small businesses** managing client records, invoices, contracts, and media assets
* **IT administrators** responsible for infrastructure backups and compliance archives
* **Content creators** with libraries of video, audio, and design files across platforms
* **Legal and medical professionals** bound by retention requirements for sensitive records
* **Personal archivists** preserving family photos, home videos, and documents
What unites them is a common problem: **data grows, scatters, and becomes harder to manage over time.**
***
### The Data Holder’s Problem
[Section titled “The Data Holder’s Problem”](#the-data-holders-problem)
Most data holders didn’t plan to end up with files in five different places. It happens organically:
1. **Files start local** — on a laptop, NAS, or external drive
2. **Cloud adoption fragments storage** — Google Drive for sharing, Dropbox for syncing, an S3 bucket for backups
3. **Platform lock-in creeps in** — GoPro Cloud holds your footage, iCloud holds your photos, OneDrive holds your documents
4. **Manual management breaks down** — folder naming conventions drift, backups become inconsistent, some files have three copies while others have none
The result is a **scattered, fragile data footprint** where no single tool gives you visibility across all your storage.
| Symptom | Root Cause |
| -------------------------------------------- | ----------------------------------------------------------- |
| ”I know I have that file somewhere” | Files spread across 3–5 providers with no unified view |
| ”My backup is months out of date” | Manual backup processes that require constant attention |
| ”I’m paying for storage I barely use” | Redundant copies in expensive tiers that should be archived |
| ”I can’t move my data without paying egress” | Provider lock-in via egress fees and proprietary APIs |
| ”Organizing everything would take weeks” | Flat folder structures with no metadata-driven automation |
***
### How Blober Solves This
[Section titled “How Blober Solves This”](#how-blober-solves-this)
[**Blober**](https://blober.io/) is a desktop application purpose-built for data holders who need to move, organize, and back up files across cloud providers and local storage — without recurring fees.
#### 1. One Interface for All Your Storage
[Section titled “1. One Interface for All Your Storage”](#1-one-interface-for-all-your-storage)
Blober connects to the storage providers data holders actually use:
| Provider | Typical Use Case |
| -------------------- | --------------------------------------------- |
| AWS S3 | Production infrastructure, enterprise backups |
| Backblaze B2 | Affordable long-term archive |
| Wasabi | Hot storage with no egress fees |
| Cloudflare R2 | CDN-adjacent delivery, zero egress |
| Google Cloud Storage | Workspace-integrated projects |
| Azure Blob Storage | Enterprise and compliance workloads |
| DigitalOcean Spaces | Dev team object storage |
| GoPro Cloud | Action camera footage (Blober exclusive) |
| Dropbox | File sharing and synchronization |
| Local / NAS | On-premise primary storage |
No other single tool covers this range — especially GoPro Cloud, which [**Blober**](https://blober.io/) is the only application to support.
#### 2. Direct Cloud-to-Cloud Transfers
[Section titled “2. Direct Cloud-to-Cloud Transfers”](#2-direct-cloud-to-cloud-transfers)
Instead of downloading files to your machine and re-uploading them, Blober transfers data directly between providers. This matters for data holders because:
* **Saves time** — a 2 TB migration doesn’t bottleneck on your home internet
* **Saves bandwidth** — your ISP data cap stays intact
* **Reduces failure points** — no half-downloaded files sitting on your local disk
#### 3. Metadata-Driven Organization
[Section titled “3. Metadata-Driven Organization”](#3-metadata-driven-organization)
Data holders accumulate files over years. Manually sorting them into folders is unsustainable. Blober supports path templates that use file metadata to auto-organize during transfer:
```plaintext
/{year}/{month}/{camera_model}/{filename}
```
A flat dump of 50,000 files becomes a clean archive:
```plaintext
/2025/06/HERO13 Black/GX015742.MP4
/2025/06/Canon EOS R5/IMG_4521.CR3
/2026/01/iPhone 15 Pro/IMG_0032.HEIC
```
This works for any transfer — cloud-to-cloud, cloud-to-local, or local-to-cloud.
#### 4. Scheduled and Resumable Transfers
[Section titled “4. Scheduled and Resumable Transfers”](#4-scheduled-and-resumable-transfers)
Backup workflows for data holders need to be reliable, not heroic. Blober supports:
* **Resumable transfers** — if your connection drops or your machine restarts, pick up where you left off
* **Incremental syncs** — only transfer files that are new or changed since the last run
* **Large-file handling** — multi-part uploads for files in the tens of gigabytes
No babysitting required. Set up a transfer, let it run, and come back to a completed job.
#### 5. One-Time Pricing
[Section titled “5. One-Time Pricing”](#5-one-time-pricing)
Most cloud migration tools charge per-GB or require annual subscriptions with data caps. For data holders who move terabytes regularly, those costs compound:
| Tool | Pricing Model | Cost for 10 TB/year |
| ---------- | -------------------------- | --------------------------------------- |
| Flexify.io | \~$0.03/GiB per migration | **\~$300+** (plus egress) |
| MultCloud | $99.98/year for 2.4 TB cap | **\~$400+** (need multiple renewals) |
| rclone | Free but manual | **$0** (but hours of CLI configuration) |
| **Blober** | **One-time purchase** | **One price, unlimited transfers** |
You buy [**Blober**](https://blober.io/) once. Transfer 1 TB or 100 TB — the price doesn’t change.
***
### Real-World Workflows
[Section titled “Real-World Workflows”](#real-world-workflows)
#### The Freelance Videographer
[Section titled “The Freelance Videographer”](#the-freelance-videographer)
**Setup:** 8 TB of footage across GoPro Cloud, a local NAS, and Google Drive. Delivers finals via Dropbox.
**With Blober:**
* Connects GoPro Cloud and pulls all footage to Backblaze B2 as a cold archive
* Moves finished projects from local NAS to Cloudflare R2 for client delivery
* Uses path templates to organize by project date and camera model
* Runs periodic syncs from Google Drive to B2 to keep a second backup
**Result:** One tool replaces four manual processes. Total cost: one Blober license.
#### The Small Business IT Admin
[Section titled “The Small Business IT Admin”](#the-small-business-it-admin)
**Setup:** 500 GB of compliance documents in Azure Blob Storage. Daily operational files in Google Workspace. Regulatory requirement for off-site backup.
**With Blober:**
* Transfers compliance archive from Azure to Backblaze B2 as a secondary backup
* Syncs critical Google Drive folders to a local NAS nightly
* Uses Blober’s incremental sync so only changed files move each day
**Result:** Meets audit requirements for geographic redundancy without provisioning a second enterprise cloud account.
#### The Research Lab
[Section titled “The Research Lab”](#the-research-lab)
**Setup:** 12 TB of experimental datasets in AWS S3. New data generated weekly. Grants require data preservation for 10 years.
**With Blober:**
* Migrates completed datasets from S3 Standard to Backblaze B2 (80% storage cost reduction)
* Keeps active datasets in S3 for compute-adjacent access
* Uses metadata templates to organize by experiment ID and date
* Resumable transfers handle multi-GB dataset files without corruption
**Result:** Storage costs drop dramatically while preservation requirements are met.
***
### Why Not Just Use rclone?
[Section titled “Why Not Just Use rclone?”](#why-not-just-use-rclone)
rclone is a powerful open-source CLI tool, and many data holders start there. But it has real limitations for ongoing data management:
| Capability | rclone | Blober |
| ---------------------------- | ------------------------- | ----------------------- |
| GUI for browsing files | No (CLI only) | Yes |
| GoPro Cloud support | No | Yes (exclusive) |
| Dropbox support | Yes | Yes |
| Visual transfer progress | Limited | Full progress dashboard |
| Resumable multi-part uploads | Partial | Built-in |
| Path template organization | Manual scripting | Visual template builder |
| Error handling and retry | Config flags | Automatic |
| Setup time | Hours (config per remote) | Minutes (OAuth flows) |
rclone is great for scripted, automated pipelines. [**Blober**](https://blober.io/) is built for data holders who want reliable transfers without writing shell scripts.
***
### Getting Started as a Data Holder
[Section titled “Getting Started as a Data Holder”](#getting-started-as-a-data-holder)
1. **Audit your storage** — list every provider and local device where you keep files
2. **Identify your archive tier** — choose an affordable destination like Backblaze B2 or Wasabi for long-term storage
3. **Connect everything in Blober** — add each provider via OAuth or API key
4. **Set up your first migration** — pick a source, pick a destination, configure a path template
5. **Let Blober handle the rest** — resumable transfers, incremental syncs, and metadata organization do the heavy lifting
***
### Your Data, Your Infrastructure
[Section titled “Your Data, Your Infrastructure”](#your-data-your-infrastructure)
Data holders shouldn’t need a subscription to manage their own files. [**Blober**](https://blober.io/) runs locally on your machine — your credentials never pass through third-party servers, your transfer bandwidth isn’t metered, and your workflow isn’t gated by monthly caps.
One license. Unlimited providers. Unlimited data.
**[Get Blober](https://blober.io/)** and take control of your data workflow.
# Data Sovereignty: Why Your Cloud Transfer Tool Matters
> Where your credentials live, where your data flows, and why local-first architecture is a trust advantage - not just a technical detail.
### Your Transfer Tool Is a Trust Decision
[Section titled “Your Transfer Tool Is a Trust Decision”](#your-transfer-tool-is-a-trust-decision)
When you move data between cloud providers, your transfer tool has access to everything: your storage credentials, your file contents, your metadata. The architecture of that tool - where it runs, where credentials are stored, where data flows - determines whether you maintain control or hand it to a third party.
Most people evaluate migration tools on speed and features. Few ask the harder question: **who else can see my data while it’s in transit?**
***
### The Three Architectures
[Section titled “The Three Architectures”](#the-three-architectures)
#### 1. SaaS (Cloud-Hosted)
[Section titled “1. SaaS (Cloud-Hosted)”](#1-saas-cloud-hosted)
Tools like **Flexify.io** and **MultCloud** run on their own servers. Your credentials are stored in their infrastructure. Your data routes through their systems during transfer.
| Concern | Flexify.io | MultCloud |
| -------------------- | ------------------------------ | ----------------------------- |
| Credential storage | Flexify servers | MultCloud servers (Hong Kong) |
| Data path | Through Flexify infrastructure | Through MultCloud servers |
| Account required | Yes | Yes |
| OAuth token storage | Server-side | Server-side |
| Offline operation | No | No |
| Privacy policy scope | US (Florida) | Hong Kong |
This doesn’t mean these services are malicious. But it means:
* A **third party stores your cloud credentials** - API keys, OAuth tokens, or access grants
* Your **data transits infrastructure you don’t control** - introducing a man-in-the-middle by design
* You’re subject to **their privacy policy and jurisdiction** - which may change without notice
* A **breach of their systems exposes your credentials** and potentially your data
For personal photos, this might feel acceptable. For business data, media archives, legal documents, or HIPAA/GDPR-adjacent workloads - it’s a serious risk.
#### 2. CLI (Local, But Exposed)
[Section titled “2. CLI (Local, But Exposed)”](#2-cli-local-but-exposed)
**rclone** runs locally on your machine. Your data goes directly to and from each cloud provider. This is a genuine trust advantage over SaaS tools.
However, rclone stores credentials in a **plaintext configuration file** (`~/.config/rclone/rclone.conf`). Anyone with access to your filesystem - malware, another user, a compromised backup - can read your cloud credentials directly.
rclone does offer an encryption option for the config file, but it’s opt-in and requires manual setup. Most users leave it in plaintext.
#### 3. Desktop App (Local + Secured)
[Section titled “3. Desktop App (Local + Secured)”](#3-desktop-app-local--secured)
[**Blober**](https://blober.io/) runs entirely on your machine with encrypted credential storage. Your data flows directly between your machine and each cloud provider. No intermediary.
| Concern | [**Blober**](https://blober.io/) |
| ------------------- | -------------------------------- |
| Credential storage | ✅ Local, encrypted |
| Data path | ✅ Direct (no middleman) |
| Account required | ✅ No (license key only) |
| OAuth token storage | ✅ Local only |
| Offline operation | ✅ Yes |
| Jurisdiction | ✅ Your machine, your rules |
***
### Why This Matters
[Section titled “Why This Matters”](#why-this-matters)
#### Credential Exposure
[Section titled “Credential Exposure”](#credential-exposure)
Your cloud storage credentials are the keys to your kingdom. An AWS access key or a Google OAuth token doesn’t just grant transfer access - it grants **full access** to your storage: read, write, delete, list. If a SaaS provider’s database is breached, your credentials are in that breach.
With [**Blober**](https://blober.io/), credentials never leave your machine. There is no remote database to breach.
#### Data in Transit
[Section titled “Data in Transit”](#data-in-transit)
When a SaaS tool transfers your files, those files pass through their servers. Even with SSL encryption in transit, the data is **decrypted on their infrastructure** before being re-encrypted and sent to the destination. This is not end-to-end encryption - it’s hop-by-hop.
With [**Blober**](https://blober.io/), data flows directly from source to your machine to destination. No hops through third-party infrastructure.
#### Jurisdiction and Compliance
[Section titled “Jurisdiction and Compliance”](#jurisdiction-and-compliance)
MultCloud operates from Hong Kong. Flexify.io from Florida, USA. Each jurisdiction has different data protection laws, government access rules, and breach notification requirements. When your data or credentials live on their servers, you’re subject to their jurisdiction - not yours.
[**Blober**](https://blober.io/) runs on your hardware, in your jurisdiction. No foreign servers. No cross-border data flow through third parties.
#### Subscription as Leverage
[Section titled “Subscription as Leverage”](#subscription-as-leverage)
SaaS tools require active accounts. Cancel your subscription, and you lose access to your workflows, task history, and potentially your configured connections. This creates a soft lock-in that has nothing to do with the quality of the tool.
[**Blober**](https://blober.io/) is a one-time purchase. No account, no subscription, no leverage.
***
### Comparison Summary
[Section titled “Comparison Summary”](#comparison-summary)
| Dimension | SaaS (Flexify, MultCloud) | CLI (rclone) | [**Blober**](https://blober.io/) |
| --------------------- | ------------------------- | -------------------- | -------------------------------- |
| Credentials | Third-party servers | Plaintext local file | ✅ Encrypted local |
| Data path | Through vendor servers | Direct | ✅ Direct |
| Account required | Yes | No | ✅ No |
| Offline capable | No | Yes | ✅ Yes |
| Risk of vendor breach | Exposes your credentials | N/A | ✅ N/A |
| Jurisdiction | Vendor’s country | Your machine | ✅ Your machine |
| Subscription lock-in | Yes | No | ✅ No |
***
### Who Should Care?
[Section titled “Who Should Care?”](#who-should-care)
* **Freelancers and agencies** handling client data - you have a professional duty to control where that data flows
* **Photographers and videographers** with irreplaceable media - GoPro footage, wedding archives, production masters
* **Small businesses** without dedicated security teams - reducing your attack surface matters
* **Anyone under GDPR, HIPAA, or SOC 2 obligations** - third-party data processors require disclosure and contractual agreements
* **Privacy-conscious individuals** who simply want to own their data pipeline
***
### So What?
[Section titled “So What?”](#so-what)
Your migration tool is not a neutral pipe. It’s an active participant in your data flow. Its architecture determines whether your credentials are stored remotely, whether your files transit foreign servers, and whether you maintain sovereignty over your data.
[**Blober**](https://blober.io/) is designed around a simple principle: **your data, your machine, your rules.**
No accounts. No SaaS intermediaries. No credential exposure. One-time purchase, local execution, direct transfers.
[Get Blober →](https://blober.io/)
# Transfer GoPro Cloud Files in 45 Seconds with Blober
> Connect GoPro Cloud, browse your media, select individual files, multiple files, or an entire directory, and create a transfer workflow in 45 seconds.
## 45-Second Demo
[Section titled “45-Second Demo”](#45-second-demo)
This video shows the full process of creating a Blober workflow with GoPro Cloud as the source.
[Play](https://youtube.com/watch?v=TLvZ4Xo9c-g)
## What’s Shown
[Section titled “What’s Shown”](#whats-shown)
### 1. Connect GoPro Cloud
[Section titled “1. Connect GoPro Cloud”](#1-connect-gopro-cloud)
Select **GoPro Cloud** as your source, click **Open GoPro Login**, and sign in. Blober captures your session. No API keys, no config files, no CLI.
### 2. Browse Your Media
[Section titled “2. Browse Your Media”](#2-browse-your-media)
Click **Browse Files and Folders**. Blober loads your GoPro Cloud library. Files are listed with date and size.
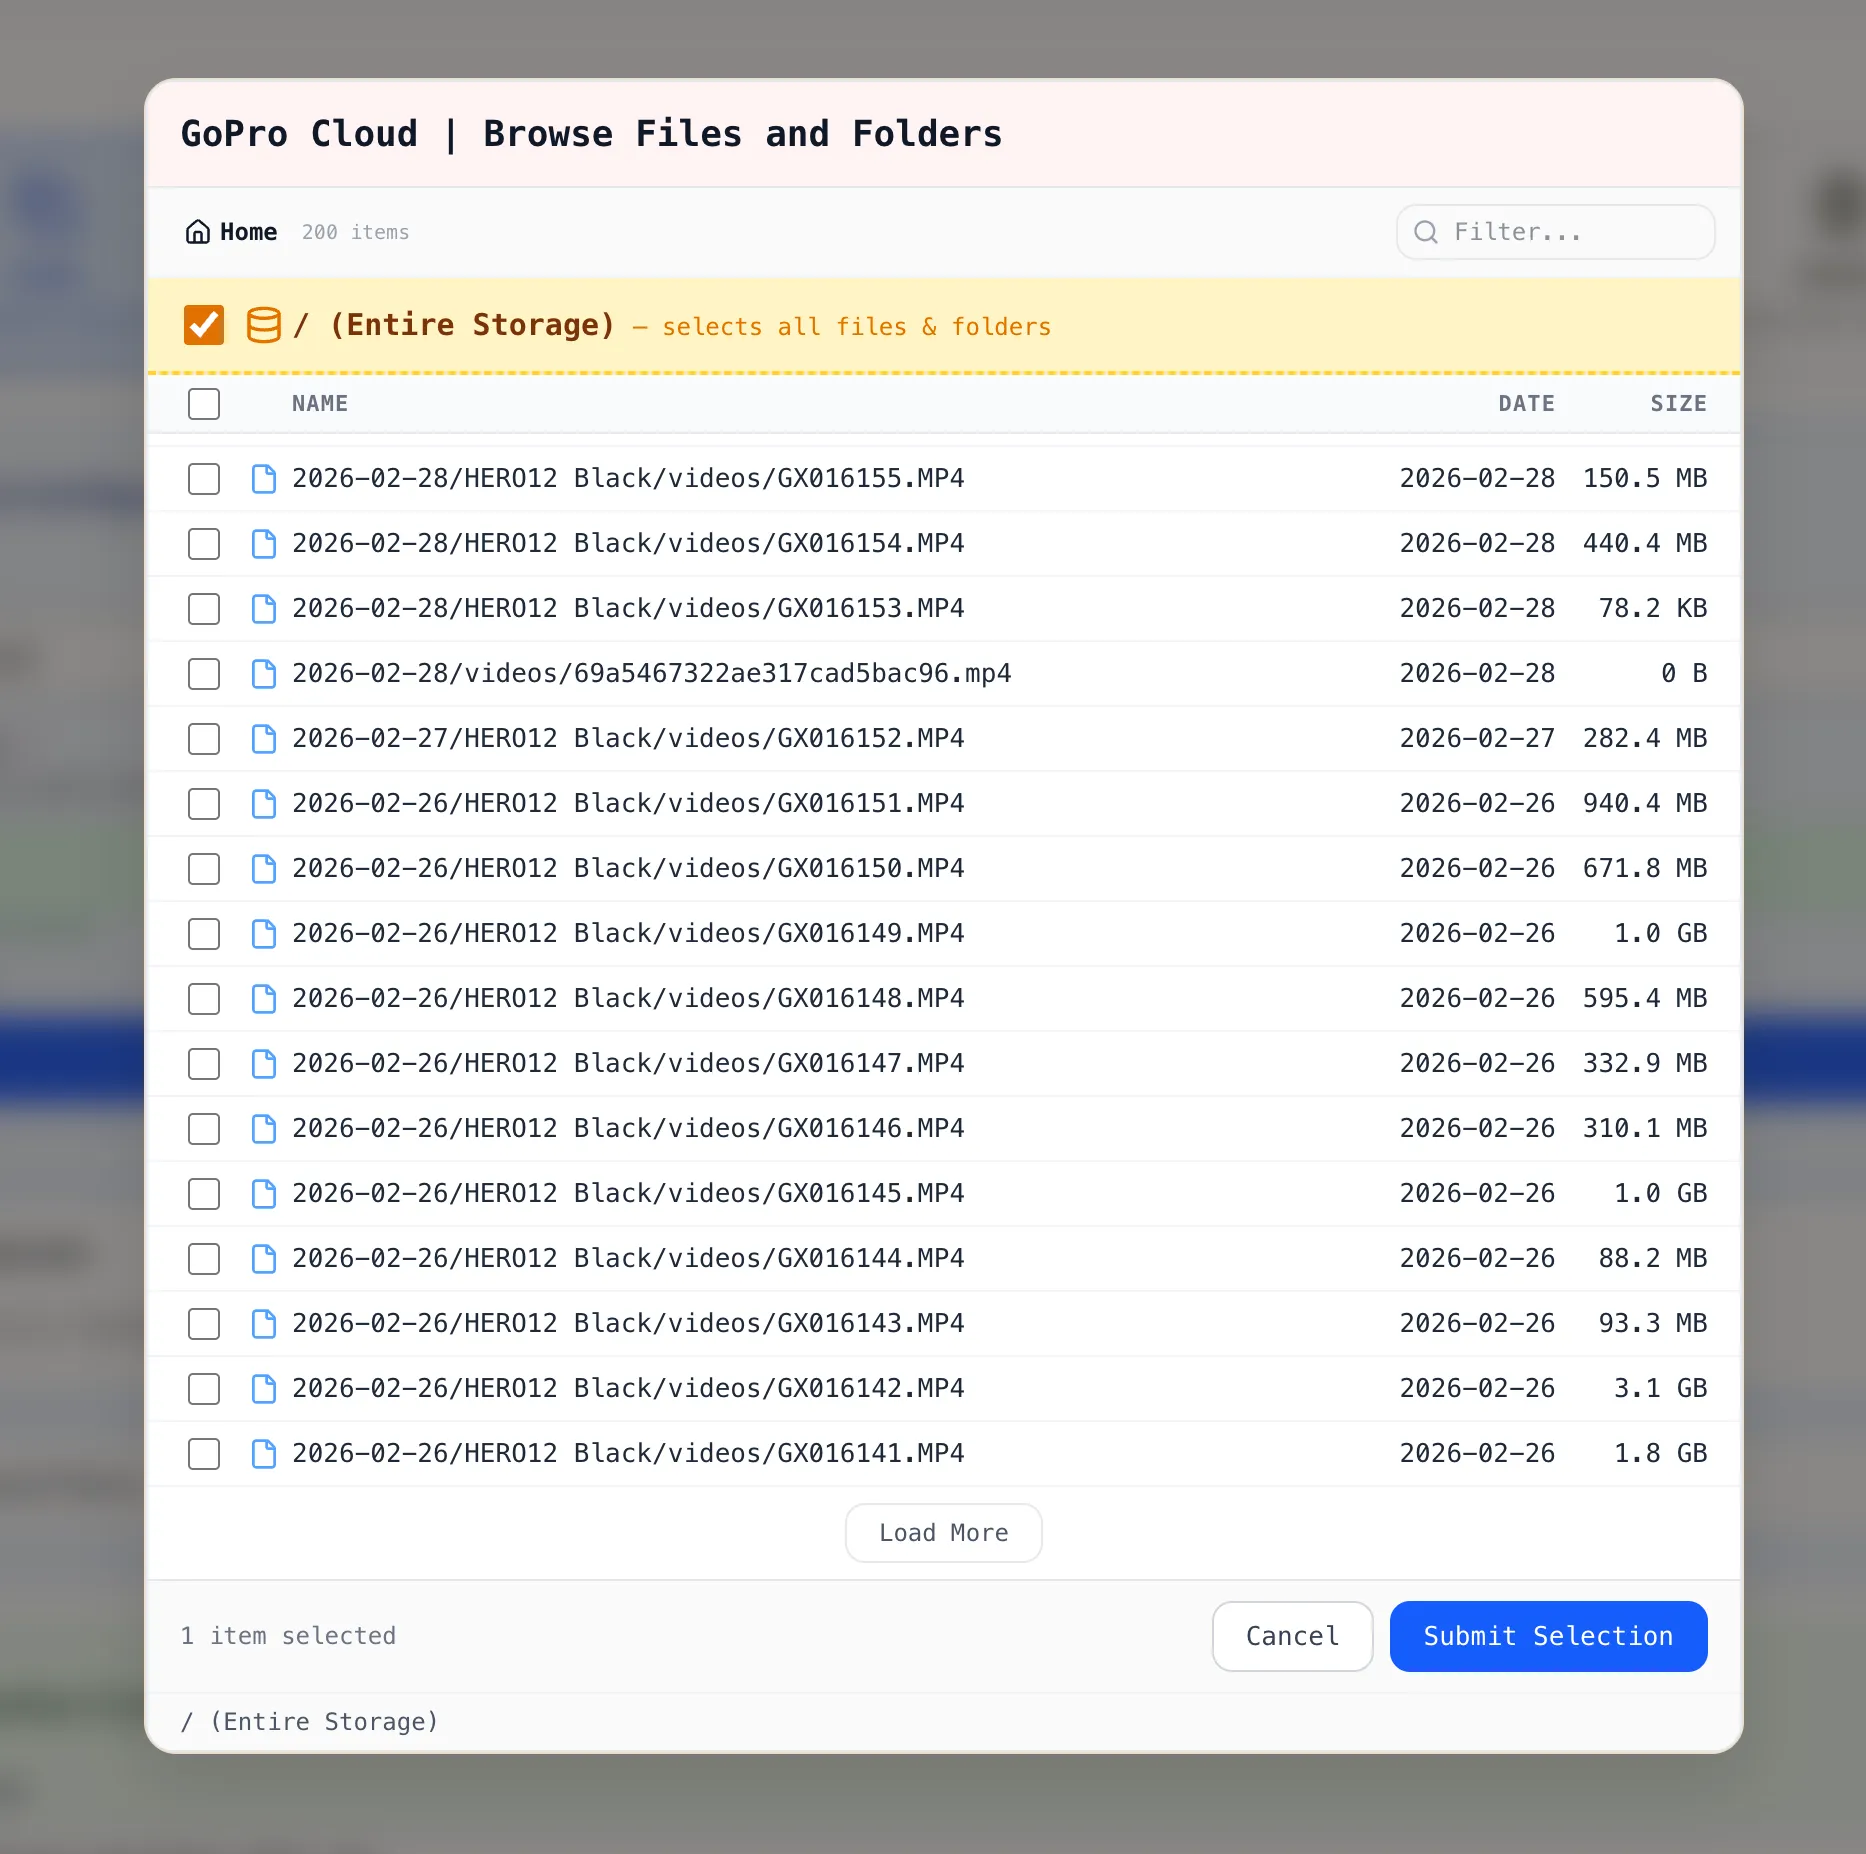
You can select:
* **Individual files** by clicking a single file
* **Multiple files** by checking several files across folders
* **Entire directory** by ticking the **/ (Entire Storage)** checkbox
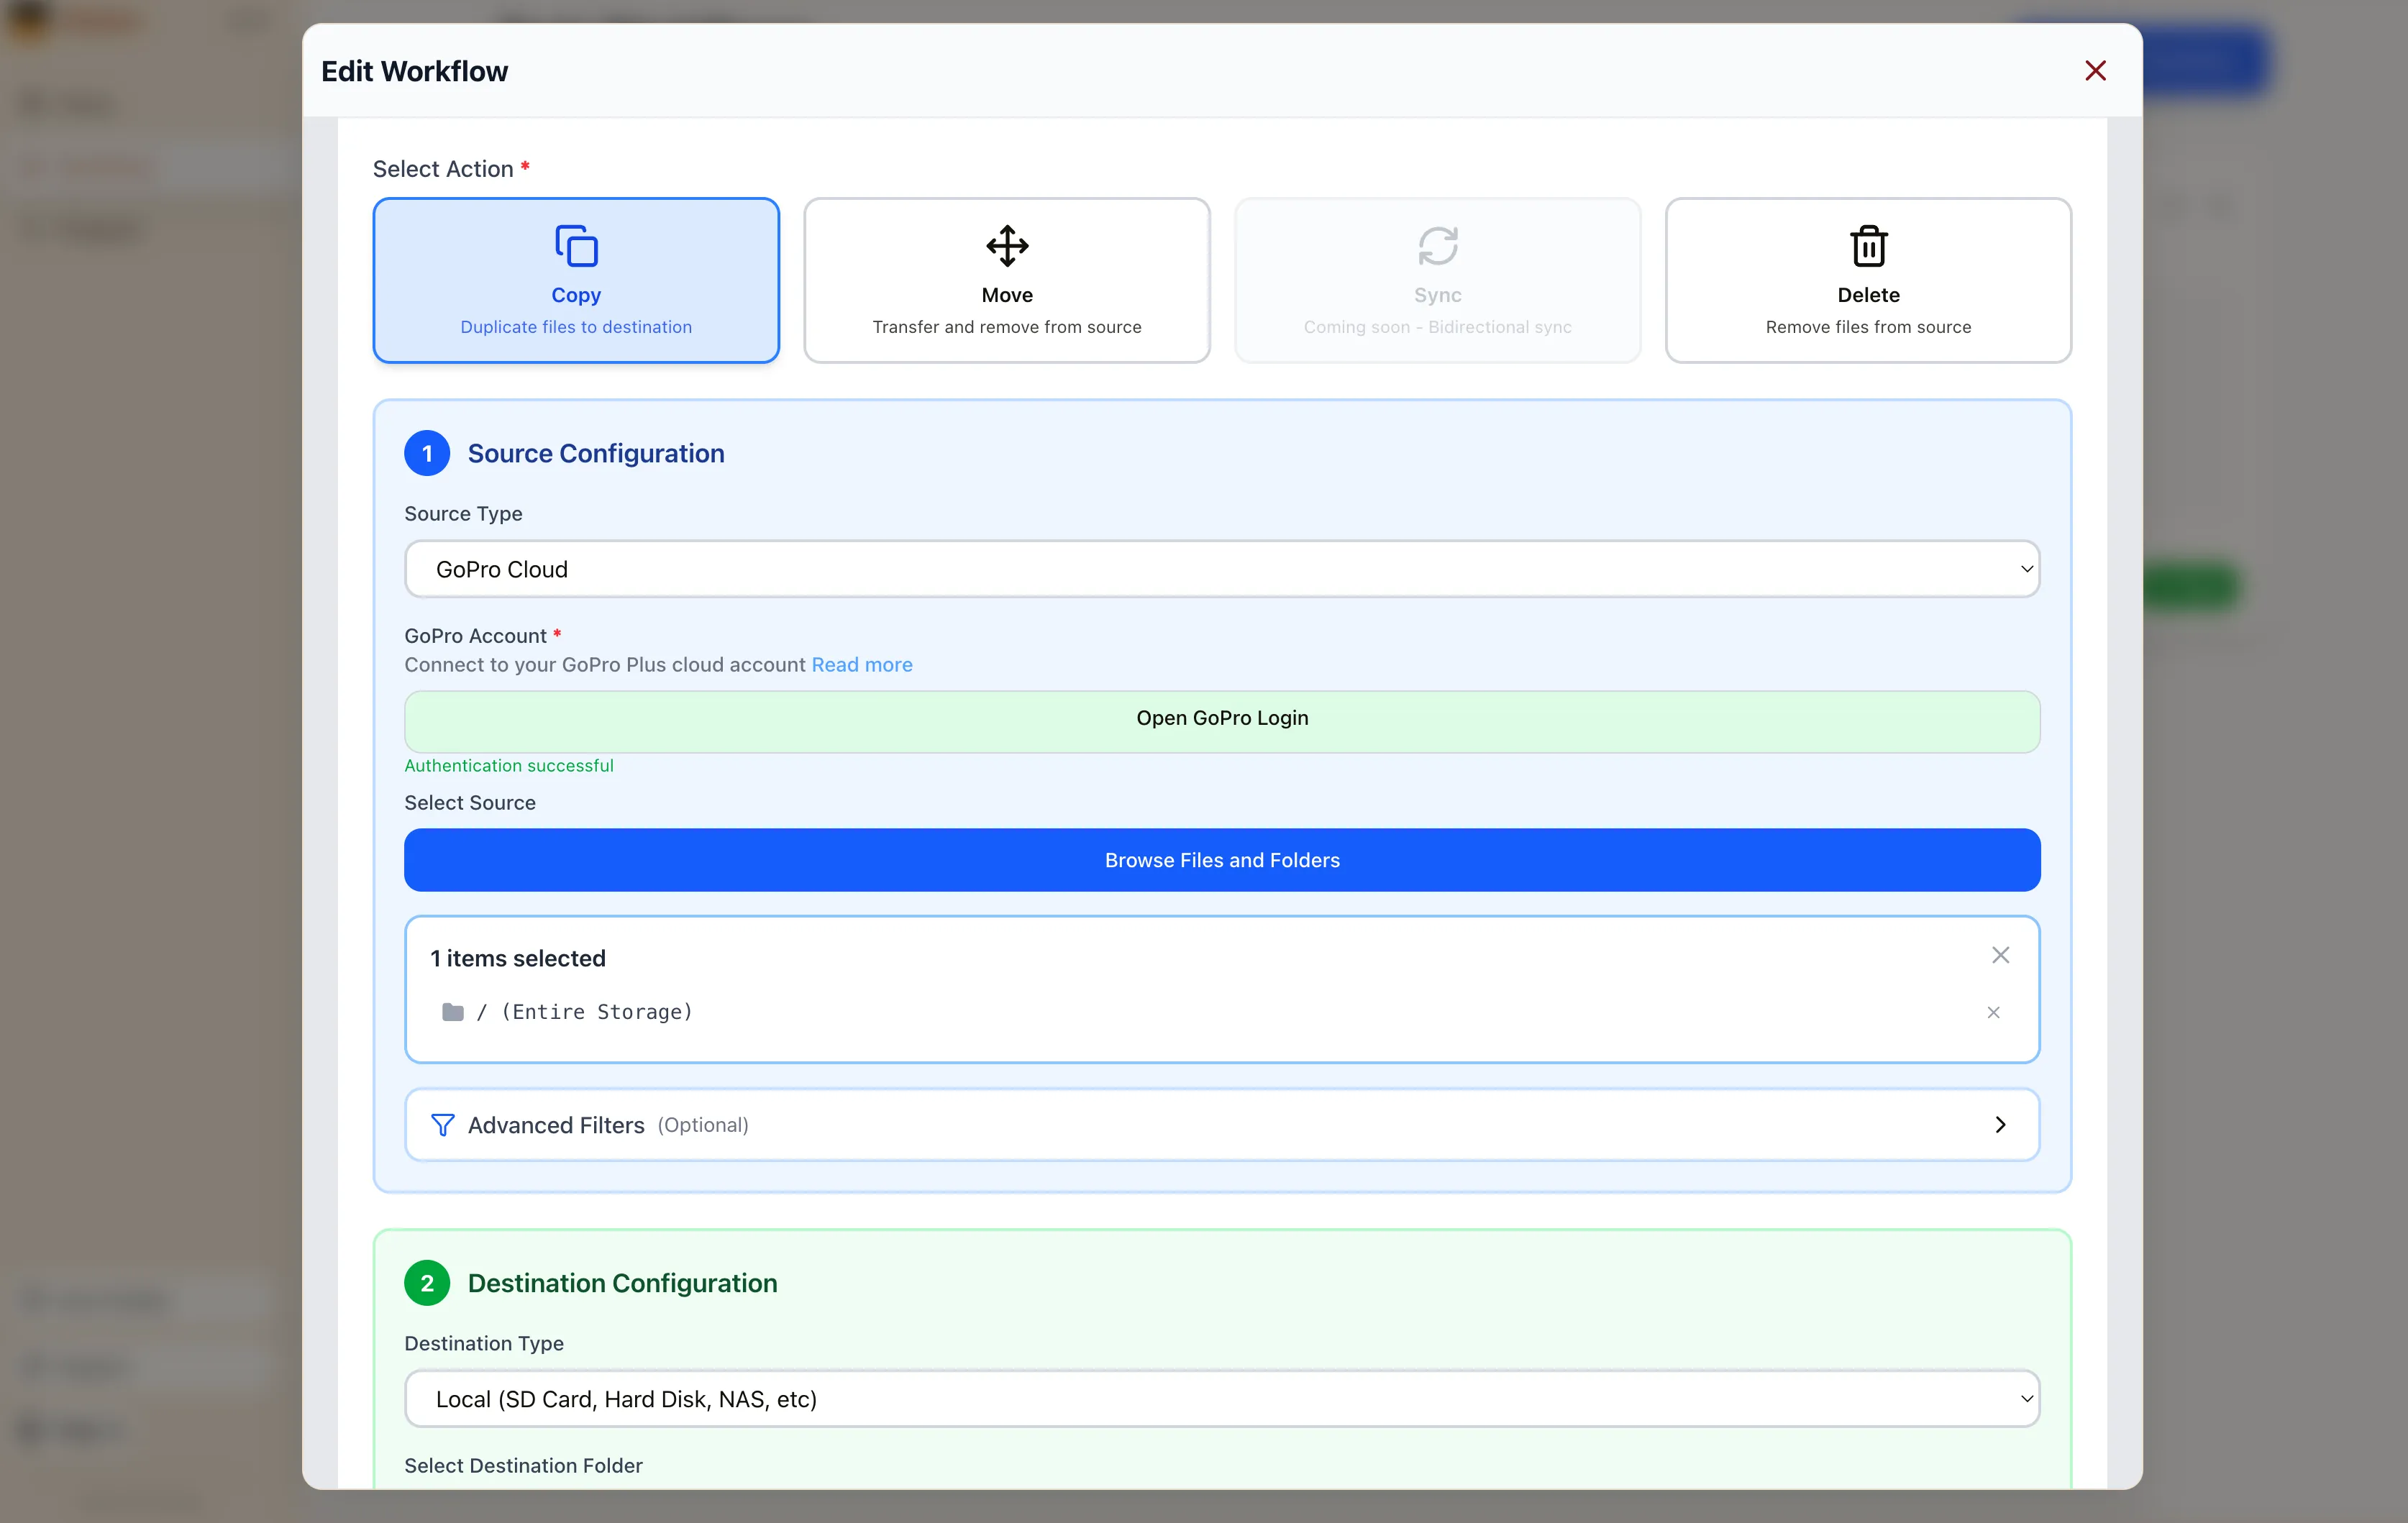
### 3. Create the Workflow
[Section titled “3. Create the Workflow”](#3-create-the-workflow)
Click **Submit Selection**. The workflow editor shows your GoPro Cloud source with the selected items. Pick your destination (local disk, Backblaze B2, AWS S3, Dropbox, or another supported provider), configure options, and click **Save Workflow**.
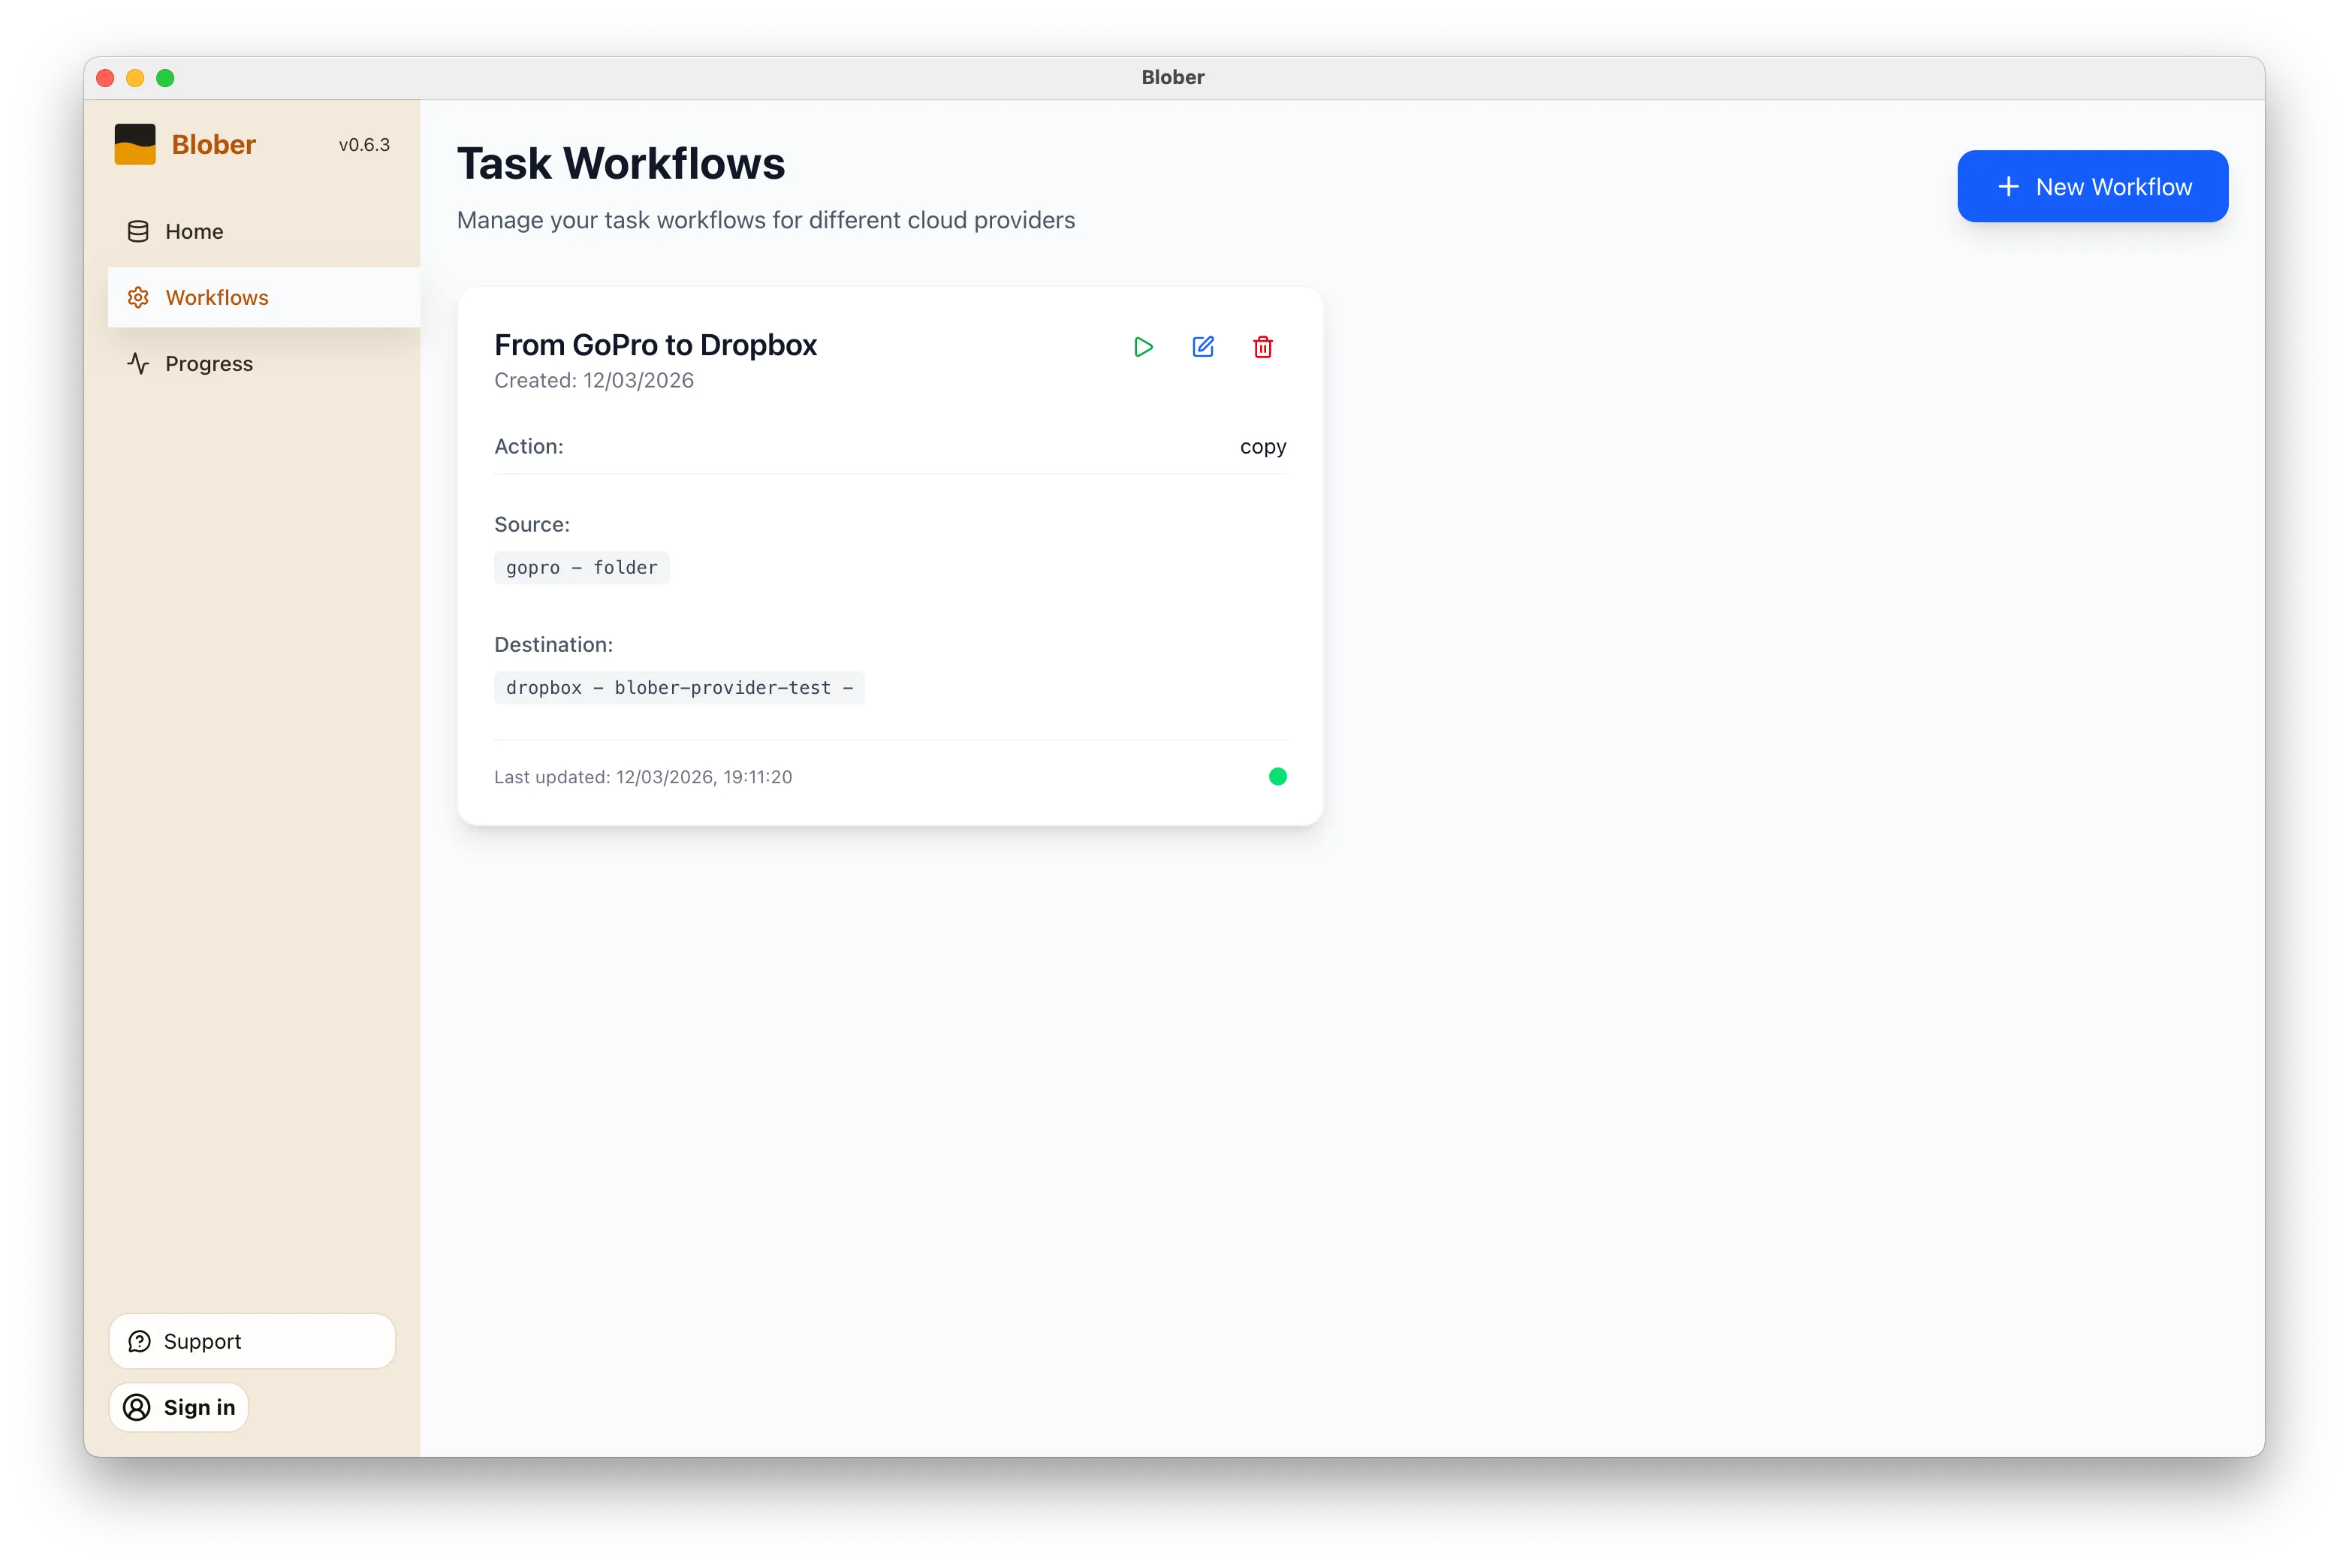
### 4. Run It
[Section titled “4. Run It”](#4-run-it)
Close the workflow editor with the **X** button in the top-right corner. On the Workflows page, click the green **Run** button on your workflow card. Blober starts the transfer with parallel downloads, progress tracking, and automatic resume.
## Why It Matters
[Section titled “Why It Matters”](#why-it-matters)
GoPro’s web portal limits batch downloads to 25 files at a time, bundled as ZIPs. Large downloads often fail. There is no bulk export and no “Download All” button.
**Blober is the only tool that connects to GoPro Cloud.** rclone, MultCloud, and Flexify do not support GoPro as a source.
* **No manual downloads.** Files move directly from GoPro Cloud to your destination.
* **No file limits.** Transfer 10 files or 10,000 in one run.
* **No subscription.** Blober is a one-time purchase.
* **No middleman.** Everything runs on your machine. Your credentials stay local.
## Get Started
[Section titled “Get Started”](#get-started)
1. [Download Blober](https://blober.io/) (macOS, Windows, Linux)
2. Connect your GoPro Cloud account
3. Create a workflow and run it
# Migrating 100M+ Files from DigitalOcean Spaces to Backblaze B2
> A practical breakdown of costs, timelines, and the smartest approach for moving a massive object storage dataset to Backblaze B2.
### The Scenario
[Section titled “The Scenario”](#the-scenario)
A media company has **25TB** of data spread across **120 million files** in DigitalOcean Spaces. Monthly bill: roughly **$500/month**. They want to move everything to Backblaze B2 to cut costs and get more flexibility.
This is a real-world pattern we see a lot. Let’s walk through what it actually takes.
***
### What It Costs
[Section titled “What It Costs”](#what-it-costs)
| Item | Details | Estimated Cost |
| ----------------------- | --------------------------------------------------- | -------------- |
| **Blober License** | One-time purchase | **$49** |
| **DigitalOcean Egress** | \~24TB billable at $0.01/GiB (first 1TB free) | **\~$240** |
| **Backblaze Ingress** | Free. Backblaze never charges for uploads | **$0** |
| **Backblaze API Calls** | Uploads are free Class A calls, minor listing costs | **\~$2** |
| **Total** | | **\~$291** |
After migrating, the monthly bill drops from \~$500 on DigitalOcean to \~$150 on Backblaze B2. The entire migration pays for itself in about two weeks.
***
### About Egress Fees
[Section titled “About Egress Fees”](#about-egress-fees)
This is where it gets interesting. Backblaze actively wants people to switch to their platform and they back that up with real programs:
* **Free egress up to 3x your average monthly storage** on B2, which means once you’re on Backblaze, downloading your own data doesn’t cost extra in most scenarios.
* **Unlimited free egress** through CDN and compute partners like Cloudflare, Fastly, Bunny.net, and Vultr.
* **Assisted data migration** is listed as a standard B2 feature on their [pricing page](https://www.backblaze.com/cloud-storage/pricing).
* **Universal Data Migration** is available for larger committed contracts (50TB+ on pay-as-you-go, or included with B2 Reserve annual plans).
Backblaze explains their philosophy well in this blog post: [Cloud Egress Fees: What They Are and How to Reduce Them](https://www.backblaze.com/blog/cloud-101-data-egress-fees-explained/). The short version is that they believe egress fees are vendor lock-in, and they want to make switching easy.
Even if your dataset is under the 50TB threshold, it’s worth contacting their [sales team](https://www.backblaze.com/contact-sales/cloud-storage). With a 25TB dataset and willingness to commit for 12 months, there’s a solid chance they’ll help reduce or cover the DigitalOcean egress fees to get you onboarded.
***
### How Long Does It Take
[Section titled “How Long Does It Take”](#how-long-does-it-take)
Let’s be honest here. 25TB is a lot of data.
Every file needs its own set of API calls: list from the source, download, then upload to the destination. Each round-trip carries network latency regardless of file size. When you multiply that per-object overhead across 120 million files with 25TB of bandwidth on top, the aggregate time adds up fast.
For a client-side migration where data streams through your local machine, you’re looking at:
* **Several weeks of continuous runtime** depending on your connection speed and latency
* Your machine needs to stay on and connected the entire time
* If your ISP has a monthly data cap, 25TB will almost certainly exceed it
* 16GB+ RAM recommended for handling the file listing at this scale
This isn’t a Blober limitation. Any client-side tool (rclone, Cyberduck, whatever) will face the same physics. Data has to travel from DigitalOcean’s datacenter to your machine, then from your machine to Backblaze’s datacenter. That’s two full trips through your ISP.
***
### The Smart Approach: Two Phases
[Section titled “The Smart Approach: Two Phases”](#the-smart-approach-two-phases)
#### Phase 1: Let the Datacenters Do the Heavy Lifting
[Section titled “Phase 1: Let the Datacenters Do the Heavy Lifting”](#phase-1-let-the-datacenters-do-the-heavy-lifting)
Contact Backblaze’s sales team and ask about their assisted migration options. For datasets at this scale, they partner with migration services that can move data directly between datacenters at speeds your home connection can’t match. What takes weeks on a home connection can take hours on a datacenter link.
Reach out here: [Backblaze Sales](https://www.backblaze.com/contact-sales/cloud-storage)
#### Phase 2: Use Blober for Everything After
[Section titled “Phase 2: Use Blober for Everything After”](#phase-2-use-blober-for-everything-after)
Once the initial bulk migration is done, [Blober](https://blober.io/) becomes your daily tool for managing files across providers. New uploads, folder syncs, log rotations, moving files between buckets, all handled from your desktop with no per-GB fees and no subscriptions. Your credentials stay on your machine and never touch a third-party server.
***
### Monthly Cost Comparison (Post-Migration)
[Section titled “Monthly Cost Comparison (Post-Migration)”](#monthly-cost-comparison-post-migration)
| | DigitalOcean Spaces | Backblaze B2 |
| ------------------- | ------------------- | -------------------------- |
| **Storage (25TB)** | \~$500/mo | \~$150/mo |
| **Egress (3TB/mo)** | \~$30/mo | Free (within 3x allowance) |
| **Total** | **\~$530/mo** | **\~$150/mo** |
| **Annual** | **\~$6,360/yr** | **\~$1,800/yr** |
That’s about **$4,500 saved per year**, every year.
***
### Bottom Line
[Section titled “Bottom Line”](#bottom-line)
For large-scale one-time migrations, use Backblaze’s own migration programs. They want your business and they’ll often help you get there.
For everything after that, [Blober](https://blober.io/) gives you a one-time $49 license to manage, sync, and move files across any supported provider, with no recurring costs and no third party ever touching your credentials.
# How to Move GoPro Cloud Media to Dropbox the Easy Way
> GoPro Cloud makes it hard to get your own footage out. Blober connects directly to GoPro Cloud and transfers your photos and videos to Dropbox in minutes, with no manual downloads or ZIP files.
## Why Move Your GoPro Footage to Dropbox?
[Section titled “Why Move Your GoPro Footage to Dropbox?”](#why-move-your-gopro-footage-to-dropbox)
GoPro Cloud (included with GoPro Plus / GoPro Premium) stores your camera footage automatically. It’s convenient, until you need to actually do something with it.
**The problems with keeping everything in GoPro Cloud:**
* **No easy bulk export.** GoPro’s web portal limits batch downloads to 25 files at a time, bundled as a ZIP. Large downloads frequently fail or time out.
* **No third-party integrations.** No other file transfer tool (rclone, MultCloud, Flexify) can connect to GoPro Cloud. You’re stuck with the GoPro web interface.
* **Subscription lock-in.** Cancel GoPro Plus and you lose access to your footage. Your media is held hostage by a recurring charge.
* **No redundancy.** If GoPro changes their cloud offering or shuts it down, you have no backup unless you’ve already downloaded everything manually.
**Why Dropbox makes a good destination:**
* **Accessible everywhere.** Desktop, mobile, web. Dropbox works across all devices.
* **Selective sync.** Keep large video files in the cloud and only download what you need locally.
* **Sharing built in.** Send footage to clients, collaborators, or editors with a link.
* **Established and reliable.** Dropbox has been around since 2007 and isn’t going anywhere.
* **Integration with editing tools.** Many video editors and photo apps integrate directly with Dropbox.
Moving your footage from GoPro Cloud to Dropbox gives you a second copy in a provider you control, one that doesn’t depend on a GoPro subscription to access.
## How Blober Makes It Easy
[Section titled “How Blober Makes It Easy”](#how-blober-makes-it-easy)
[Blober](https://blober.io/) is the only desktop app that connects directly to GoPro Cloud. No browser extensions, no manual downloads, no CLI config files. You create a workflow, press play, and your media transfers automatically.
[Play](https://youtube.com/watch?v=NTqqf4sKbpk)
### Step 1: Create a Workflow
[Section titled “Step 1: Create a Workflow”](#step-1-create-a-workflow)
Open Blober, go to the **Workflows** page, and click **New Workflow**. Select **GoPro** as the source and **Dropbox** as the destination. Pick the folders you want to transfer from and where they should land.
### Step 2: Run It
[Section titled “Step 2: Run It”](#step-2-run-it)
Click the play button on your workflow. Blober connects to both providers and starts transferring files immediately. Every file (photos, videos, time-lapses) gets moved directly from GoPro Cloud to Dropbox without touching your local disk first (unless you want it to).
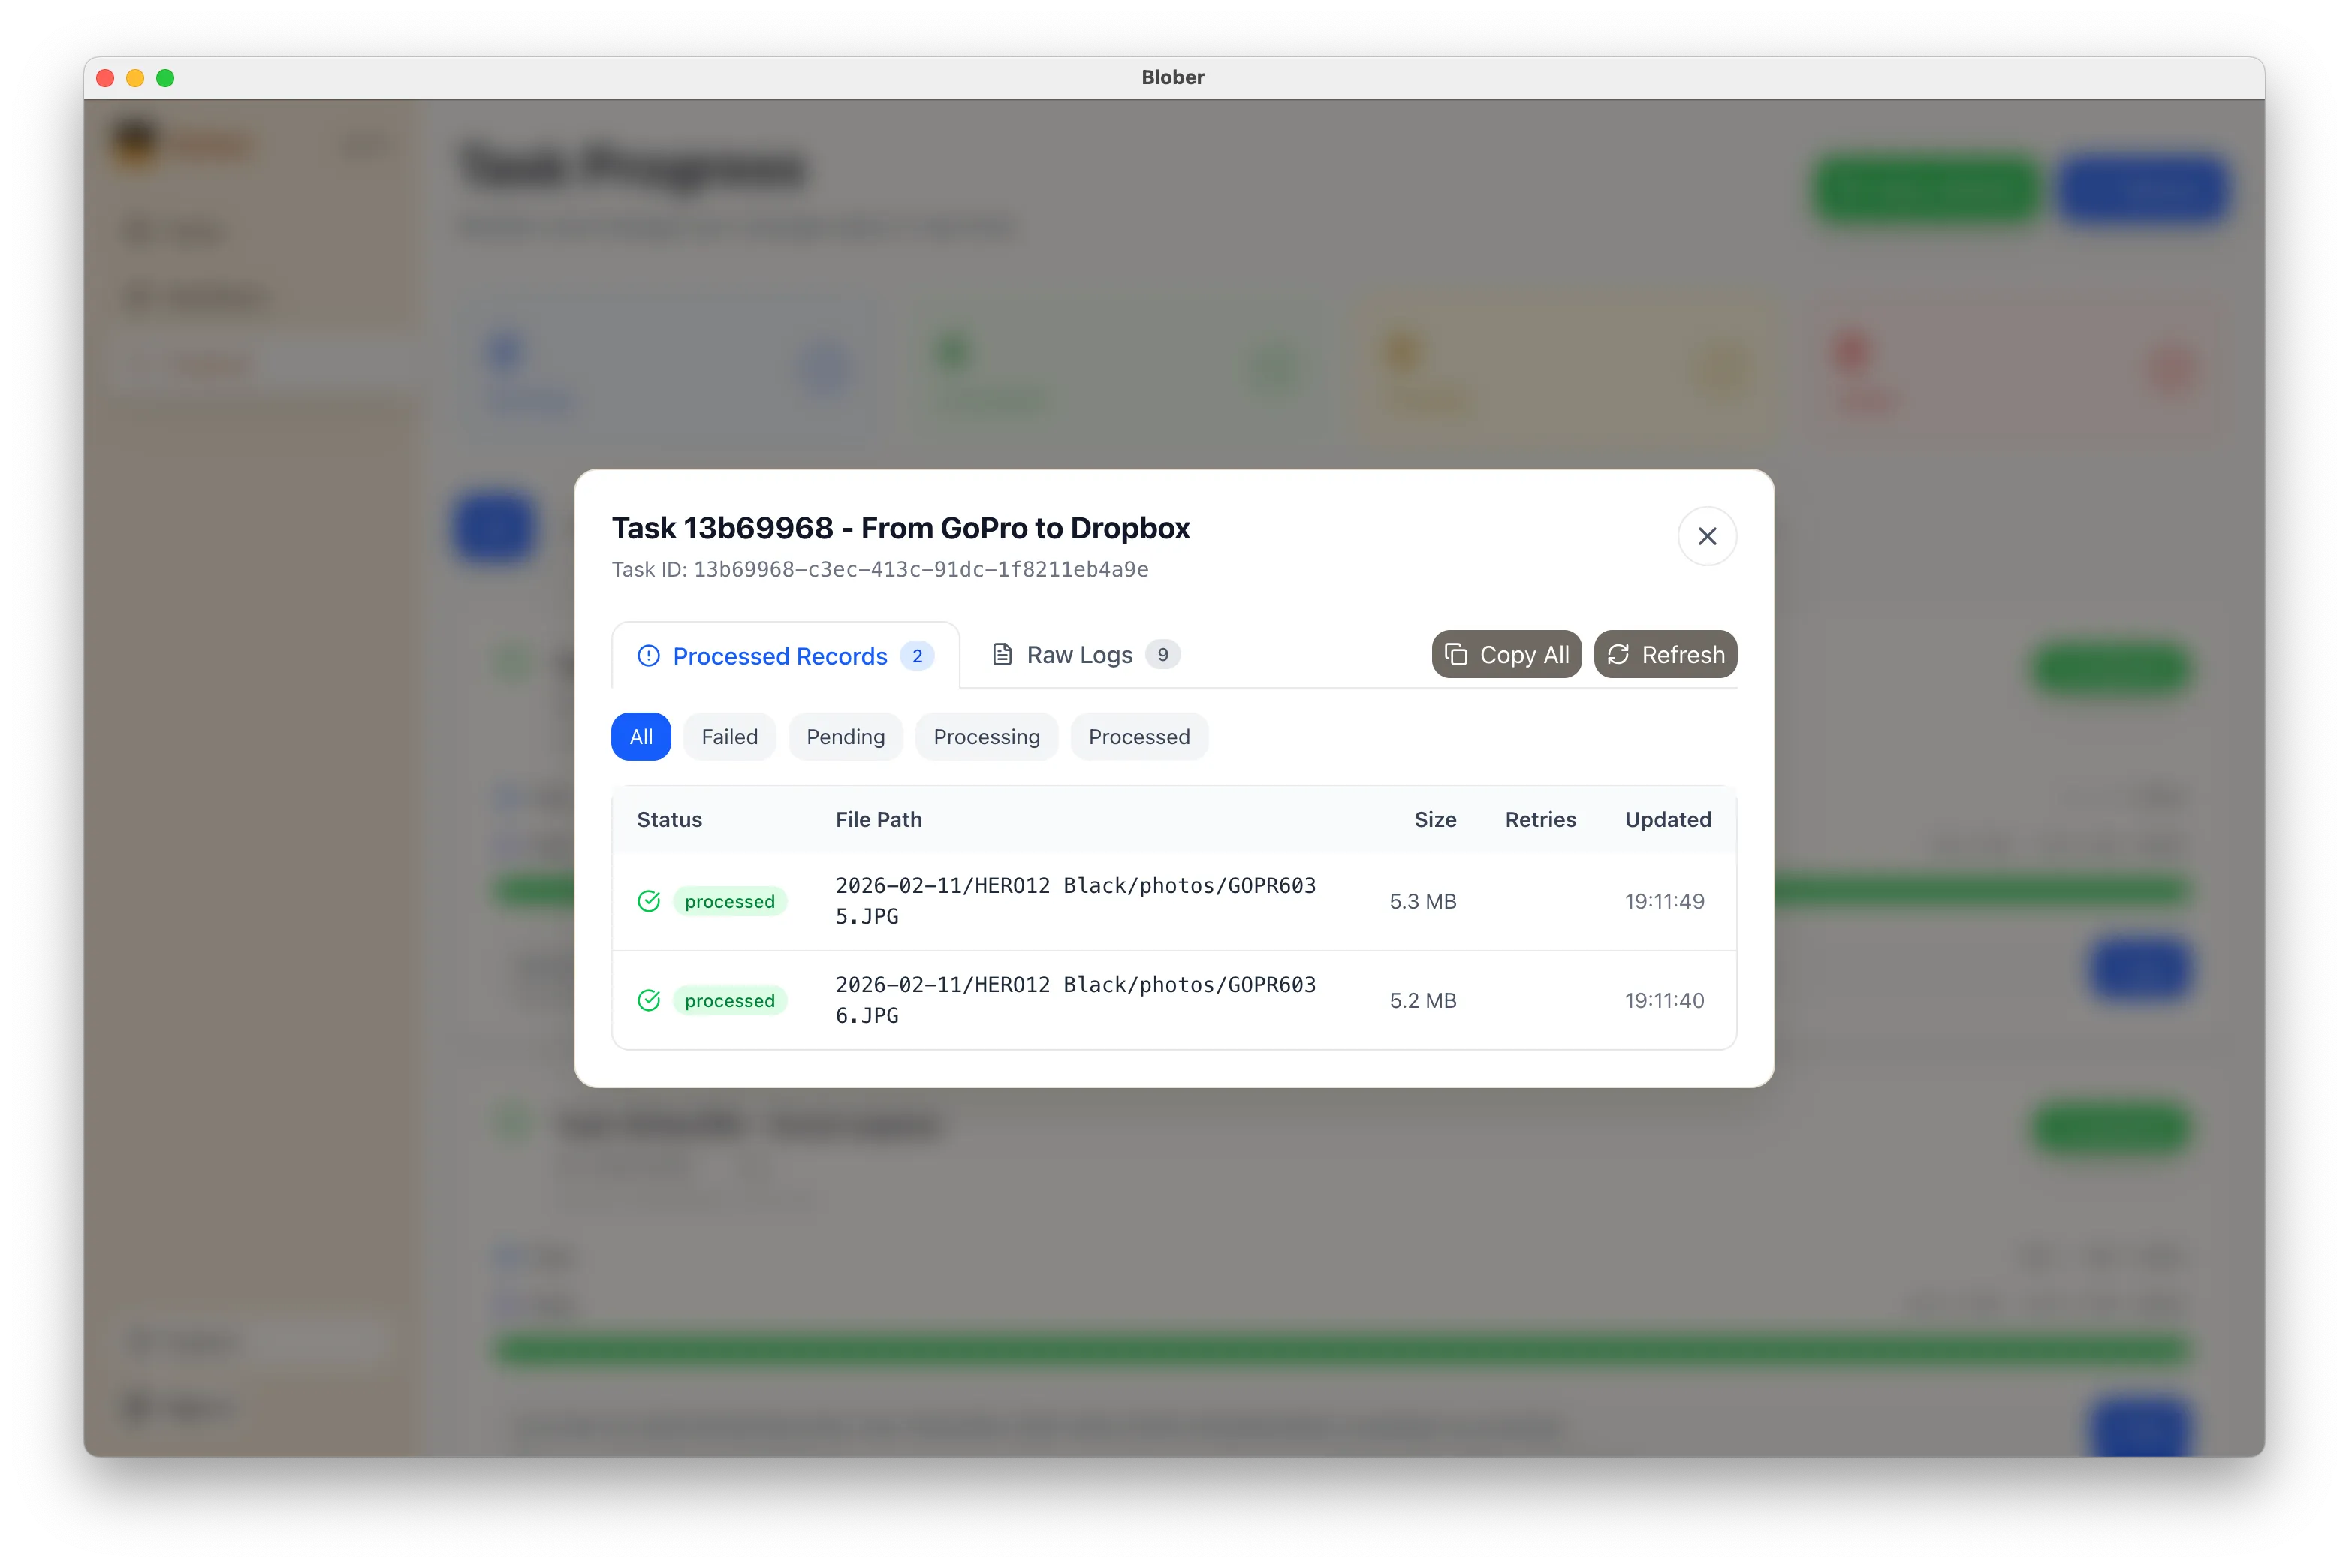
### Step 3: Monitor Progress
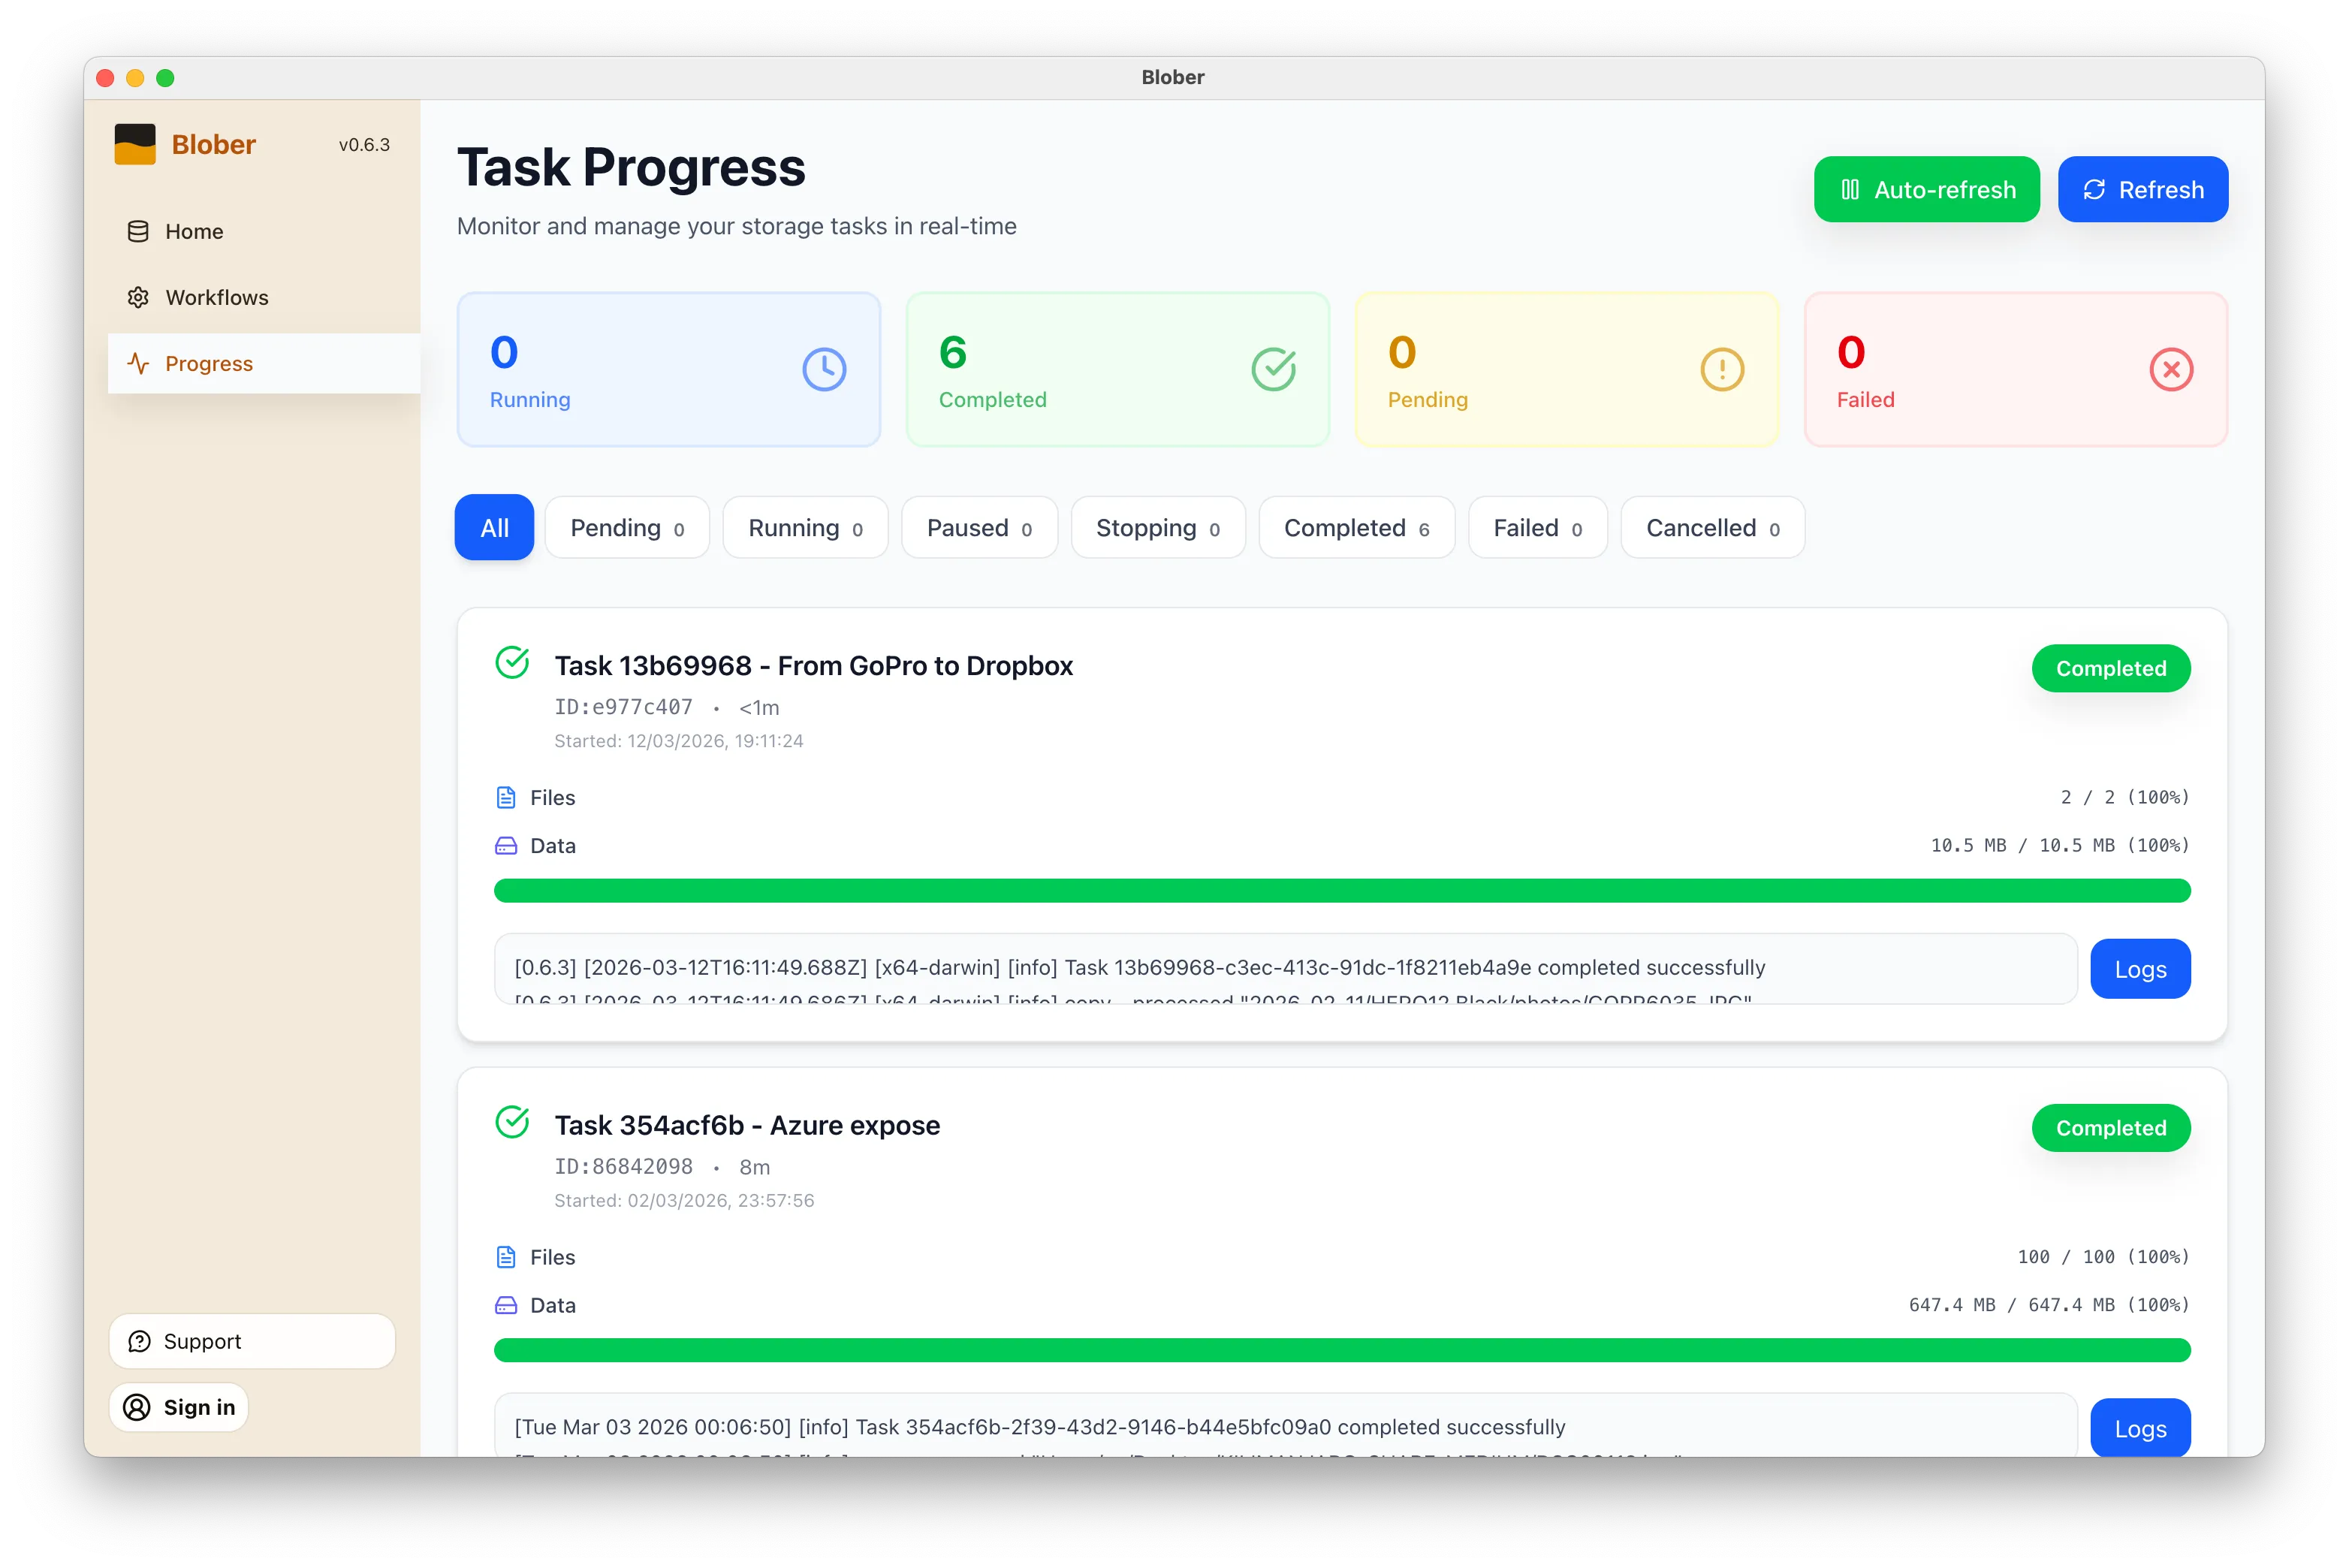
[Section titled “Step 3: Monitor Progress”](#step-3-monitor-progress)
The **Progress** page shows exactly what’s happening: files transferred, bytes moved, current speed, and estimated time remaining. If something goes wrong, you can pause, retry, or cancel at any time.
### What Makes This Different
[Section titled “What Makes This Different”](#what-makes-this-different)
* **No manual work.** You don’t download ZIPs, unzip them, then re-upload to Dropbox. Blober handles the entire pipeline.
* **No file limits.** Transfer 10 files or 10,000. Blober processes them all in one run.
* **No subscription.** Blober is a one-time purchase. No monthly fees, no per-GB transfer charges, no limits on how many times you run a workflow.
* **Runs locally.** Your credentials stay on your machine. Files transfer directly between providers. Nothing passes through Blober’s servers.
## When to Use This
[Section titled “When to Use This”](#when-to-use-this)
* **Before canceling GoPro Plus.** Get your footage out before you lose access.
* **Regular backups.** Set up a workflow now and run it whenever you want a fresh copy in Dropbox.
* **Switching providers.** Moving off GoPro Cloud entirely? Transfer everything to Dropbox first, then cancel.
* **Sharing with a team.** Put footage in a shared Dropbox folder so editors and collaborators can access it immediately.
## Get Started
[Section titled “Get Started”](#get-started)
1. [Download Blober](https://blober.io/) (available for macOS, Windows, and Linux)
2. Connect your GoPro and Dropbox accounts
3. Create a workflow and press play
That’s it. Your GoPro footage in Dropbox in minutes, not hours.
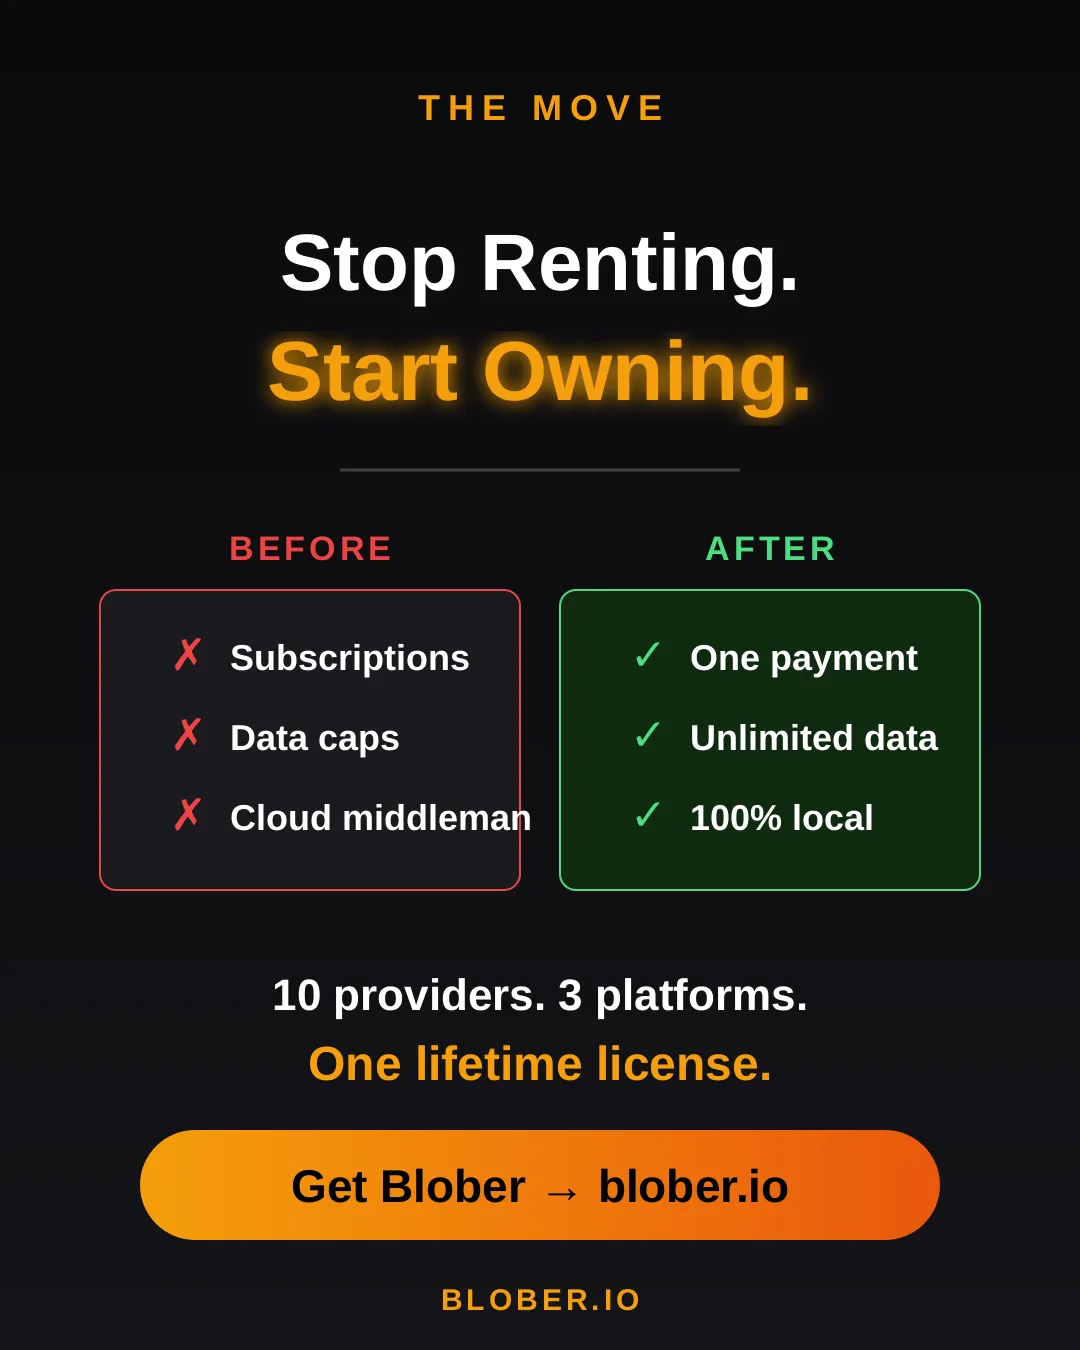
# Stop Paying Rent to Move Your Own Files
> You uploaded terabytes to the cloud. Now your provider charges you to leave. Here's how Blober lets you escape vendor lock-in with a single payment — no subscriptions, no data caps, no CLI.
## The Trap
[Section titled “The Trap”](#the-trap)
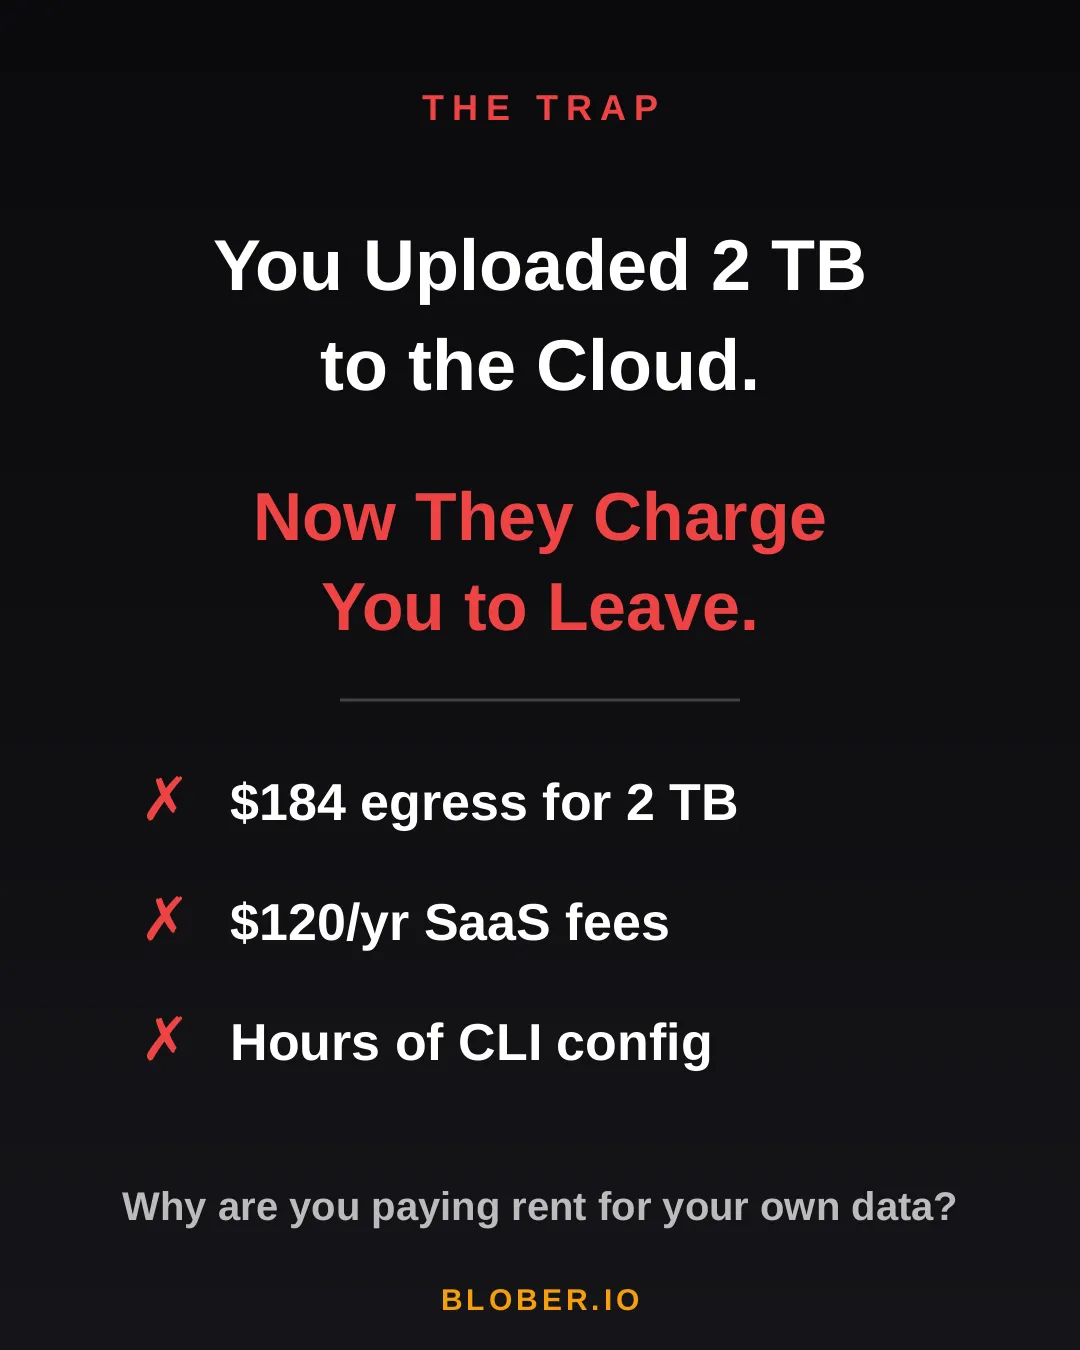
You uploaded 2 TB of photos, videos, and backups to the cloud. Life was good — until you wanted to move them somewhere else.
Suddenly, you’re hit with **egress fees**, per-GB migration charges, and the realization that your cloud provider has been counting on you never leaving. It’s your data. But moving it costs real money — every single time.
AWS charges \~$0.09/GB for egress. That’s **$184 just to download 2 TB of your own files**. Want to use a SaaS migration tool? That’s another $10–20/month, with transfer caps. Prefer the open-source CLI route? Clear your afternoon — you’ll need it for YAML configs, credential files, and provider-specific quirks.
***
## The Math
[Section titled “The Math”](#the-math)
Let’s talk real numbers. Over three years, here’s what you’ll pay using common approaches:
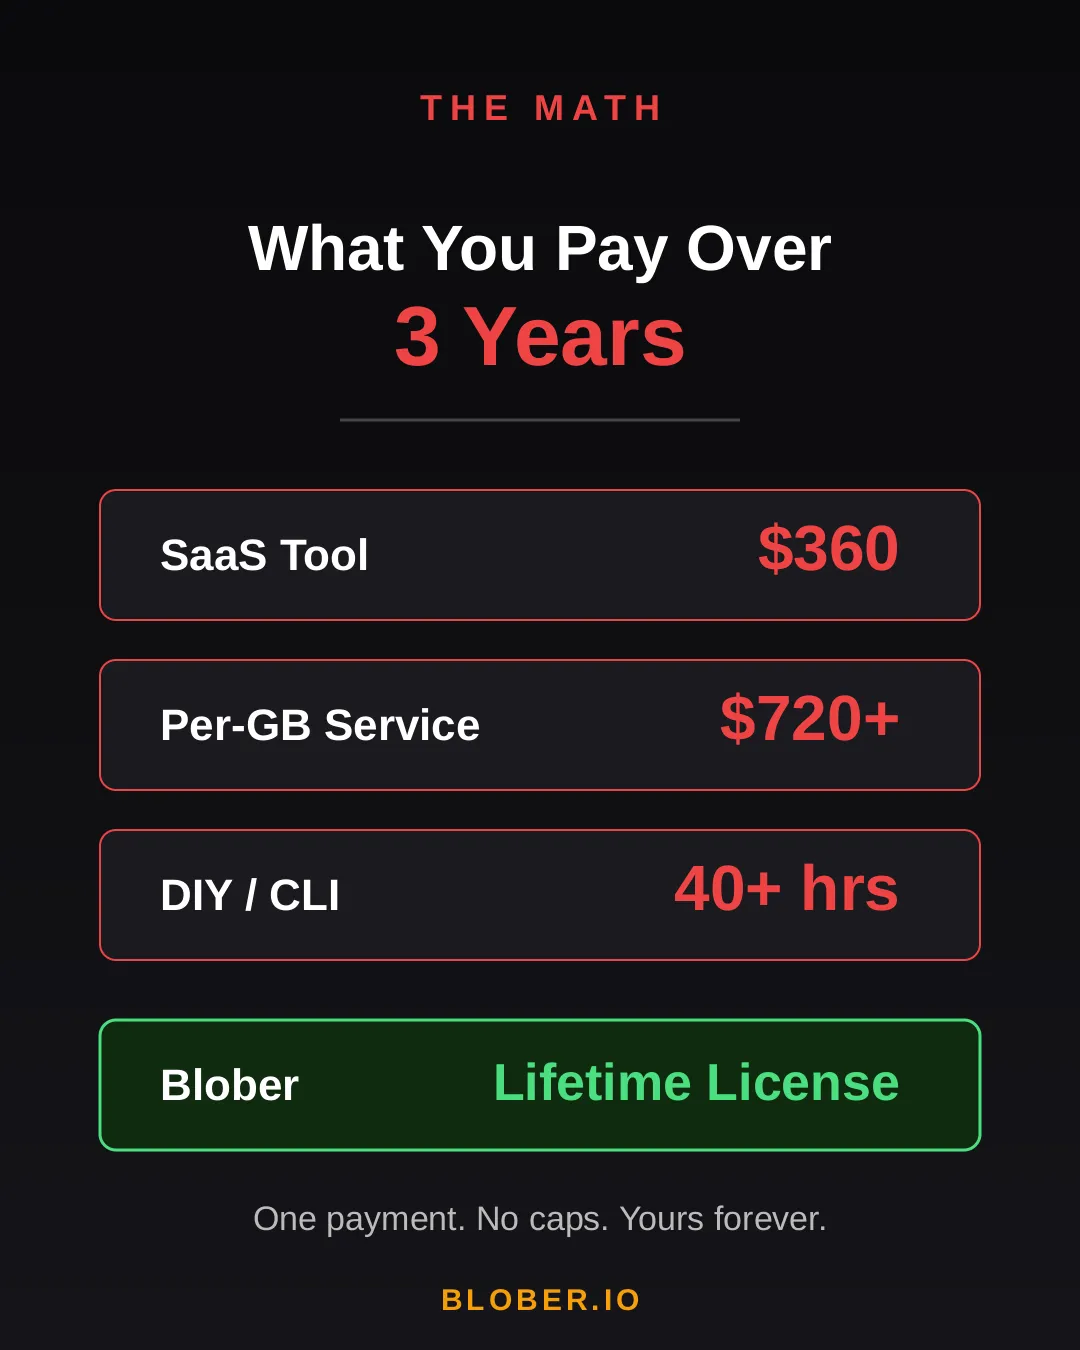
| Approach | 3-Year Cost | Catch |
| ----------------------- | --------------- | ------------------------------------------- |
| **SaaS Migration Tool** | \~$360 | Monthly sub + data caps |
| **Per-GB Service** | \~$720+ | $0.03/GB, billed every transfer |
| **DIY with CLI** | 40+ hours | Config per provider, no UI, breaks silently |
| **Blober** | **One payment** | Unlimited transfers. Forever. |
The subscription model is designed to extract value from you month after month. The per-GB model punishes you for having more data. The CLI path trades money for your time.
Blober breaks the cycle. **Pay once. Transfer as much as you want, as many times as you want.** No meter running. No renewal emails. No “upgrade to unlock more.”
***
## The Escape
[Section titled “The Escape”](#the-escape)
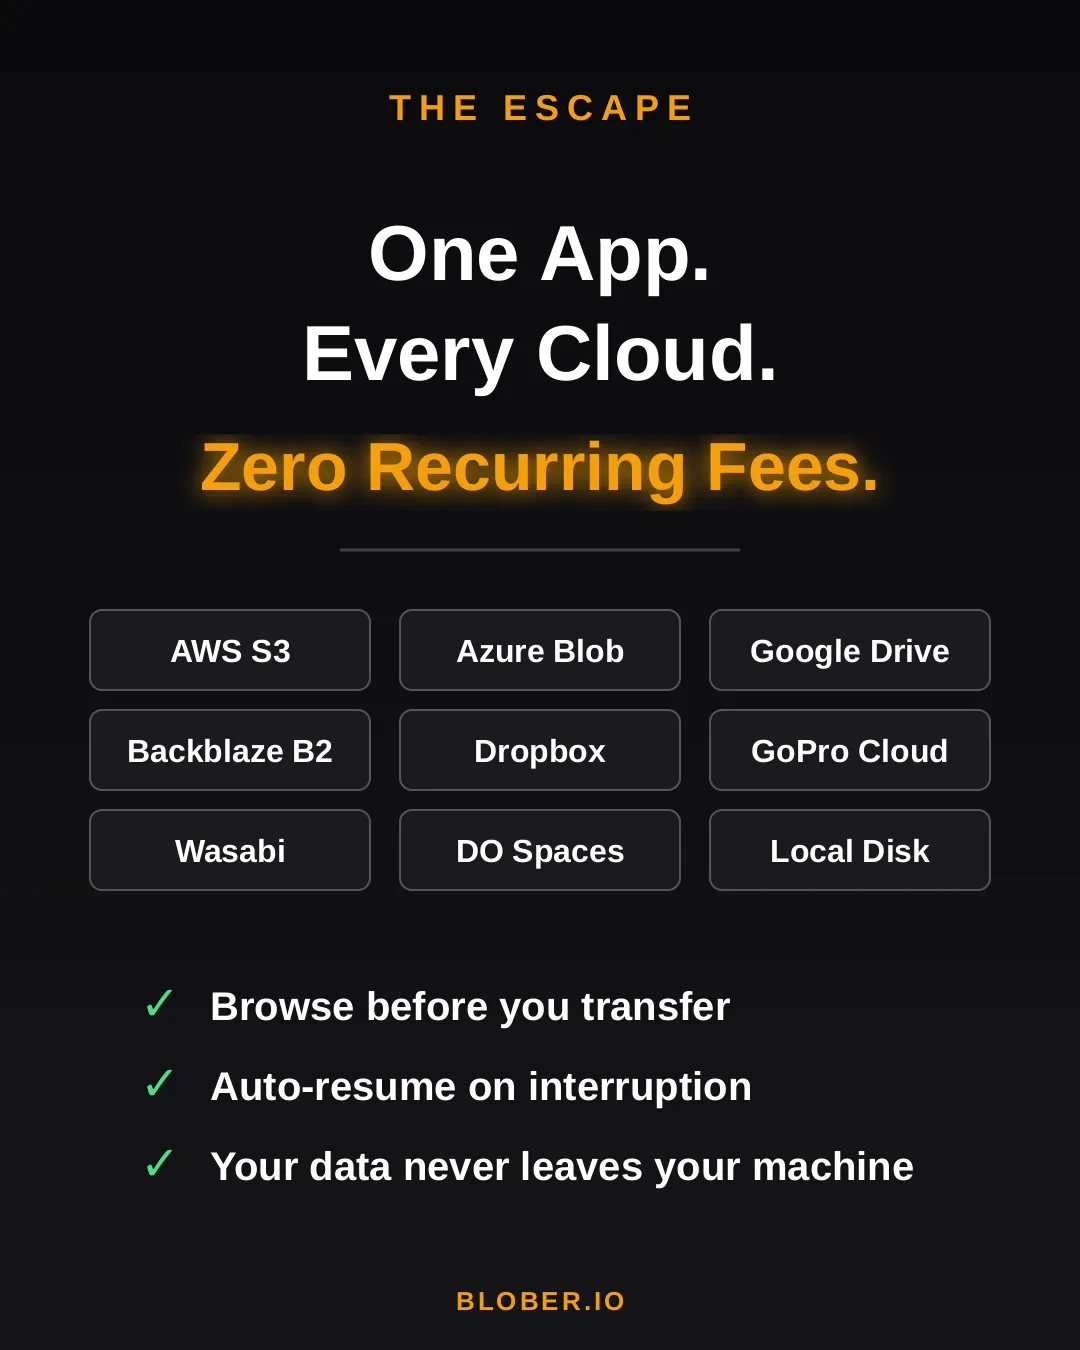
Blober is a desktop app — not a SaaS, not a CLI tool, not a cloud service. It runs on your Mac, Windows, or Linux machine and connects directly to your cloud providers:
* **AWS S3** — buckets and objects, any region
* **Azure Blob Storage** — containers and blobs
* **Google Drive** — files and folders, including shared drives
* **GoPro Cloud** — back up your action footage locally or to any cloud
* **Backblaze B2** — the affordable S3 alternative
* **Dropbox** — personal and business accounts
* **Cloudflare R2** — zero-egress object storage
* **Wasabi** — hot storage without the cold fees
* **DigitalOcean Spaces** — all regions, auto-detected
* **Local Disk** — any folder on your machine
Your files never touch a middleman server. Blober streams directly between your machine and the provider APIs. Browse your cloud storage visually, select what you want, pick a destination — done.
If a transfer gets interrupted (bad WiFi, laptop closed, provider hiccup), Blober picks up where it left off. No re-uploading. No duplicate files.
***
## The Move
[Section titled “The Move”](#the-move)
Here’s what switching to Blober actually looks like:
**Before:** You’re juggling browser tabs, CLI sessions, and a spreadsheet tracking which files went where. A SaaS tool emails you that you’ve hit your 1.2 TB monthly cap. You Google “rclone config azure” for the third time.
**After:** You open Blober. Connect your accounts. Drag from source to destination. Walk away. It just works.
No account required to transfer. No internet needed for local-to-local moves. No data ever leaves your machine unless you’re sending it to a cloud provider *you* chose.
***
## Who Is This For?
[Section titled “Who Is This For?”](#who-is-this-for)
* **Photographers & videographers** moving terabytes of footage from GoPro Cloud or Google Drive to cheaper archival storage
* **Developers & DevOps engineers** migrating between S3-compatible providers without writing scripts
* **Small businesses** consolidating cloud storage without paying an enterprise migration service
* **Privacy-conscious users** who want their files transferred directly, not through a third-party cloud
* **Anyone tired of paying monthly fees** to tools that move files you already own
***
## Get Blober
[Section titled “Get Blober”](#get-blober)
Your data. Your machine. Your rules.
**One payment. Unlimited transfers. No expiration.**
**[Download Blober → blober.io](https://blober.io)**
# The True Cost of Cloud Data Migration in 2026
> Subscriptions, per-GB fees, and hidden costs add up. Here's what cloud data migration actually costs - and why one-time pricing changes the math.
### The Hidden Tax on Moving Your Own Data
[Section titled “The Hidden Tax on Moving Your Own Data”](#the-hidden-tax-on-moving-your-own-data)
Moving data between cloud providers should be simple. You own the files - you just want them somewhere else. But the cloud industry has turned data migration into a profit center, layering fees at every step: egress charges, per-GB migration fees, monthly subscriptions, and data traffic caps.
Here’s what cloud data migration actually costs in 2026, and why [**Blober**](https://blober.io/)’s one-time pricing model is a fundamentally better deal for anyone who transfers data more than once.
***
### The Three Cost Models
[Section titled “The Three Cost Models”](#the-three-cost-models)
#### 1. Per-GB Fees (Flexify.io)
[Section titled “1. Per-GB Fees (Flexify.io)”](#1-per-gb-fees-flexifyio)
Flexify charges a per-GiB fee for every migration, on top of your cloud provider’s egress charges.
| Migration Size | Flexify Fee (\~$0.03/GiB) | Provider Egress (AWS \~$0.09/GB) | **Total** |
| -------------- | ------------------------- | -------------------------------- | ------------- |
| 100 GB | $3 | $9 | **\~$12** |
| 1 TB | $30 | $92 | **\~$122** |
| 10 TB | $307 | $922 | **\~$1,229** |
| 100 TB | $3,072 | $9,216 | **\~$12,288** |
These are *per-job* costs. Run the same migration next month? Pay again. Sync regularly? The meter never stops.
Flexify does offer managed migrations for 10+ TB where provider egress may be avoided through direct peering - but those require contacting sales and negotiating custom pricing.
#### 2. Annual Subscriptions with Data Caps (MultCloud)
[Section titled “2. Annual Subscriptions with Data Caps (MultCloud)”](#2-annual-subscriptions-with-data-caps-multcloud)
MultCloud charges an annual subscription that includes a fixed amount of transfer traffic:
| Plan | Annual Cost | Data Allowance | Cost Per TB Transferred |
| ------------- | ----------- | -------------- | ----------------------- |
| Free | $0 | 5 GB/month | N/A (60 GB/year cap) |
| 1,200 GB plan | $59.99/year | 1,200 GB/year | **\~$50/TB** |
| 2,400 GB plan | $99.98/year | 2,400 GB/year | **\~$42/TB** |
Hit the cap? Transfers stop until you renew. Need to move 5 TB? You’ll need to buy the top-tier plan and wait over two years to exhaust the quota - or pay for multiple years upfront.
Over three years, MultCloud costs **$180–$300** in subscriptions alone, and you’re still capped on how much data you can actually move.
#### 3. One-Time License (Blober)
[Section titled “3. One-Time License (Blober)”](#3-one-time-license-blober)
[**Blober**](https://blober.io/) charges a one-time license fee. No per-GB charges. No annual renewal. No data caps.
| Migration Size | Blober Cost | Provider Egress (your standard cloud fees) |
| -------------- | ------------------ | ------------------------------------------ |
| 100 GB | ✅ One-time license | Standard egress only |
| 1 TB | ✅ Same license | Standard egress only |
| 10 TB | ✅ Same license | Standard egress only |
| 100 TB | ✅ Same license | Standard egress only |
The only variable cost is your cloud provider’s standard egress fee - which you’d pay with *any* tool, including rclone. There is no Blober surcharge.
***
### The Compounding Problem
[Section titled “The Compounding Problem”](#the-compounding-problem)
Per-GB fees and subscriptions compound over time. If you migrate data regularly - monthly syncs, media archives, backup rotations - the cost gap widens fast:
| Scenario | Flexify (per-GB) | MultCloud (subscription) | [**Blober**](https://blober.io/) (one-time) |
| ---------------------- | ---------------- | ------------------------ | ------------------------------------------- |
| One 1 TB migration | \~$122 | $59.99/year | ✅ One-time |
| Monthly 500 GB sync | \~$732/year | Exceeds cap | ✅ One-time |
| 3 years of regular use | $2,196+ | $180–$300 | ✅ One-time |
For users who transfer data as part of their regular workflow - not a one-time event - subscription and per-GB models are an ongoing tax. [**Blober**](https://blober.io/) eliminates it.
***
### What About rclone?
[Section titled “What About rclone?”](#what-about-rclone)
rclone is free and open-source. On raw cost, nothing beats free.
But rclone’s cost is measured in time, not money:
* **Setup time** - configuring remotes, flags, and cron jobs
* **Debugging time** - when a transfer fails silently or a flag is wrong
* **Maintenance time** - updating scripts when providers change APIs
For engineers who already live in the terminal, rclone is excellent. For everyone else, the time cost is significant and ongoing. [**Blober**](https://blober.io/) trades a one-time purchase for a visual, persistent workflow engine that eliminates scripting overhead entirely.
***
### Egress Fees: The Unavoidable Cost
[Section titled “Egress Fees: The Unavoidable Cost”](#egress-fees-the-unavoidable-cost)
Regardless of which tool you use, cloud provider egress fees apply when downloading data. These are charged by your cloud provider, not by Blober:
| Provider | Storage (TB/mo) | Egress (per GB) | Notes |
| -------------------- | --------------- | --------------- | ------------------------------------ |
| AWS S3 | $26 | $0.09 | Egress-heavy workloads get expensive |
| Azure Blob Storage | $20 | $0.08 | First 100 GB/month free |
| Google Cloud Storage | $23 | $0.11 | Varies by region |
| Backblaze B2 | $6 | Free (up to 3x) | Free egress up to 3x stored |
| Wasabi | $6.99 | **Free** | No egress fees ever |
| Cloudflare R2 | $15 | **Free** | Zero egress by design |
| DigitalOcean Spaces | $5 (250 GB) | $0.01 | 1 TB outbound included |
**Pro tip:** If you’re choosing a destination for long-term storage, providers like Backblaze B2 ($6/TB/mo, free egress), Wasabi ($6.99/TB/mo, no egress fees), and Cloudflare R2 (zero egress) offer significantly lower total cost of ownership than AWS, Azure, or GCS. [**Blober**](https://blober.io/) supports all of them.
***
### TL;DR
[Section titled “TL;DR”](#tldr)
| Tool | Cost Model | Best For |
| -------------------------------- | -------------------- | ------------------------------------------------------------------------------------ |
| Flexify.io | Per-GB + egress | Enterprise one-time migrations |
| MultCloud | Annual subscription | Light, occasional consumer transfers |
| rclone | Free (time cost) | Engineers comfortable with CLI |
| [**Blober**](https://blober.io/) | **One-time license** | Anyone who transfers data regularly, values simplicity, or needs GoPro Cloud support |
If you transfer data more than once - or plan to - a one-time license pays for itself after a single job. No subscriptions. No per-GB surprises. No data caps.
[Get Blober →](https://blober.io/)
# What Is Blober? Cloud File Transfer Made Simple
> Moving files between cloud providers shouldn't require subscriptions, hidden fees, or config files. Blober is the one-time purchase desktop app that connects AWS S3, Azure Blob, Google Drive, GoPro Cloud, OneDrive, Backblaze B2, and local storage — with a beautiful UI.
## The Problem
[Section titled “The Problem”](#the-problem)
Transferring files between cloud providers today means monthly subscriptions, surprise transfer fees, and wrestling with CLI config files. Most tools are either expensive SaaS platforms or developer-only terminals with steep learning curves.
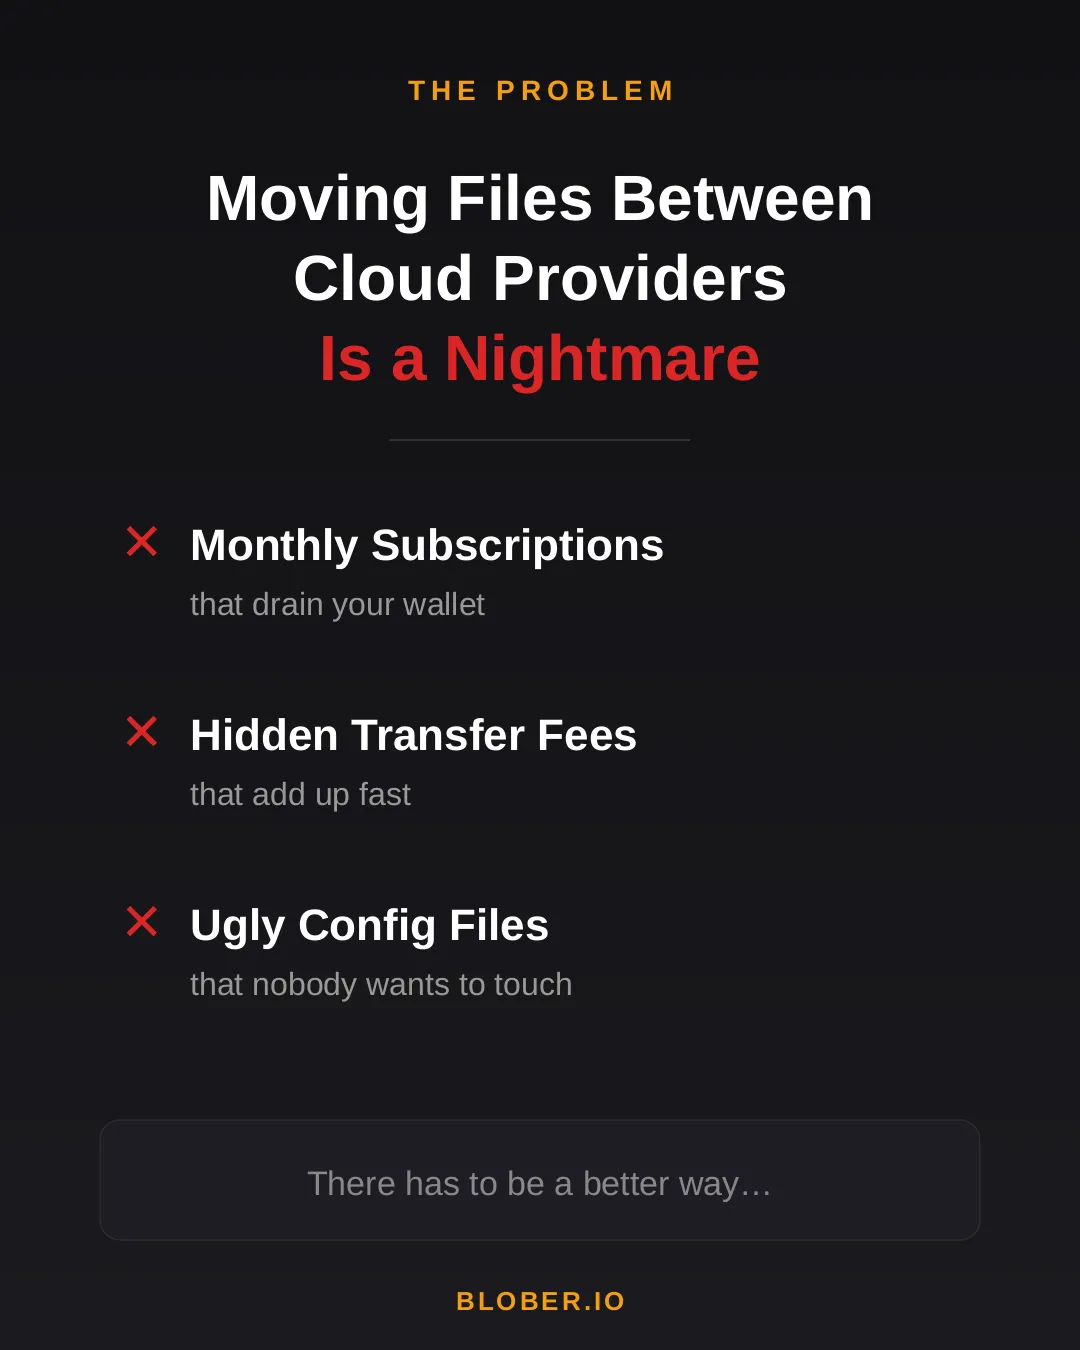
***
## The Solution
[Section titled “The Solution”](#the-solution)
Blober is a desktop app that connects all your cloud storage in one place. AWS S3, Azure Blob Storage, Google Drive, GoPro Cloud, OneDrive, Backblaze B2, and local disk — all supported out of the box. No CLI. No config files. Just a beautiful, intuitive interface.
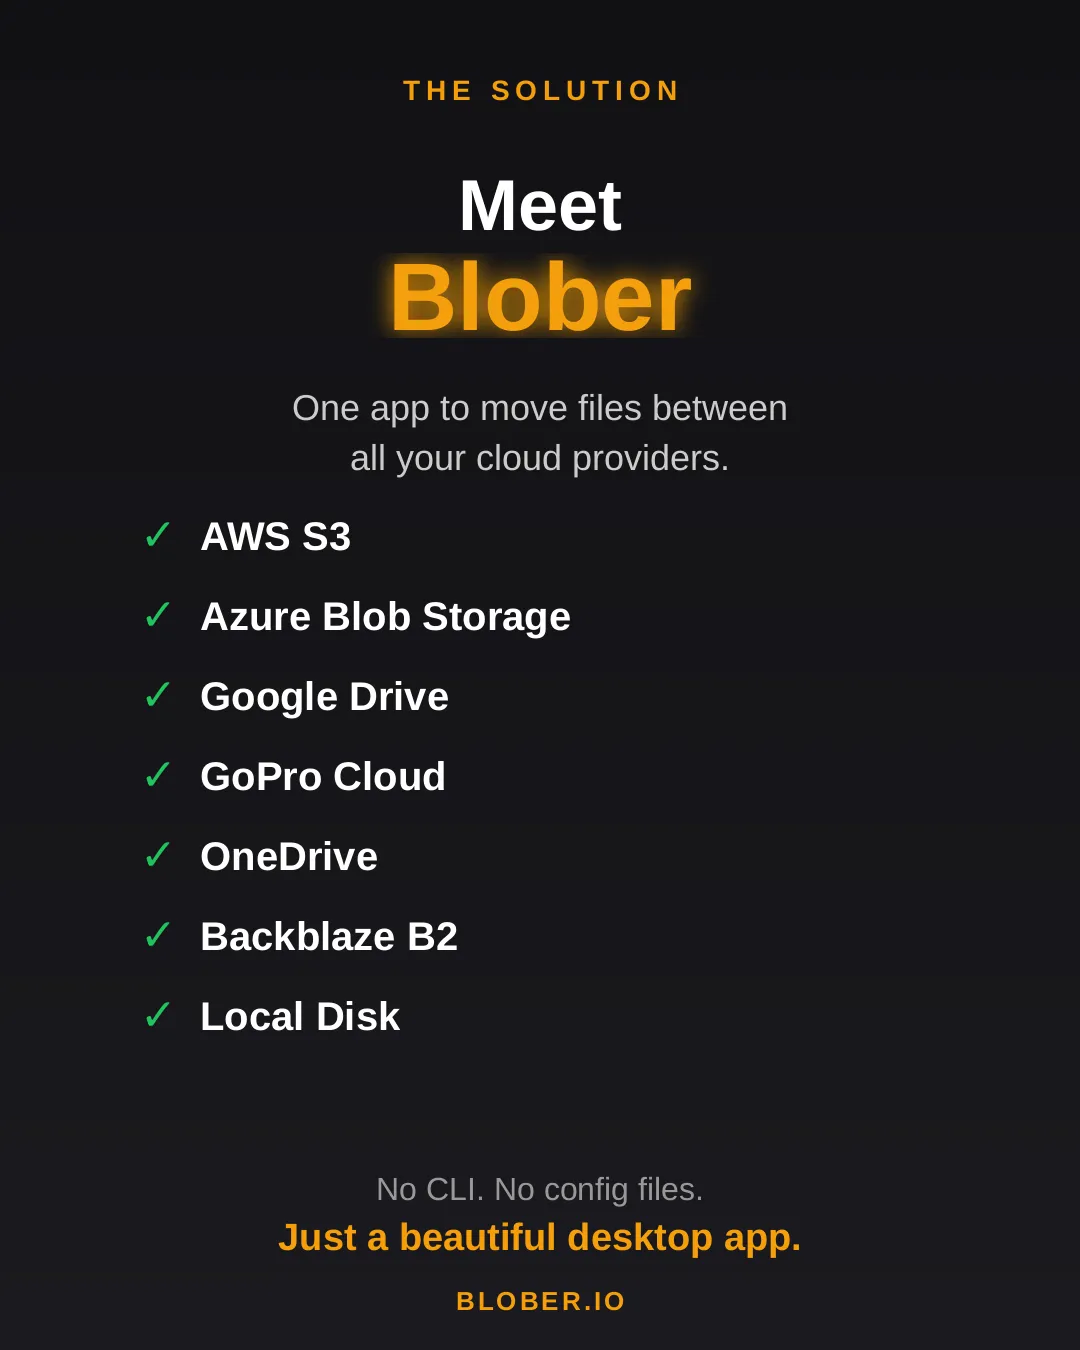
***
## The Value
[Section titled “The Value”](#the-value)
Buy once, transfer forever. No subscriptions. No transfer fees. Blober runs natively on Mac, Windows, and Linux — and it works offline too.
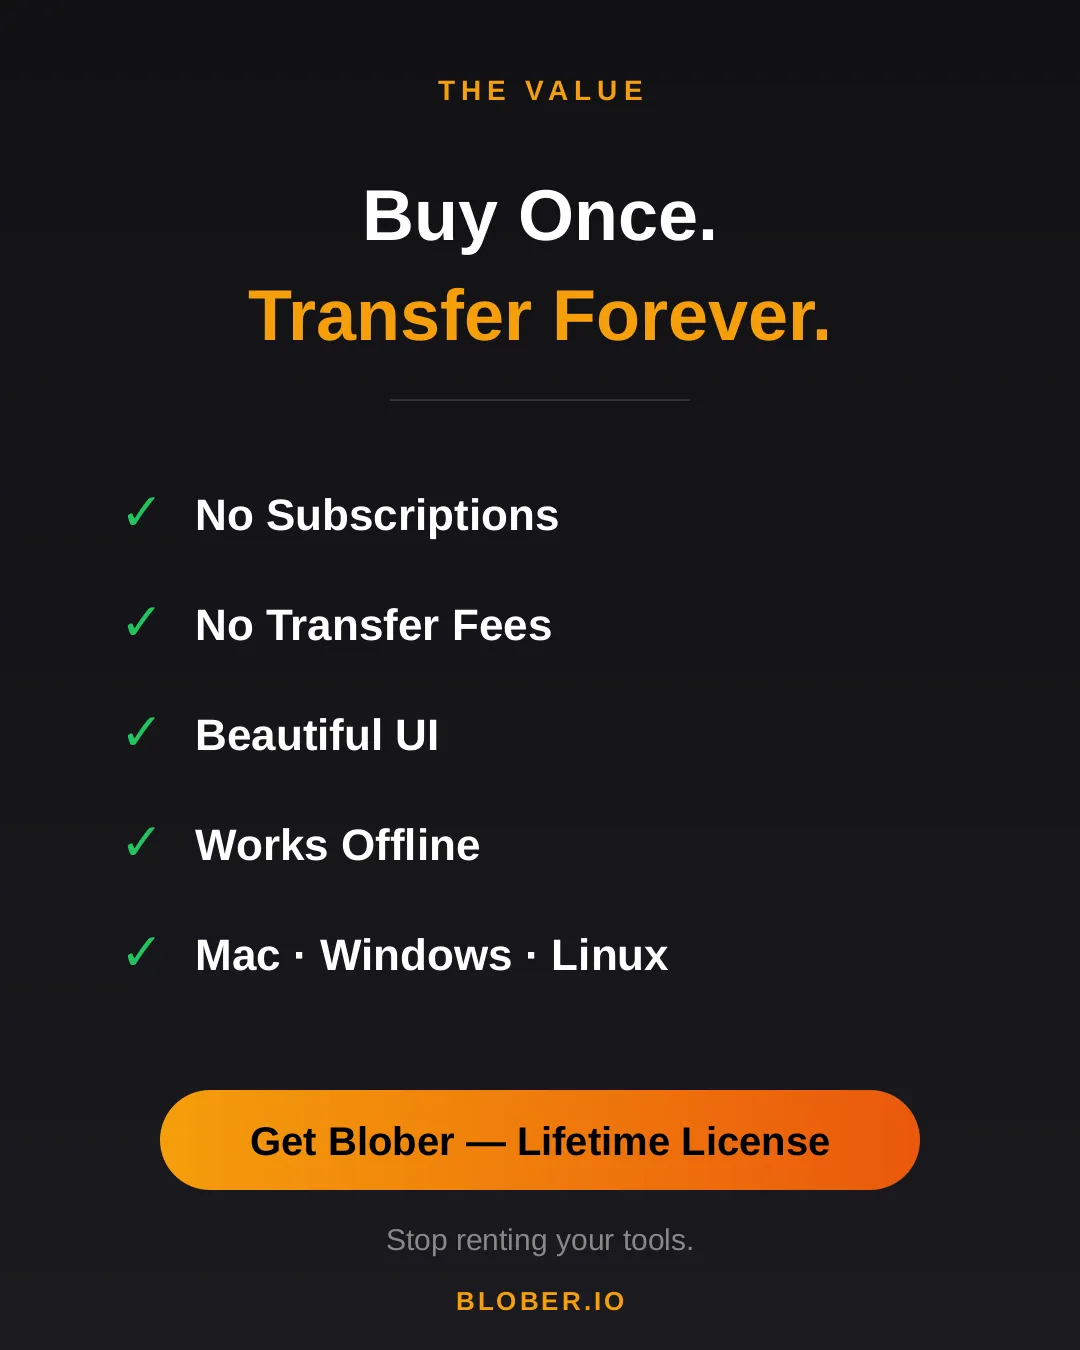
***
## Get Blober
[Section titled “Get Blober”](#get-blober)
Stop renting your tools. **[Download Blober →](https://blober.io)**
# Why Photographers and Videographers Choose Blober
> Large files, multiple storage providers, GoPro footage, and metadata-driven organization - how Blober fits into creative workflows.
### The Creative Storage Problem
[Section titled “The Creative Storage Problem”](#the-creative-storage-problem)
Photographers and videographers generate enormous volumes of data. A single shoot can produce hundreds of gigabytes of RAW photos and 4K/5.3K video files. Over months and years, that adds up to terabytes of irreplaceable media scattered across local drives, cloud providers, and camera-specific platforms.
The challenges are consistent:
* **Files are large** - 4K video clips are often 1–5 GB each. 5.3K GoPro footage is even larger.
* **Storage is fragmented** - footage lives on local SSDs, NAS devices, Google Drive, GoPro Cloud, and various object storage providers
* **Organization is painful** - manually sorting files into date/camera/project folders is tedious and error-prone
* **Backups are inconsistent** - some footage has 3 copies, some has 1, some has none
* **Cloud costs add up** - Google Drive, AWS S3, and iCloud storage bills grow every month
[**Blober**](https://blober.io/) is built to solve exactly these problems.
***
### How Blober Fits Into Creative Workflows
[Section titled “How Blober Fits Into Creative Workflows”](#how-blober-fits-into-creative-workflows)
#### 1. Consolidate Scattered Storage
[Section titled “1. Consolidate Scattered Storage”](#1-consolidate-scattered-storage)
Most creators have files spread across multiple providers - intentionally or not. Blober connects to all of them in one interface:
| Provider | Use Case |
| --------------- | ----------------------------------- |
| GoPro Cloud | Action camera footage auto-uploaded |
| Google Drive | Client deliverables and sharing |
| Local NAS / SSD | Primary working storage |
| Backblaze B2 | Long-term archive (cheap, reliable) |
| Wasabi | Hot archive (no egress fees) |
| AWS S3 | Production infrastructure |
| Cloudflare R2 | CDN-adjacent delivery |
Instead of logging into 4 different dashboards and downloading/uploading manually, Blober lets you build workflows that move files between any of these in a single operation.
#### 2. GoPro Cloud Backup (Blober Exclusive)
[Section titled “2. GoPro Cloud Backup (Blober Exclusive)”](#2-gopro-cloud-backup-blober-exclusive)
If you shoot with GoPro cameras, you likely have footage auto-uploaded to GoPro Cloud. The problem: GoPro’s web portal only allows batch downloads of 25 files at a time (as ZIPs that frequently fail), and no third-party tool supports GoPro Cloud as a transfer source.
[**Blober**](https://blober.io/) is the **only tool** that connects to GoPro Cloud. You can:
* Download all GoPro footage to local storage
* Transfer directly to Backblaze B2 or Wasabi for long-term archival
* Organize files by camera model, date, and resolution automatically
No other tool - not rclone, not MultCloud, not Flexify - supports GoPro Cloud.
#### 3. Metadata-Driven Organization
[Section titled “3. Metadata-Driven Organization”](#3-metadata-driven-organization)
Blober’s path templating system uses file metadata to automatically organize transfers. Instead of dumping files into flat folders, you define a template:
```plaintext
/{camera_model}/{capture_date}/{filename}
```
And Blober organizes the output:
```plaintext
/HERO13 Black/2026-01-23/GX015742.MP4
/Sony A7IV/2026-01-20/DSC09845.ARW
/DJI Mini 4/2026-01-18/DJI_0042.MP4
```
This works across all providers - GoPro Cloud to local, Google Drive to B2, or any combination. Months of manual folder sorting, automated in one workflow.
#### 4. Repeatable Workflows
[Section titled “4. Repeatable Workflows”](#4-repeatable-workflows)
Creative work is cyclical. Shoots happen regularly, and the post-shoot workflow is always the same: ingest → organize → edit → archive → backup.
Blober saves each transfer as a durable workflow:
* **One-click re-execution** - run the same ingest pattern after every shoot
* **Resumable transfers** - if a 500 GB transfer drops at 80%, pick up where it stopped
* **Task history** - see exactly what was transferred, when, and whether it succeeded
* **No scripting** - no cron jobs, no bash scripts, no forgotten flags
#### 5. Cost-Optimized Archival
[Section titled “5. Cost-Optimized Archival”](#5-cost-optimized-archival)
For long-term storage, the hyperscalers (AWS, Azure, GCS) are expensive. Creative professionals are increasingly moving to budget-friendly alternatives:
| Provider | Storage Cost | Egress | Why Creators Choose It |
| ------------- | -------------- | --------------- | ----------------------------------- |
| Backblaze B2 | $6/TB/month | Free (up to 3x) | Cheapest reliable archive |
| Wasabi | $6.99/TB/month | Free | No egress fees, predictable billing |
| Cloudflare R2 | $15/TB/month | Free | Zero egress, great for delivery |
[**Blober**](https://blober.io/) supports all of these, making it trivial to set up an archive workflow: shoot → ingest to local NAS → archive to Backblaze B2 → done. One-time license, no per-GB fees.
***
### Real-World Scenarios
[Section titled “Real-World Scenarios”](#real-world-scenarios)
#### Wedding Photographer
[Section titled “Wedding Photographer”](#wedding-photographer)
After each wedding: 80 GB of RAW photos + 40 GB of video. Create a Blober workflow that copies everything from your SSD to Backblaze B2, organized by date and event name. Run it after every wedding with one click.
#### YouTube Creator
[Section titled “YouTube Creator”](#youtube-creator)
Finished projects sit on Google Drive eating into your 2 TB plan. Use Blober to move completed projects to Wasabi for long-term storage at a fraction of the cost, freeing up Google Drive space for active work.
#### GoPro Adventure Creator
[Section titled “GoPro Adventure Creator”](#gopro-adventure-creator)
Years of GoPro footage sitting in GoPro Cloud with no easy way out. Use Blober to download everything to a local NAS, organized by camera and date. Cancel GoPro Plus knowing your footage is safe.
#### Drone Operator
[Section titled “Drone Operator”](#drone-operator)
100+ GB per flight day across DJI footage on local cards and backup copies on Google Drive. Use Blober to standardize your archive: everything goes to Backblaze B2, organized by date and location, with a local NAS mirror.
***
### Why Not rclone?
[Section titled “Why Not rclone?”](#why-not-rclone)
rclone is free and powerful, but it requires terminal expertise. For each new storage provider, you configure a remote. For each workflow, you write a command with precise flags. There’s no visual interface, no persistent workflows, and no GoPro support.
If you’re a software engineer, rclone might work. If you’re a photographer who wants to focus on photography, [**Blober**](https://blober.io/) is what you need.
***
### Get Started
[Section titled “Get Started”](#get-started)
[**Blober**](https://blober.io/) is available for Windows, macOS, and Linux. One-time license, currently at discounted beta pricing. No subscriptions. No per-GB fees. No data caps.
Connect your providers, build your workflows, and take control of your media archive.
[Get Blober →](https://blober.io/)
# Your Files, Your Machine, No Middleman: Why Local-First Transfers Matter
> SaaS transfer tools route your files through their servers. Blober doesn't. Learn why local-first cloud file transfers are faster, safer, and cheaper.
## The Risk You’re Not Thinking About
[Section titled “The Risk You’re Not Thinking About”](#the-risk-youre-not-thinking-about)
Every time you use a SaaS cloud transfer tool (MultCloud, Flexify, or any browser-based service), your files pass through someone else’s servers. Your vacation photos, your client deliverables, your financial backups: all routed through infrastructure you don’t control, operated by companies you’ve never audited.
Most people don’t think about this. They click “transfer,” see a progress bar, and assume their files went from A to B. In reality, the path is A to middleman to B. That middleman sees your filenames, your folder structure, and in many cases, the file contents themselves.
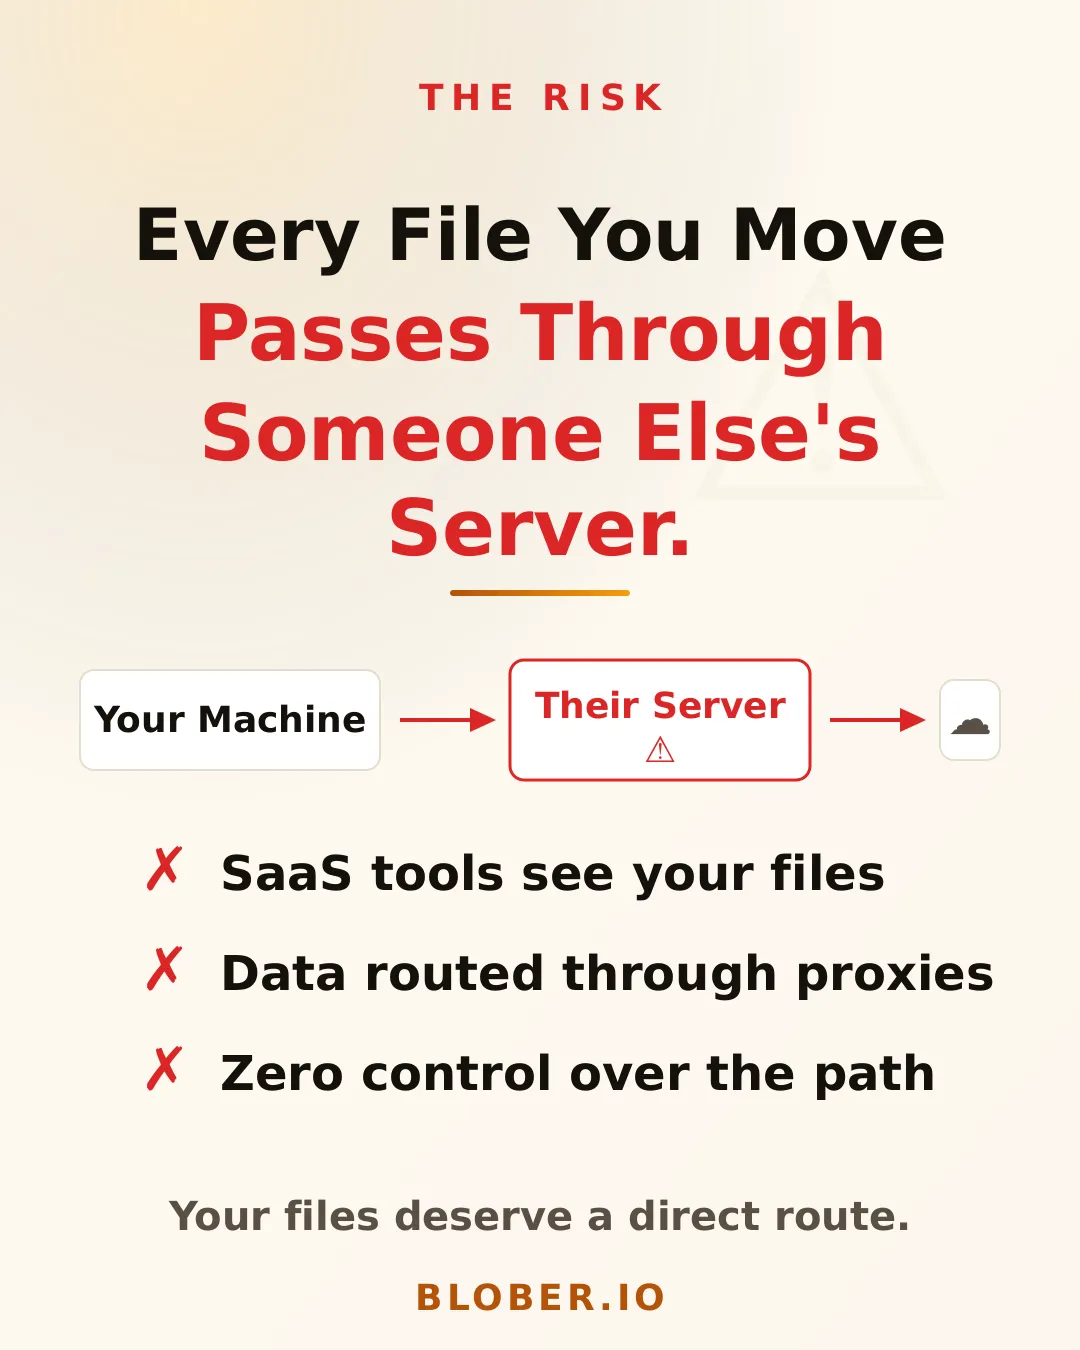
***
## How Blober Is Different
[Section titled “How Blober Is Different”](#how-blober-is-different)
Blober is a desktop app. It runs on your machine (Mac, Windows, or Linux) and talks directly to your cloud provider’s API. When you transfer files from AWS S3 to Backblaze B2, the data flows from your machine to the provider endpoint. No relay. No proxy. No middleman.
This isn’t just a privacy feature. It’s a fundamentally different architecture:
* **SaaS tools:** Your Machine > Their Server > Cloud Provider
* **Blober:** Your Machine > Cloud Provider (direct)
Your credentials never leave your device. Your files never touch a server you didn’t choose. And because there’s no middleman bandwidth to pay for, there are no per-GB transfer charges from the tool itself. You only pay what your cloud provider charges.
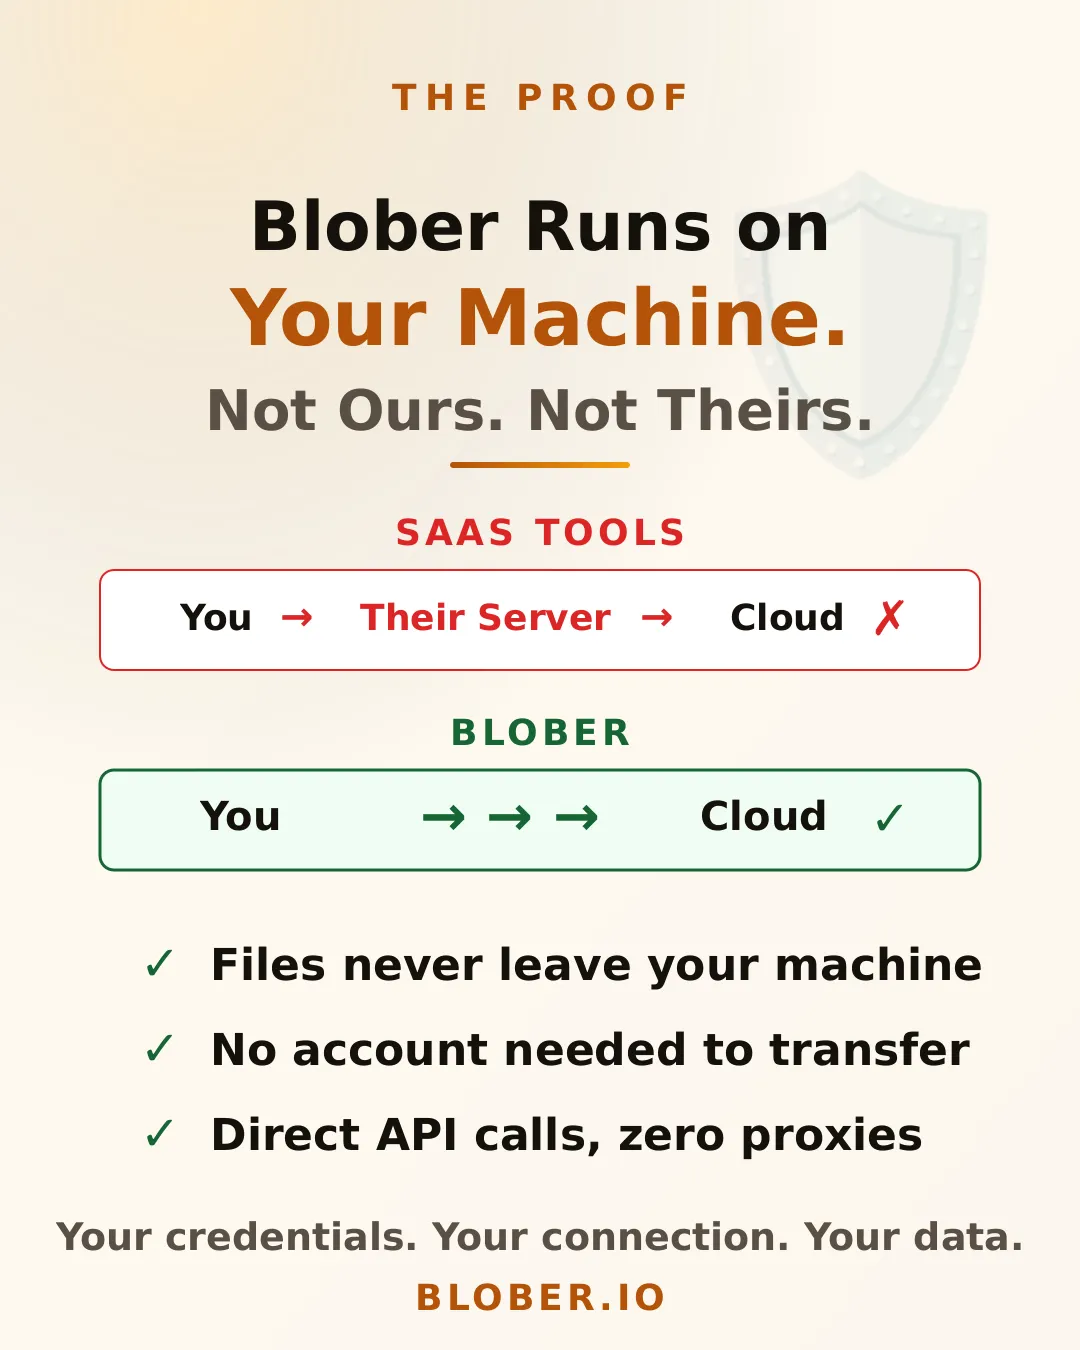
***
## Take Back Control
[Section titled “Take Back Control”](#take-back-control)
Blober connects to 10 providers (AWS S3, Azure Blob Storage, Backblaze B2, Cloudflare R2, DigitalOcean Spaces, Dropbox, Google Drive, GoPro Cloud, Local Disk, and Wasabi), all from a single app with a visual file browser.
No subscriptions. No per-transfer fees. One purchase, lifetime access. And every byte stays between you and your cloud provider.
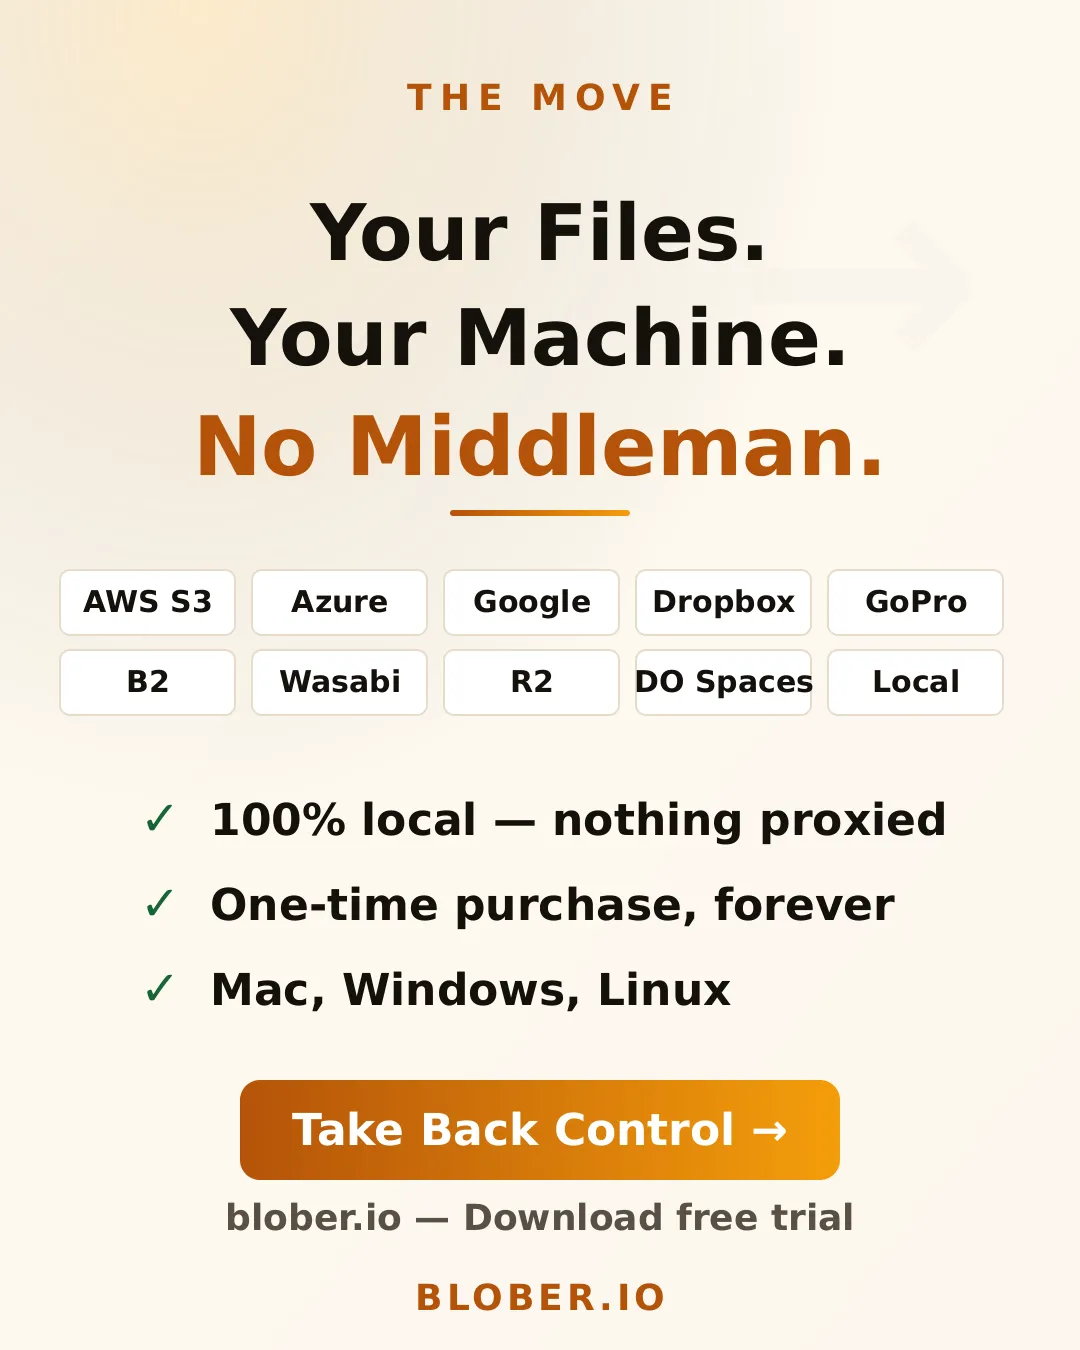
***
## Who Is This For?
[Section titled “Who Is This For?”](#who-is-this-for)
* **Privacy-conscious users** who don’t want their files routed through third-party servers
* **Photographers and videographers** transferring large media libraries between providers
* **Small businesses** that need to move data without compliance headaches
* **Anyone leaving a cloud provider** who wants a clean, direct migration path
* **GoPro users** who want their footage somewhere they actually control
***
## Get Blober
[Section titled “Get Blober”](#get-blober)
Your files. Your machine. No middleman. **[Download Blober](https://blober.io)**
# Blober Documentation
> Your guide to using Blober effectively
# Desktop App
> Use the Blober desktop app to transfer files between storage providers locally.
The Blober desktop app is the fastest way to transfer files between storage providers. All transfers run locally on your machine - your files never pass through Blober’s servers.
## Key Features
[Section titled “Key Features”](#key-features)
* **Local Processing** - Transfers run directly on your machine
* **Multiple Providers** - Connect AWS S3, Azure Blob, Google Drive, and more
* **Workflow Automation** - Create reusable transfer configurations
* **Progress Tracking** - Monitor, pause, resume, or cancel transfers
* **Path Templates** - Organize files dynamically based on dates, filenames, and metadata
# Home Page
> View and manage connected storage providers in Blober.
The Home page shows all available storage providers and their connection status. Use this page to verify which providers are ready to use.
### Which providers can connect?
[Section titled “Which providers can connect?”](#which-providers-can-connect)
Not all source-destination combinations are supported. The valid destinations depend on your chosen source:
* **Local => Cloud** - Upload files to any cloud provider
* **Cloud => Local** - Download files to your machine
* **Cloud => Cloud** - Transfer between cloud providers (files route through your machine)
### Provider credentials
[Section titled “Provider credentials”](#provider-credentials)
* Credentials are stored in the local database
* They’re used automatically when you create workflows
* OAuth providers (Google) require browser authorization
# Progress & Tasks
> Start workflows, monitor transfers, and control running tasks in Blober.
The Progress page is your control center for running transfers. Start workflows, monitor real-time progress, and manage running tasks.
## Understanding Tasks
[Section titled “Understanding Tasks”](#understanding-tasks)
When you start a workflow, Blober creates a **task**. A task is a single execution of a workflow that tracks:
* Which files need to be transferred
* Current progress (files and bytes)
* Status of each file
* Logs and error messages
### Workflow vs Task
[Section titled “Workflow vs Task”](#workflow-vs-task)
| Concept | Description | Persistence |
| ------------ | ------------------------------------------------- | ----------------------- |
| **Workflow** | Saved configuration (source, destination, action) | Permanent until deleted |
| **Task** | Single execution of a workflow | Kept for history |
You can run the same workflow multiple times, creating a new task each time.
## Starting a Workflow
[Section titled “Starting a Workflow”](#starting-a-workflow)
### From the Progress Page
[Section titled “From the Progress Page”](#from-the-progress-page)
1. Go to the **Progress** page
2. Find the workflow you want to run
3. Click **Start**
4. A new task is created and begins executing
### What Happens When You Start
[Section titled “What Happens When You Start”](#what-happens-when-you-start)
1. **Enumeration** - Blober lists all files matching your source criteria
2. **Filtering** - Filters are applied to include/exclude files
3. **Transfer** - Files are processed one by one
4. **Completion** - Task status changes to completed or failed
## Controlling Tasks
[Section titled “Controlling Tasks”](#controlling-tasks)
### Pause a Running Task
[Section titled “Pause a Running Task”](#pause-a-running-task)
1. Find the running task
2. Click **Pause**
3. The task pauses after the current file completes
4. State changes to **Paused**
**Why pause?**
* Free up bandwidth for other work
* Investigate an issue without losing progress
* Resume later when convenient
### Resume a Paused Task
[Section titled “Resume a Paused Task”](#resume-a-paused-task)
1. Find the paused task
2. Click **Resume**
3. Task continues from where it left off
4. State changes to **Running**
### Cancel a Task
[Section titled “Cancel a Task”](#cancel-a-task)
1. Find the task (running or paused)
2. Click **Cancel**
3. Task moves to **Stopping** state
4. After cleanup, state changes to **Cancelled**
**What happens to files?**
* Files already transferred remain at destination
* The current file may be partially transferred
* Source files are unchanged (unless Move action completed for some files)
## Progress Indicators
[Section titled “Progress Indicators”](#progress-indicators)
### Task Progress
[Section titled “Task Progress”](#task-progress)
Each task shows real-time progress:
| Metric | Description |
| ---------------- | -------------------------- |
| **Files** | `X / Y` files processed |
| **Size** | `X MB / Y MB` transferred |
| **Progress Bar** | Visual percentage complete |
### File-Level Progress
[Section titled “File-Level Progress”](#file-level-progress)
For large files, you may see:
* Current file being transferred
* Bytes transferred for current file
* Transfer speed
## Viewing Logs
[Section titled “Viewing Logs”](#viewing-logs)
Each task maintains a log of operations:
### Log Entries
[Section titled “Log Entries”](#log-entries)
| Entry Type | Description |
| ----------- | ------------------------------------------- |
| **Info** | Normal operations (file started, completed) |
| **Warning** | Non-fatal issues (retry, skip) |
| **Error** | Problems that caused failures |
## File States
[Section titled “File States”](#file-states)
Within a task, each file has its own status:
| Status | Description |
| -------------- | ------------------------------ |
| **Pending** | File queued for processing |
| **Processing** | Currently being transferred |
| **Processed** | Successfully transferred |
| **Failed** | Transfer failed for this file |
| **Retrying** | Attempting again after failure |
| **Paused** | Waiting for task to resume |
## Error Handling
[Section titled “Error Handling”](#error-handling)
### Automatic Retries
[Section titled “Automatic Retries”](#automatic-retries)
Blober automatically retries failed operations:
* Network timeouts
* Rate limiting (429 errors)
* Temporary API errors
### Common Errors
[Section titled “Common Errors”](#common-errors)
| Error | Cause | Solution |
| ------------------------- | ---------------------------- | ------------------------------ |
| **Authentication Failed** | Invalid credentials | Update credentials in workflow |
| **Permission Denied** | Insufficient access rights | Check provider permissions |
| **Not Found** | Source file no longer exists | Skip or re-run workflow |
| **Quota Exceeded** | Storage limit reached | Free up space or upgrade plan |
| **Network Error** | Connection issues | Check internet, retry |
### Partial Failures
[Section titled “Partial Failures”](#partial-failures)
If some files fail:
* Successfully transferred files remain at destination
* Failed files are logged with error messages
* You can create a new task to retry
## Task History
[Section titled “Task History”](#task-history)
Completed and cancelled tasks remain visible:
* Review what was transferred
* Check for errors
* Reference for troubleshooting
## Performance Tips
[Section titled “Performance Tips”](#performance-tips)
### Optimize Transfer Speed
[Section titled “Optimize Transfer Speed”](#optimize-transfer-speed)
1. **Use a wired connection** - More stable than WiFi
2. **Close other applications** - Free up bandwidth and CPU
3. **Transfer during off-peak hours** - Less network congestion
4. **Choose nearby regions** - For cloud providers, pick closest region
### Large Transfers
[Section titled “Large Transfers”](#large-transfers)
For transfers with thousands of files:
* Expect initial enumeration to take time
* Progress will be slow at first, then speed up
* Consider breaking into smaller batches
### Resumable Transfers
[Section titled “Resumable Transfers”](#resumable-transfers)
If a task is interrupted:
1. Don’t delete the task
2. Click **Resume** to continue
3. Blober skips already-transferred files
## Troubleshooting
[Section titled “Troubleshooting”](#troubleshooting)
### Task Stuck on “Pending”
[Section titled “Task Stuck on “Pending””](#task-stuck-on-pending)
* Check if another task is running
* Verify internet connection
* Restart the app if needed
### Transfer Very Slow
[Section titled “Transfer Very Slow”](#transfer-very-slow)
* Check your internet speed
* Verify provider isn’t rate-limiting
* Try smaller batch sizes
### Task Failed Immediately
[Section titled “Task Failed Immediately”](#task-failed-immediately)
* Check credentials in the workflow
* Verify source path exists
* Check destination has write access
### Files Missing at Destination
[Section titled “Files Missing at Destination”](#files-missing-at-destination)
* Verify path template is correct
* Check filters aren’t excluding files
* Look in subfolders (if using path templates)
# Workflows
> Create and manage workflows to automate file transfers in Blober.
Workflows are the core of Blober. A workflow defines **what** to transfer, **where** it goes, and **what action** to perform. Once created, you can run a workflow any time to execute the transfer.
## What is a Workflow?
[Section titled “What is a Workflow?”](#what-is-a-workflow)
A workflow is a saved configuration with three parts:
1. **Source** - Where files come from (provider + path + credentials)
2. **Destination** - Where files go (provider + path + credentials)
3. **Action** - What to do (copy, move, sync, or delete)
## Creating a Workflow
[Section titled “Creating a Workflow”](#creating-a-workflow)
### Step 1: Open the Workflow Modal
[Section titled “Step 1: Open the Workflow Modal”](#step-1-open-the-workflow-modal)
1. Go to the **Workflows** page
2. Click **New Workflow** button
3. The workflow creation modal opens
### Step 2: Configure the Source
[Section titled “Step 2: Configure the Source”](#step-2-configure-the-source)
1. **Select Provider** - Choose where files come from (e.g., Local, Google Drive, AWS S3)
2. **Enter Credentials** - Provide the required authentication (see [Storage Providers](/kb/docs/providers))
3. **Browse Location** - Click **Browse** to select files or folders
4. **Apply Filters** (optional) - Limit which files are included
#### Source Options
[Section titled “Source Options”](#source-options)
| Field | Description |
| ----------- | --------------------------------- |
| Provider | The storage provider to use |
| Credentials | Authentication for the provider |
| Path | Starting folder or specific files |
| Filters | Include/exclude patterns |
### Step 3: Configure the Destination
[Section titled “Step 3: Configure the Destination”](#step-3-configure-the-destination)
1. **Select Provider** - Choose where files will go
2. **Enter Credentials** - Authentication for destination
3. **Set Base Path** - The folder where files will be placed
4. **Path Template** (optional) - Dynamic path based on file metadata
#### Destination Options
[Section titled “Destination Options”](#destination-options)
| Field | Description |
| ------------- | --------------------------------- |
| Provider | The storage provider to use |
| Credentials | Authentication for the provider |
| Base Path | Root folder for transferred files |
| Path Template | Dynamic subfolder structure |
### Step 4: Choose an Action
[Section titled “Step 4: Choose an Action”](#step-4-choose-an-action)
| Action | Description | Source Files |
| ---------- | ----------------------------------- | ---------------------- |
| **Copy** | Copy files to destination | Unchanged |
| **Move** | Copy files, then delete from source | Deleted after transfer |
| **Sync** | Mirror source to destination | Unchanged |
| **Delete** | Remove files from source | Deleted |
### Step 5: Save the Workflow
[Section titled “Step 5: Save the Workflow”](#step-5-save-the-workflow)
1. Give the workflow a name
2. Click **Save**
3. The workflow appears in your list
## Path Templates
[Section titled “Path Templates”](#path-templates)
Path templates let you organize destination files dynamically based on file metadata. Use placeholders in curly braces `{variable}` that get replaced with actual values.
### Available Variables
[Section titled “Available Variables”](#available-variables)
| Variable | Description | Example |
| -------------------------- | -------------------------------- | --------------------- |
| `{current_date}` | Current date | `2025-10-25` |
| `{current_datetime}` | Current date and time | `2025-10-25_14-30-00` |
| `{file_created_date}` | File creation date | `2024-12-15` |
| `{file_created_datetime}` | File creation date/time | `2024-12-15_09-15-30` |
| `{file_modified_date}` | File modification date | `2025-01-20` |
| `{file_modified_datetime}` | File modification date/time | `2025-01-20_16-45-22` |
| `{file_accessed_date}` | Last accessed date | `2025-10-25` |
| `{file_accessed_datetime}` | Last accessed date/time | `2025-10-25_12-00-15` |
| `{filename}` | Complete filename with extension | `document.pdf` |
| `{filename_no_ext}` | Filename without extension | `document` |
| `{file_ext}` | File extension (no dot) | `pdf` |
| `{file_size}` | File size in bytes | `1048576` |
| `{file_size_mb}` | File size in MB | `1.50` |
| `{file_dir}` | Immediate parent directory | `uploads` |
### Path Template Examples
[Section titled “Path Template Examples”](#path-template-examples)
#### Organize by Date
[Section titled “Organize by Date”](#organize-by-date)
```plaintext
photos/{file_created_date}/{filename}
```
**Result:** `photos/2024-12-15/IMG_0001.jpg`
#### Organize by Year and Month
[Section titled “Organize by Year and Month”](#organize-by-year-and-month)
```plaintext
backup/{file_modified_date}/{filename}
```
**Result:** `backup/2025-01-20/report.pdf`
#### Organize by File Type
[Section titled “Organize by File Type”](#organize-by-file-type)
```plaintext
documents/{file_ext}/{filename}
```
**Result:** `documents/pdf/invoice.pdf`
#### Archive with Timestamp
[Section titled “Archive with Timestamp”](#archive-with-timestamp)
```plaintext
archive/{current_date}/{file_dir}/{filename}
```
**Result:** `archive/2025-10-25/uploads/data.csv`
## Source Filters
[Section titled “Source Filters”](#source-filters)
Filters let you include or exclude specific files from the transfer.
### Filter Patterns
[Section titled “Filter Patterns”](#filter-patterns)
| Pattern | Matches |
| ----------------- | ----------------------------- |
| `*.jpg` | All JPEG files |
| `*.{jpg,png,gif}` | All image files |
| `report-*` | Files starting with “report-” |
| `!*.tmp` | Exclude temporary files |
| `documents/**` | All files in documents folder |
### Example Filter Configuration
[Section titled “Example Filter Configuration”](#example-filter-configuration)
**Include only images:**
```plaintext
*.jpg
*.png
*.gif
*.webp
```
**Exclude temporary and system files:**
```plaintext
!*.tmp
!*.log
!.DS_Store
!Thumbs.db
```
## Managing Workflows
[Section titled “Managing Workflows”](#managing-workflows)
### View Workflows
[Section titled “View Workflows”](#view-workflows)
The Workflows page shows all saved workflows in a list with:
* Workflow name
* Source provider and path
* Destination provider and path
* Action type
* Last run time
### Edit a Workflow
[Section titled “Edit a Workflow”](#edit-a-workflow)
1. Click on a workflow in the list
2. Modify any settings in the modal
3. Click **Save**
### Delete a Workflow
[Section titled “Delete a Workflow”](#delete-a-workflow)
1. Click the delete icon on a workflow
2. Confirm deletion
> **Note:** Deleting a workflow does not delete any transferred files. It only removes the saved configuration.
## Workflow Examples
[Section titled “Workflow Examples”](#workflow-examples)
### Backup Documents to S3
[Section titled “Backup Documents to S3”](#backup-documents-to-s3)
| Setting | Value |
| ------------- | ------------------------------------- |
| Source | Local: `/Users/you/Documents` |
| Destination | AWS S3: `my-backup-bucket/documents/` |
| Action | Copy |
| Path Template | `{file_modified_date}/{filename}` |
### Archive Photos by Date
[Section titled “Archive Photos by Date”](#archive-photos-by-date)
| Setting | Value |
| ------------- | -------------------------------- |
| Source | Local: `/Users/you/Pictures` |
| Destination | Azure Blob: `photos-archive/` |
| Action | Move |
| Path Template | `{file_created_date}/{filename}` |
| Filters | `*.jpg, *.png, *.heic` |
### Sync Google Drive to Local
[Section titled “Sync Google Drive to Local”](#sync-google-drive-to-local)
| Setting | Value |
| ----------- | --------------------------------- |
| Source | Google Drive: `My Files/Projects` |
| Destination | Local: `/Users/you/Projects` |
| Action | Sync |
## Tips
[Section titled “Tips”](#tips)
### Preview Before Running
[Section titled “Preview Before Running”](#preview-before-running)
Before starting a workflow, use the **Preview** feature to see which files will be transferred and where they’ll go.
### Test with a Small Folder
[Section titled “Test with a Small Folder”](#test-with-a-small-folder)
Start with a small folder to verify your path templates and filters work as expected.
### Use Copy Before Move
[Section titled “Use Copy Before Move”](#use-copy-before-move)
If you’re unsure, use **Copy** first. Once you’ve verified the transfer, you can use **Move** to remove source files.
### Credential Storage
[Section titled “Credential Storage”](#credential-storage)
Credentials are saved with the workflow and stored securely in your local database. You won’t need to re-enter them each time.
# Introduction to Blober
> Learn about Blober and what it can do for you
Blober is a file management application designed to simplify working with multiple cloud storage providers. Transfer files between AWS S3, Azure Blob, Google Drive, and more-all from a single interface.
## What is Blober?
[Section titled “What is Blober?”](#what-is-blober)
Blober provides a unified interface for managing files across different storage providers. Instead of logging into multiple websites or using different apps for each service, Blober brings everything together.
[Play](https://youtube.com/watch?v=NTqqf4sKbpk)
**Key capabilities:**
* Transfer files between any combination of providers
* Automate recurring transfers with saved workflows
* Organize files dynamically with path templates
* Monitor progress and control running transfers
## How It Works
[Section titled “How It Works”](#how-it-works)
1. **Create a Workflow** - Choose a source, destination, and action
2. **Start the Transfer** - Run the workflow to create a task
3. **Monitor Progress** - Watch files transfer in real-time
4. **Control Execution** - Pause, resume, or cancel as needed
All transfers run locally on your machine. Your files never pass through Blober’s servers.
## Supported Providers
[Section titled “Supported Providers”](#supported-providers)
See [Storage Providers](/kb/docs/providers) for the complete list.
## Desktop App
[Section titled “Desktop App”](#desktop-app)
The Blober desktop app is available for:
* [**Windows**](https://blober.io/) - Windows 10+
* [**macOS**](https://blober.io/) - macOS 10.15+
* [**Linux**](https://blober.io/) - Ubuntu 20.04+ and equivalents
The desktop app runs transfers locally, stores credentials securely on your machine, and provides a full-featured interface for managing workflows.
## Next Steps
[Section titled “Next Steps”](#next-steps)
Ready to get started?
1. [Install Blober](/kb/docs/getting-started/installation) - Download and install the desktop app
2. [Quick Start Guide](/kb/docs/getting-started/quick-start) - Create your first workflow in 5 minutes
3. [Storage Providers](/kb/docs/providers) - Set up your preferred cloud services
# Concepts
> Core concepts for understanding Blober's architecture.
This section explains the core concepts behind Blober’s design. Understanding these will help you use the app effectively.
## Workflows
[Section titled “Workflows”](#workflows)
A **workflow** is a saved configuration that defines:
1. **Source** - Where files come from (provider + path + credentials)
2. **Destination** - Where files go (provider + path + credentials)
3. **Action** - What to do (copy, move, sync, delete)
Workflows are templates that can be run multiple times. Each run creates a task.
See [Workflows Guide](/kb/docs/desktop-app/workflows) for details.
## Tasks
[Section titled “Tasks”](#tasks)
A **task** is a single execution of a workflow. When you start a workflow, Blober creates a task that:
* Enumerates files matching the source criteria
* Processes each file according to the action
* Tracks progress (files, bytes, status)
* Logs operations and errors
Tasks have states: pending, running, paused, completed, failed, cancelled.
See [Progress Guide](/kb/docs/desktop-app/progress) for details.
## Actions
[Section titled “Actions”](#actions)
An **action** defines what happens to source files:
| Action | Description | Source Files After |
| ---------- | ------------------------------ | ------------------ |
| **Copy** | Duplicate files to destination | Unchanged |
| **Move** | Transfer files to destination | Deleted |
| **Sync** | Mirror source to destination | Unchanged |
| **Delete** | Remove files from source | Deleted |
## Path Templates
[Section titled “Path Templates”](#path-templates)
**Path templates** let you organize destination files dynamically using placeholders:
```plaintext
{file_created_date}/{filename}
```
This creates a date-based folder structure automatically.
Available variables include:
* `{filename}`, `{filename_no_ext}`, `{file_ext}`
* `{file_created_date}`, `{file_modified_date}`
* `{current_date}`, `{current_datetime}`
* `{file_size}`, `{file_size_mb}`
* `{file_dir}`
See [Workflows Guide](/kb/docs/desktop-app/workflows#path-templates) for the full list.
## Source Filters
[Section titled “Source Filters”](#source-filters)
**Filters** control which files are included in a transfer:
* **Include patterns:** `*.jpg`, `*.{png,gif}`
* **Exclude patterns:** `!*.tmp`, `!.DS_Store`
* **Folder patterns:** `documents/**`
Filters use glob syntax for flexible matching.
## Credentials
[Section titled “Credentials”](#credentials)
Each provider requires **credentials** to authenticate with the service:
* **API Keys:** AWS, Wasabi, Backblaze (key ID + secret)
* **Connection Strings:** Azure Blob
* **OAuth:** Google Drive, Google Photos (browser authorization)
Credentials are stored securely in your local database and never sent to Blober’s servers.
# Installation
> How to install and set up Blober
## Desktop App
[Section titled “Desktop App”](#desktop-app)
### Download
[Section titled “Download”](#download)
Download the latest version for your platform:
* [Windows Installer (.exe)](https://blober.io/)
* [macOS (.dmg)](https://blober.io/)
* [Linux (.AppImage)](https://blober.io/)
### Windows Installation
[Section titled “Windows Installation”](#windows-installation)
1. Download the `.exe` installer
2. Run the installer
3. Follow the installation wizard
4. Launch Blober from the Start Menu
⚠️ Windows SmartScreen may block the installer. When prompted, click **“More info”**, then click **“Run anyway”** to proceed with the installation. This is only needed once.
> **🔒 Your PC stays secure.** Clicking “Run anyway” only allows the Blober installer to run - it does not change your system security settings or make your computer vulnerable in any way. Future updates will include code signing and will not trigger this warning.
### macOS Installation
[Section titled “macOS Installation”](#macos-installation)
⚠️ App not yet Notarized!
1. Download the `.dmg` file
2. Open the DMG and drag Blober to Applications
3. Launch Blober from Applications folder
4. If prompted about unidentified developer, go to System Preferences > Security & Privacy and click “Open Anyway”
Alternatively, after installing to `/Applications/`, open Terminal and run the following three commands to bypass macOS Gatekeeper:
* `xattr -cr /Applications/blober.app`
* `codesign --force --deep --sign - /Applications/blober.app`
* `chmod +x /Applications/blober.app`
> **🔒 Your Mac stays secure.** These commands only create an exception for the Blober app - they do not change your system security settings or make your computer vulnerable in any way. Future updates will include Apple notarization and will not require these steps.
### Linux Installation
[Section titled “Linux Installation”](#linux-installation)
1. Download the `.deb` or `.rpm` package for your distribution
2. Install the package using your package manager, e.g.:
* For Debian/Ubuntu: `sudo dpkg -i blober-x.y.z.deb`
* For Fedora/CentOS: `sudo rpm -i blober-x.y.z.rpm`
3. Launch Blober from your application menu or run `blober` in terminal
# Quick Start Guide
> Get started with Blober in 5 minutes
[Play](https://youtube.com/watch?v=mFrAd4pwSVs)
This guide will help you create your first workflow and transfer files between storage providers.
## Prerequisites
[Section titled “Prerequisites”](#prerequisites)
* [Blober Desktop App](/kb/docs/getting-started/installation) installed
* Credentials for at least one storage provider (see [Storage Providers](/kb/docs/providers))
## Step 1: Create a Workflow
[Section titled “Step 1: Create a Workflow”](#step-1-create-a-workflow)
Workflows define what to transfer and where. Let’s create one:
1. Open the Blober desktop app
2. Go to the **Workflows** page
3. Click **New Workflow**
### Configure Source
[Section titled “Configure Source”](#configure-source)
4. **Select a Source Provider** (e.g., Local, Google Drive, AWS S3)
5. **Enter Credentials** if required (the first time you use a provider)
6. **Browse** to select the folder or files you want to transfer
### Configure Destination
[Section titled “Configure Destination”](#configure-destination)
7. **Select a Destination Provider** (e.g., AWS S3, Azure Blob)
8. **Enter Credentials** for the destination
9. **Set the Destination Path** - the folder where files will go
10. *(Optional)* **Add a Path Template** to organize files dynamically
### Choose an Action
[Section titled “Choose an Action”](#choose-an-action)
11. Select what to do with the files:
* **Copy** - Duplicate files to destination (source unchanged)
* **Move** - Transfer files and remove from source
* **Delete** - Remove files from source
12. Click **Save** to create the workflow
## Step 2: Start the Transfer
[Section titled “Step 2: Start the Transfer”](#step-2-start-the-transfer)
1. Go to the **Workflows** page
2. Find your workflow in the list
3. Click the **Play** icon at the top right of the workflow card
4. Watch the transfer progress in real-time on the **Progress** page
## Step 3: Monitor Progress
[Section titled “Step 3: Monitor Progress”](#step-3-monitor-progress)
While the transfer runs, you can:
* **View progress** - Files transferred, bytes, percentage
* **Read logs** - See what’s happening with each file
* **Pause** - Temporarily stop the transfer
* **Resume** - Continue from where you left off
* **Cancel** - Stop the transfer entirely
## Example: Backup Documents to S3
[Section titled “Example: Backup Documents to S3”](#example-backup-documents-to-s3)
Here’s a complete example backing up local documents to AWS S3:
| Setting | Value |
| ------------------------ | --------------------------------- |
| **Source Provider** | Local |
| **Source Path** | `/Users/you/Documents` |
| **Destination Provider** | AWS S3 |
| **Destination Path** | `my-backup-bucket/documents/` |
| **Path Template** | `{file_modified_date}/{filename}` |
| **Action** | Copy |
**Result:** Files are organized by date in S3:
```plaintext
my-backup-bucket/documents/2025-01-04/report.pdf
my-backup-bucket/documents/2025-01-03/notes.txt
```
# Storage Providers
> Configure and use storage providers with Blober
Blober connects to multiple storage providers through its **provider** system. Each provider handles authentication, file operations, and service-specific features.
## Available Providers
[Section titled “Available Providers”](#available-providers)
| Provider | Status |
| ------------------------------------------------------------- | -------------- |
| [Local Filesystem](/kb/docs/providers/local) | ✅ Available |
| [Amazon S3](/kb/docs/providers/aws-s3) | ✅ Available |
| [Azure Blob Storage](/kb/docs/providers/azure-blob) | ✅ Available |
| [Wasabi](/kb/docs/providers/wasabi) | ✅ Available |
| [Backblaze B2](/kb/docs/providers/backblaze-b2) | ✅ Available |
| [Cloudflare R2](/kb/docs/providers/cloudflare-r2) | ✅ Available |
| [Google Drive](/kb/docs/providers/google-drive) | ✅ Available |
| [DigitalOcean Spaces](/kb/docs/providers/digitalocean-spaces) | ✅ Available |
| [GoPro Plus Cloud](/kb/docs/providers/gopro) | ✅ Available |
| [Dropbox](/kb/docs/providers/dropbox) | ✅ Available |
| Google Photos | 🚧 Coming Soon |
| OneDrive | 🚧 Coming Soon |
| Box | 🚧 Coming Soon |
| pCloud | 🚧 Coming Soon |
| iCloud Drive | 🚧 Coming Soon |
| YouTube | 🚧 Coming Soon |
| Frame.io | 🚧 Coming Soon |
| Google Cloud Storage | 🚧 Coming Soon |
| Adobe Creative Cloud | 🚧 Coming Soon |
## Tips for Choosing Providers:
[Section titled “Tips for Choosing Providers:”](#tips-for-choosing-providers)
### For Cloud Backup
[Section titled “For Cloud Backup”](#for-cloud-backup)
* **AWS S3** - Industry standard, most compatible, pay-per-use
* **Wasabi** - Flat-rate pricing, no egress fees
* **Backblaze B2** - Lowest cost per GB
### For Media Storage
[Section titled “For Media Storage”](#for-media-storage)
* **Azure Blob** - Excellent tier system (Hot/Cool/Archive)
* **Cloudflare R2** - Zero egress fees, global edge network
### For Collaboration
[Section titled “For Collaboration”](#for-collaboration)
* **Google Drive** - Integrates with Google Workspace
* **Dropbox** - Simple sharing, cross-platform sync
* **Local** - Keep files on your machine
### For Camera Import
[Section titled “For Camera Import”](#for-camera-import)
* **GoPro** - Direct import from GoPro cloud
* **Local** - Import from SD cards and connected cameras
Terms Compliance
Your use of any storage provider through Blober is subject to that provider’s terms of service. Some integrations (such as GoPro Plus) rely on unofficial APIs and may break without notice. Blober makes no guarantees about third-party service availability. See our [Terms of Service](/kb/docs/terms-and-privacy/terms-of-service/) for full details.
# Amazon S3
Amazon Simple Storage Service (S3) is a highly scalable object storage service and one of the most popular cloud storage solutions. In Blober, S3 paths use this format:
```plaintext
bucket-name/path/to/file.ext
```
## Capabilities
[Section titled “Capabilities”](#capabilities)
* ✅ Browse buckets and objects
* ✅ Upload files (multipart for large files)
* ✅ Download files
* ✅ Delete objects
* ✅ Copy/move within S3 and across providers
* ✅ Storage class selection
## Prerequisites
[Section titled “Prerequisites”](#prerequisites)
* An AWS account ([create one](https://aws.amazon.com/free/))
* An S3 bucket (or permission to list buckets)
* IAM user or role with S3 permissions
* Access key ID and secret access key
## Required Credentials
[Section titled “Required Credentials”](#required-credentials)
[]()
### Access Key ID
[Section titled “Access Key ID”](#access-key-id)
* **Option key:** `accessKeyId`
* **Format:** 20 uppercase alphanumeric characters
* **Example:** `AKIAIOSFODNN7EXAMPLE`
[]()
### Secret Access Key
[Section titled “Secret Access Key”](#secret-access-key)
* **Option key:** `secretAccessKey`
* **Format:** 40 characters
* **Example:** `wJalrXUtnFEMI/K7MDENG/bPxRfiCYEXAMPLEKEY`
## Optional Settings
[Section titled “Optional Settings”](#optional-settings)
[]()
### Storage Class
[Section titled “Storage Class”](#storage-class)
* **Option key:** `storageClass`
* **Default:** `STANDARD`
| Storage Class | Use Case | Retrieval |
| --------------------- | ---------------------------------- | ---------------- |
| `STANDARD` | Frequently accessed data | Immediate |
| `INTELLIGENT_TIERING` | Unknown/changing access patterns | Immediate |
| `STANDARD_IA` | Infrequent access, rapid retrieval | Immediate |
| `ONEZONE_IA` | Infrequent, non-critical data | Immediate |
| `GLACIER_IR` | Archive with instant retrieval | Immediate |
| `GLACIER` | Long-term archive | Minutes to hours |
| `DEEP_ARCHIVE` | Lowest cost archive | 12-48 hours |
## Setup (AWS Console)
[Section titled “Setup (AWS Console)”](#setup-aws-console)
### 1. Create an S3 Bucket
[Section titled “1. Create an S3 Bucket”](#1-create-an-s3-bucket)
1. Go to [S3 Console](https://console.aws.amazon.com/s3/)
2. Click **“Create bucket”**
3. Enter a bucket name (must be globally unique)
4. Choose your preferred AWS Region
5. Configure settings as needed
6. Click **“Create bucket”**
### 2. Create an IAM User
[Section titled “2. Create an IAM User”](#2-create-an-iam-user)
1. Go to [IAM Console](https://console.aws.amazon.com/iam/)
2. Click **Users** => **Create user**
3. Enter a username (e.g., `blober-s3-user`)
4. Click **Next**
5. Select **Attach policies directly**
6. For quick setup: Attach `AmazonS3FullAccess`
* For production: Create a custom policy (see below)
7. Click through to **Create user**
### 3. Generate Access Keys
[Section titled “3. Generate Access Keys”](#3-generate-access-keys)
1. Click on your new user
2. Go to **Security credentials** tab
3. Under **Access keys**, click **Create access key**
4. Select **Application running outside AWS**
5. **Save the Access Key ID and Secret Access Key** (shown only once!)
### 4. Configure in Blober
[Section titled “4. Configure in Blober”](#4-configure-in-blober)
1. In Blober, go to **Workflows** => **New Workflow**
2. Select **Amazon S3** as source or destination
3. Enter your Access Key ID and Secret Access Key
4. Test by browsing your buckets
## Troubleshooting
[Section titled “Troubleshooting”](#troubleshooting)
### ”Access Denied” or “403 Forbidden”
[Section titled “”Access Denied” or “403 Forbidden””](#access-denied-or-403-forbidden)
* Double-check your Access Key ID and Secret Access Key
* Verify the IAM user has the correct S3 permissions
* Ensure the bucket policy doesn’t block your IAM user
### Buckets not showing up
[Section titled “Buckets not showing up”](#buckets-not-showing-up)
* Your IAM user needs `s3:ListAllMyBuckets` permission
* If using a restricted policy, add `ListBucket` for specific buckets
### Slow transfers
[Section titled “Slow transfers”](#slow-transfers)
* Choose an S3 region geographically close to you
* Large files are automatically uploaded in parts for reliability
* Check your network speed - S3 performance depends on your connection
## Best Practices
[Section titled “Best Practices”](#best-practices)
### Security
[Section titled “Security”](#security)
* Create a dedicated IAM user for Blober - avoid using root credentials
* Use the **minimum permissions** needed (don’t use `AmazonS3FullAccess` in production)
* Rotate access keys periodically
* Enable MFA on your AWS account
### Cost Management
[Section titled “Cost Management”](#cost-management)
* Use **Intelligent Tiering** for data with unpredictable access patterns
* Move old backups to **Glacier** or **Deep Archive** for significant savings
* Enable [S3 Lifecycle rules](https://docs.aws.amazon.com/AmazonS3/latest/userguide/object-lifecycle-mgmt.html) to automate tier transitions
* Monitor costs in the [AWS Billing Console](https://console.aws.amazon.com/billing/)
Terms Compliance
Your use of Amazon S3 through Blober is subject to [AWS’s Customer Agreement](https://aws.amazon.com/agreement/) and the [S3 Service Terms](https://aws.amazon.com/service-terms/). See our [Terms of Service](/kb/docs/terms-and-privacy/terms-of-service/) for details.
## External References
[Section titled “External References”](#external-references)
* [AWS IAM Access Keys](https://docs.aws.amazon.com/IAM/latest/UserGuide/id_credentials_access-keys.html)
* [S3 Storage Classes](https://aws.amazon.com/s3/storage-classes/)
* [IAM Best Practices](https://docs.aws.amazon.com/IAM/latest/UserGuide/best-practices.html)
* [S3 Security Best Practices](https://docs.aws.amazon.com/AmazonS3/latest/userguide/security-best-practices.html)
* [AWS S3 Pricing](https://aws.amazon.com/s3/pricing/)
# Azure Blob Storage
Azure Blob Storage is Microsoft’s scalable object storage solution for the cloud, ideal for storing large amounts of unstructured data. In Blober, Azure paths use:
```plaintext
container-name/path/to/blob.ext
```
## Capabilities
[Section titled “Capabilities”](#capabilities)
* ✅ Browse containers and blobs
* ✅ Upload files
* ✅ Download files
* ✅ Delete files
* ✅ Change blob tier (Hot/Cool/Cold/Archive)
* ✅ View blob metadata
## Prerequisites
[Section titled “Prerequisites”](#prerequisites)
* An Azure account ([create one free](https://azure.microsoft.com/free/))
* An Azure Storage account
* Storage account access keys or connection string
## Required credentials
[Section titled “Required credentials”](#required-credentials)
[]()
### Connection string
[Section titled “Connection string”](#connection-string)
* **Option key:** `connectionString`
* **Format:** A connection string containing account name, key, and endpoint
Example:
```plaintext
DefaultEndpointsProtocol=https;AccountName=myaccount;AccountKey=mykey;EndpointSuffix=core.windows.net
```
## Optional settings
[Section titled “Optional settings”](#optional-settings)
[]()
### Storage tier
[Section titled “Storage tier”](#storage-tier)
* **Option key:** `storageTier`
* **Default:** `Cool`
* **Values:** `Hot`, `Cool`, `Cold`, `Archive`
**Access tier guidance:**
| Tier | Use Case | Retrieval Cost |
| ------- | -------------------------------- | -------------- |
| Hot | Frequently accessed data | Lowest |
| Cool | Infrequently accessed (30+ days) | Low |
| Cold | Rarely accessed (90+ days) | Medium |
| Archive | Long-term backup (180+ days) | Highest |
## Setup (Azure Portal)
[Section titled “Setup (Azure Portal)”](#setup-azure-portal)
### 1. Create a Storage Account
[Section titled “1. Create a Storage Account”](#1-create-a-storage-account)
1. Go to [Azure Portal](https://portal.azure.com)
2. Search for “Storage accounts”
3. Click **“Create”**
4. Fill in:
* **Subscription:** Your Azure subscription
* **Resource group:** Create new or use existing
* **Storage account name:** Unique name (e.g., `mybloberstorage`)
* **Region:** Choose closest to you
* **Performance:** Standard (or Premium for high-performance needs)
* **Redundancy:** LRS (locally redundant) for cost savings
5. Click **“Review + create”** => **“Create”**
### 2. Get Connection String
[Section titled “2. Get Connection String”](#2-get-connection-string)
1. Open your Storage account in Azure Portal
2. In the left menu, go to **Security + networking** => **Access keys**
3. Click **“Show”** next to key1
4. Copy the **Connection string** (not just the key)
### 3. Configure in Blober
[Section titled “3. Configure in Blober”](#3-configure-in-blober)
1. In Blober, go to **Workflows** => **New Workflow**
2. Select **Azure Blob Storage** as source or destination
3. Paste the connection string
4. Test the connection by browsing
## Troubleshooting
[Section titled “Troubleshooting”](#troubleshooting)
### ”Invalid connection string”
[Section titled “”Invalid connection string””](#invalid-connection-string)
* Make sure you copied the **full** connection string, including `DefaultEndpointsProtocol=https;...`
* Don’t copy the key alone - you need the entire connection string
### ”Container not found”
[Section titled “”Container not found””](#container-not-found)
* Check the container name is correct (case-sensitive)
* Ensure the container exists in your storage account
### Slow uploads to Archive tier
[Section titled “Slow uploads to Archive tier”](#slow-uploads-to-archive-tier)
* Archive tier has higher write latency - this is normal
* Consider uploading to **Cool** first, then using Azure Lifecycle Management to transition to Archive
## Notes
[Section titled “Notes”](#notes)
* Move infrequently accessed data to **Cool** or **Archive** tiers
## Best Practices
[Section titled “Best Practices”](#best-practices)
### Cost Management
[Section titled “Cost Management”](#cost-management)
* Use **Cool** tier for data accessed less than once a month - significant savings over Hot
* Use **Archive** tier for long-term backups you rarely need - lowest storage cost
* Set up [Lifecycle Management rules](https://learn.microsoft.com/en-us/azure/storage/blobs/lifecycle-management-overview) to automatically transition blobs between tiers
* Monitor costs with [Azure Cost Management](https://portal.azure.com/#blade/Microsoft_Azure_CostManagement)
### Security
[Section titled “Security”](#security)
* Use **SAS tokens** with limited permissions and expiry instead of full account keys when possible
* Rotate access keys periodically
* Enable **soft delete** for blob recovery in case of accidental deletion
* Keep your connection string secure and never share it publicly
### Performance
[Section titled “Performance”](#performance)
* Upload to **Cool** tier first, then use lifecycle rules to move to Archive - avoids high Archive write latency
* Choose a storage account region close to your location for best transfer speeds
* Use **LRS** (Locally Redundant Storage) for cost savings when geo-redundancy isn’t required
Terms Compliance
Your use of Azure Blob Storage through Blober is subject to [Microsoft’s Service Agreement](https://www.microsoft.com/en-us/servicesagreement). See our [Terms of Service](/kb/docs/terms-and-privacy/terms-of-service/) for details.
## External References
[Section titled “External References”](#external-references)
* [Azure Storage Connection Strings](https://learn.microsoft.com/en-us/azure/storage/common/storage-configure-connection-string)
* [Access Tiers Overview](https://learn.microsoft.com/en-us/azure/storage/blobs/access-tiers-overview)
* [Azure Blob Storage Documentation](https://docs.microsoft.com/en-us/azure/storage/blobs/)
* [Security Best Practices](https://learn.microsoft.com/en-us/azure/storage/blobs/security-recommendations)
* [Set up Lifecycle management rules](https://learn.microsoft.com/en-us/azure/storage/blobs/lifecycle-management-overview)
* [Azure Cost Management](https://portal.azure.com/#blade/Microsoft_Azure_CostManagement)
# Backblaze B2
Backblaze B2 is affordable cloud storage with an S3-compatible API. Blober connects via the S3 layer for reliable compatibility.
Path format:
```plaintext
bucket-name/path/to/file.ext
```
## Capabilities
[Section titled “Capabilities”](#capabilities)
* ✅ Browse buckets and objects
* ✅ Upload files (multipart for large files)
* ✅ Download files
* ✅ Delete objects
* ✅ Copy/move objects
* ✅ Automatic region detection per bucket
* ✅ Storage class selection (inherited from S3)
## Prerequisites
[Section titled “Prerequisites”](#prerequisites)
* A Backblaze account ([create one](https://www.backblaze.com/b2/sign-up.html))
* At least one B2 bucket
* An application key with appropriate permissions
## Required Credentials
[Section titled “Required Credentials”](#required-credentials)
[]()
### Application Key ID
[Section titled “Application Key ID”](#application-key-id)
* **Option key:** `applicationKeyId`
* **Format:** 25 alphanumeric characters
* **Example:** `0000123456789abcdef000000`
[]()
### Application Key
[Section titled “Application Key”](#application-key)
* **Option key:** `applicationKey`
* **Format:** 31 characters
* **Example:** `K000abcdefghijklmnopqrstuvwxy`
## Setup (Backblaze Console)
[Section titled “Setup (Backblaze Console)”](#setup-backblaze-console)
### 1. Create a B2 Bucket
[Section titled “1. Create a B2 Bucket”](#1-create-a-b2-bucket)
1. Go to [Backblaze B2 Console](https://secure.backblaze.com/b2_buckets.htm)
2. Click **Create a Bucket**
3. Enter a unique bucket name
4. Choose **Private** or **Public** as needed
5. Click **Create a Bucket**
### 2. Create an Application Key
[Section titled “2. Create an Application Key”](#2-create-an-application-key)
1. Go to **App Keys** in the B2 Console
2. Click **Add a New Application Key**
3. Configure the key:
* **Name:** Give it a descriptive name (e.g., `blober-key`)
* **Allow List All Bucket Names:** ✅ Enable for bucket browsing
* **Access:** Select buckets or “All” for full access
* **Permissions:** Read and Write (or as needed)
4. Click **Create New Key**
5. **Copy the keyID and applicationKey immediately** (the secret is shown only once!)
### 3. Configure in Blober
[Section titled “3. Configure in Blober”](#3-configure-in-blober)
1. In Blober, go to **Workflows** => **New Workflow**
2. Select **Backblaze B2** as source or destination
3. Enter your Application Key ID and Application Key
4. Test by browsing your buckets
## Troubleshooting
[Section titled “Troubleshooting”](#troubleshooting)
### ”Unauthorized” or “401” error
[Section titled “”Unauthorized” or “401” error”](#unauthorized-or-401-error)
* Verify your Application Key ID and Application Key are correct
* Check if the key has expired or been revoked
* If using a bucket-scoped key, ensure it has access to the bucket you’re trying to browse
### Buckets not showing up
[Section titled “Buckets not showing up”](#buckets-not-showing-up)
* Make sure **Allow List All Bucket Names** is enabled on your application key
* If using a restricted key, it can only see buckets it has access to
### Slow downloads
[Section titled “Slow downloads”](#slow-downloads)
* Backblaze B2 download speeds depend on your region and connection
* Files are served from the bucket’s region - choose a region close to you when creating buckets
## Best Practices
[Section titled “Best Practices”](#best-practices)
* **Use bucket-scoped keys** in production for better security (limit access to specific buckets)
* **Enable versioning** on buckets with important data for accidental deletion protection
* Backblaze B2 pricing is simple: $6/TB/month storage, $0.01/GB download (first 1 GB/day free)
Terms Compliance
Your use of Backblaze B2 through Blober is subject to [Backblaze’s Terms of Service](https://www.backblaze.com/company/policy/terms-of-service). See our [Terms of Service](/kb/docs/terms-and-privacy/terms-of-service/) for details.
## External References
[Section titled “External References”](#external-references)
* [B2 Cloud Storage Documentation](https://www.backblaze.com/b2/docs/)
* [Creating App Keys](https://www.backblaze.com/docs/cloud-storage-create-and-manage-app-keys)
* [B2 S3-Compatible API](https://www.backblaze.com/b2/docs/s3_compatible_api.html)
* [Backblaze B2 Pricing](https://www.backblaze.com/b2/cloud-storage-pricing.html)
# Cloudflare R2
Cloudflare R2 is S3-compatible object storage with **zero egress fees**. Blober connects via the S3-compatible API.
Path format:
```plaintext
bucket-name/path/to/file.ext
```
## Capabilities
[Section titled “Capabilities”](#capabilities)
* ✅ Browse buckets and objects
* ✅ Upload files (multipart for large files)
* ✅ Download files
* ✅ Delete objects
* ✅ Copy/move objects
* ✅ S3-compatible API
* ✅ Zero egress fees
## Prerequisites
[Section titled “Prerequisites”](#prerequisites)
* A Cloudflare account ([create one](https://dash.cloudflare.com/sign-up))
* R2 enabled on your account
* At least one R2 bucket
* API credentials with R2 access
## Required Credentials
[Section titled “Required Credentials”](#required-credentials)
[]()
### Account ID
[Section titled “Account ID”](#account-id)
* **Option key:** `accountId`
* **Where to find:** Cloudflare dashboard => Overview => right sidebar
* **Format:** 32-character hex string
* **Example:** `a1b2c3d4e5f6a1b2c3d4e5f6a1b2c3d4`
[]()
### Access Key ID
[Section titled “Access Key ID”](#access-key-id)
* **Option key:** `accessKeyId`
* **Format:** 32 alphanumeric characters
* **Example:** `abc123def456ghi789jkl012mno345pq`
[]()
### Secret Access Key
[Section titled “Secret Access Key”](#secret-access-key)
* **Option key:** `secretAccessKey`
* **Format:** 64-character string
* **Example:** `abcdefghijklmnopqrstuvwxyz1234567890ABCDEFGHIJKLMNOP`
[]()
### API Token (Optional)
[Section titled “API Token (Optional)”](#api-token-optional)
* **Option key:** `apiToken`
* **Where to find:** Shown alongside Access Key ID and Secret Access Key when creating an R2 API token
* **Format:** Cloudflare API Bearer token string
* **Why use it:** Enables server-side paginated bucket listing via the Cloudflare REST API. Recommended if you have more than 100 buckets. Without it, all buckets are fetched in a single S3 `ListBuckets` call and paginated client-side with a cursor.
* **Required permissions:** `Workers R2 Storage Read` (or `Workers R2 Storage Write`)
## Setup (Cloudflare Dashboard)
[Section titled “Setup (Cloudflare Dashboard)”](#setup-cloudflare-dashboard)
### 1. Create an R2 Bucket
[Section titled “1. Create an R2 Bucket”](#1-create-an-r2-bucket)
1. Go to [Cloudflare Dashboard](https://dash.cloudflare.com)
2. Select **R2** from the sidebar
3. Click **Create bucket**
4. Enter a bucket name (lowercase, unique within your account)
5. Click **Create bucket**
### 2. Create API Credentials
[Section titled “2. Create API Credentials”](#2-create-api-credentials)
1. In R2 settings, click **Manage R2 API Tokens**
2. Click **Create API token**
3. Configure the token:
* **Token name:** Give it a descriptive name (e.g., `blober-access`)
* **Permissions:** Object Read & Write (or as needed)
* **Bucket scope:** Specific bucket or all buckets
4. Click **Create API Token**
5. **Copy Access Key ID and Secret Access Key immediately** (secret shown only once!)
### 3. Find Your Account ID
[Section titled “3. Find Your Account ID”](#3-find-your-account-id)
1. Go to the Cloudflare dashboard
2. Click on any domain or go to **Overview**
3. The Account ID is in the right sidebar under “API”
4. Copy the Account ID
### 4. Configure in Blober
[Section titled “4. Configure in Blober”](#4-configure-in-blober)
1. In Blober, go to **Workflows** => **New Workflow**
2. Select **Cloudflare R2** as source or destination
3. Enter:
* Account ID
* Access Key ID
* Secret Access Key
* API Token *(optional — recommended for accounts with 100+ buckets)*
4. Test by browsing your buckets
## Troubleshooting
[Section titled “Troubleshooting”](#troubleshooting)
### ”Access Denied” error
[Section titled “”Access Denied” error”](#access-denied-error)
* Double-check your Account ID - it’s found in the Cloudflare dashboard sidebar, not in R2 settings
* Verify your API token has **Object Read & Write** permissions
* Ensure the token isn’t scoped to a different bucket than the one you’re accessing
### ”Invalid Account ID”
[Section titled “”Invalid Account ID””](#invalid-account-id)
* The Account ID is a 32-character hex string found on the Cloudflare dashboard overview page
* Don’t confuse it with Zone ID or API token
### Buckets not listing
[Section titled “Buckets not listing”](#buckets-not-listing)
* Your API token may be scoped to a specific bucket - create a token with “All buckets” scope to see all
## Best Practices
[Section titled “Best Practices”](#best-practices)
* **Zero egress fees** make R2 ideal as a destination for frequently downloaded data
* Use R2 for serving assets or as a CDN origin - pair with Cloudflare’s CDN for global delivery
* Create separate API tokens per application for better security and easy revocation
Terms Compliance
Your use of Cloudflare R2 through Blober is subject to [Cloudflare’s Terms of Service](https://www.cloudflare.com/terms/). See our [Terms of Service](/kb/docs/terms-and-privacy/terms-of-service/) for details.
## External References
[Section titled “External References”](#external-references)
* [R2 Documentation](https://developers.cloudflare.com/r2/)
* [Creating API Tokens](https://developers.cloudflare.com/r2/api/s3/tokens/)
* [S3 API Compatibility](https://developers.cloudflare.com/r2/api/s3/)
* [Cloudflare R2 Pricing](https://developers.cloudflare.com/r2/pricing/)
# DigitalOcean Spaces
DigitalOcean Spaces is S3-compatible object storage with a built-in CDN. Blober connects via the S3-compatible API and supports both standard and cold storage tiers.
Path format:
```plaintext
space-name/path/to/file.ext
```
## Capabilities
[Section titled “Capabilities”](#capabilities)
* ✅ Browse Spaces and objects
* ✅ Upload files (multipart for large files)
* ✅ Download files
* ✅ Delete objects
* ✅ Copy objects (within the same Space)
* ✅ Move objects
* ✅ S3-compatible API
* ✅ Multi-region support (automatic region detection)
* ✅ Cold storage tier support
* ✅ Project organization via Personal Access Token
## Prerequisites
[Section titled “Prerequisites”](#prerequisites)
* A DigitalOcean account ([create one](https://cloud.digitalocean.com/registrations/new))
* At least one Space created
* Spaces access keys
## Required Credentials
[Section titled “Required Credentials”](#required-credentials)
[]()
### Access Key
[Section titled “Access Key”](#access-key)
* **Option key:** `accessKeyId`
* **Where to find:** DigitalOcean Control Panel => API => Spaces Keys
* **Format:** 20 uppercase alphanumeric characters
* **Example:** `AKIAIOSFODNN7EXAMPLE`
[]()
### Secret Key
[Section titled “Secret Key”](#secret-key)
* **Option key:** `secretAccessKey`
* **Format:** 40 characters
* **Example:** `wJalrXUtnFEMI/K7MDENG/bPxRfiCYEXAMPLEKEY`
## Optional Credentials
[Section titled “Optional Credentials”](#optional-credentials)
[]()
### Personal Access Token
[Section titled “Personal Access Token”](#personal-access-token)
* **Option key:** `personalAccessToken`
* **Purpose:** Lists Spaces organized by project and shows project names
* **Where to find:** DigitalOcean Control Panel => API => Tokens
* **Note:** Without this, Blober probes all regions to discover Spaces
## Available Regions
[Section titled “Available Regions”](#available-regions)
DigitalOcean Spaces is available in these regions:
| Region Code | Location |
| ----------- | --------------- |
| `nyc3` | New York 3 |
| `sfo3` | San Francisco 3 |
| `ams3` | Amsterdam 3 |
| `sgp1` | Singapore 1 |
| `fra1` | Frankfurt 1 |
| `syd1` | Sydney 1 |
| `blr1` | Bangalore 1 |
Note
Unlike AWS S3, DigitalOcean Spaces is region-scoped. Blober automatically discovers Spaces across all regions by probing each one.
## Storage Tiers
[Section titled “Storage Tiers”](#storage-tiers)
DigitalOcean Spaces supports two storage tiers, set at bucket creation:
| Tier | Use Case | Retrieval |
| ------------ | --------------------------- | --------------------------------- |
| **Standard** | Frequently accessed data | Immediate |
| **Cold** | Infrequent access, archival | Immediate (higher retrieval cost) |
Caution
The storage tier is set when creating a Space and cannot be changed afterward. Objects inherit the Space’s tier.
## Setup (DigitalOcean Control Panel)
[Section titled “Setup (DigitalOcean Control Panel)”](#setup-digitalocean-control-panel)
### 1. Create a Space
[Section titled “1. Create a Space”](#1-create-a-space)
1. Go to [DigitalOcean Control Panel](https://cloud.digitalocean.com)
2. Navigate to **Spaces Object Storage** in the sidebar
3. Click **Create a Space**
4. Configure:
* **Datacenter region:** Choose from available regions
* **Storage tier:** Standard or Cold
* **CDN:** Enable if needed for edge caching
* **Space name:** Unique name (lowercase, 3-63 characters)
5. Click **Create a Space**
### 2. Generate Spaces Access Keys
[Section titled “2. Generate Spaces Access Keys”](#2-generate-spaces-access-keys)
1. Go to **API** in the left sidebar
2. Scroll to **Spaces Keys**
3. Click **Generate New Key**
4. Enter a name (e.g., `blober-access`)
5. **Copy the Access Key and Secret Key immediately** (secret shown only once!)
### 3. (Optional) Create Personal Access Token
[Section titled “3. (Optional) Create Personal Access Token”](#3-optional-create-personal-access-token)
For project-organized Space listings:
1. Go to **API** in the left sidebar
2. Under **Tokens**, click **Generate New Token**
3. Enter a name and select scopes (read access is sufficient)
4. **Copy the token immediately**
### 4. Configure in Blober
[Section titled “4. Configure in Blober”](#4-configure-in-blober)
1. In Blober, go to **Workflows** => **New Workflow**
2. Select **DigitalOcean Spaces** as source or destination
3. Enter:
* Access Key
* Secret Key
* (Optional) Personal Access Token
4. Test by browsing your Spaces
## Troubleshooting
[Section titled “Troubleshooting”](#troubleshooting)
### ”Access Denied” error
[Section titled “”Access Denied” error”](#access-denied-error)
* Double-check your Access Key and Secret Key
* Verify the key has permissions for the Spaces you’re trying to access
* Make sure you’re using **Spaces keys**, not regular API tokens
### Not all Spaces showing up
[Section titled “Not all Spaces showing up”](#not-all-spaces-showing-up)
* Blober probes all 7 DigitalOcean regions in parallel to discover your Spaces - this may take a moment
* If you provide a **Personal Access Token**, Spaces will load faster and be organized by project
* Newly created Spaces may take a few seconds to appear
### Slow transfers
[Section titled “Slow transfers”](#slow-transfers)
* Choose a Space in a region geographically close to you
* Transfer speeds depend on your internet connection and the distance to the datacenter
### Cold storage retrieval
[Section titled “Cold storage retrieval”](#cold-storage-retrieval)
* Files in Cold Spaces are retrieved at normal speed but have higher per-request costs
* The storage tier is set at Space creation and cannot be changed afterward
## Best Practices
[Section titled “Best Practices”](#best-practices)
* **Use a Personal Access Token** alongside your Spaces keys for faster, project-organized listing
* **Choose the right tier** at creation time - Standard for frequently accessed data, Cold for archives
* DigitalOcean Spaces pricing: $5/month for 250 GB storage + 1 TB outbound transfer, then $0.02/GB storage and $0.01/GB transfer
* **Create dedicated Spaces keys** for Blober rather than reusing keys from other applications
* Consider Spaces CDN for publicly served files you access frequently
Terms Compliance
Your use of DigitalOcean Spaces through Blober is subject to [DigitalOcean’s Terms of Service](https://www.digitalocean.com/legal/terms-of-service-agreement). See our [Terms of Service](/kb/docs/terms-and-privacy/terms-of-service/) for details.
## External References
[Section titled “External References”](#external-references)
* [Spaces Documentation](https://docs.digitalocean.com/products/spaces/)
* [Creating Spaces Access Keys](https://docs.digitalocean.com/products/spaces/how-to/manage-access/#access-keys)
* [Spaces Regions](https://docs.digitalocean.com/products/platform/availability-matrix/#spaces-object-storage)
* [DigitalOcean Spaces Pricing](https://www.digitalocean.com/pricing/spaces-object-storage)
* [S3 Compatibility](https://docs.digitalocean.com/products/spaces/reference/s3-compatibility/)
# Dropbox
Dropbox is a cloud storage and file synchronization service with cross-platform support. In Blober, Dropbox paths use this format:
```plaintext
/folder/subfolder/file.ext
```
## Capabilities
[Section titled “Capabilities”](#capabilities)
* ✅ Browse folders and files
* ✅ Upload files (simple upload up to 150 MB, upload sessions up to \~2 TB)
* ✅ Download files
* ✅ Create folders (automatically created when uploading)
* ✅ Delete files/folders
* ✅ Copy files within Dropbox
* ✅ Move files within Dropbox
* ✅ View file metadata (size, dates, content hash)
* ✅ Progress tracking for uploads
* ✅ Automatic rate-limit retry (HTTP 429)
* ✅ Token auto-refresh (OAuth flow only)
## Prerequisites
[Section titled “Prerequisites”](#prerequisites)
* A [Dropbox account](https://www.dropbox.com/) (free or paid)
* A Dropbox App created in the [Dropbox App Console](https://www.dropbox.com/developers/apps)
## Authentication Methods
[Section titled “Authentication Methods”](#authentication-methods)
Blober supports two ways to connect to Dropbox. Choose the one that fits your workflow:
| Method | Setup Complexity | Token Lifetime | Auto-Refresh |
| ----------------------------------------------------------- | ---------------- | -------------- | ----------------------------------- |
| [Generated Access Token](#option-1-generated-access-token) | Simple | \~4 hours | ❌ No — must regenerate manually |
| [App Key + Secret (OAuth)](#option-2-app-key--secret-oauth) | Moderate | Indefinite | ✅ Yes — automatic via refresh token |
Tip
If you plan to run unattended/scheduled workflows, use **App Key + Secret (OAuth)** — it auto-refreshes expired tokens so your workflows won’t break after 4 hours.
If you just want to try Blober quickly, **Generated Access Token** gets you started in under a minute.
***
[]()
### Option 1: Generated Access Token
[Section titled “Option 1: Generated Access Token”](#option-1-generated-access-token)
Use a short-lived token generated directly from the Dropbox App Console. Quick to set up but requires manual renewal every \~4 hours.
**Credential fields:**
| Field | Description |
| -------------------------------- | --------------------------------------------------- |
| **Dropbox Generated Access Key** | Bearer token string (e.g., `sl.u.AGUFCwsCKpMW-...`) |
#### Setup steps
[Section titled “Setup steps”](#setup-steps)
1. [Create a Dropbox App](#1-create-a-dropbox-app) and [configure permissions](#2-configure-permissions) (see below)
2. In your app’s **Settings** tab, scroll to **OAuth 2**
3. Click **“Generate”** under **Generated access token**
4. Copy the token — it is only shown once
5. In Blober, go to **Workflows** → **New Workflow**
6. Select **Dropbox** as source or destination
7. Paste the token into the **Dropbox Generated Access Key** field
8. Test by browsing your Dropbox files
Caution
Generated tokens expire after approximately **4 hours**. When your token expires, generate a new one from the App Console and update it in Blober. Any in-progress workflows using an expired token will fail.
***
[]()
### Option 2: App Key + Secret (OAuth)
[Section titled “Option 2: App Key + Secret (OAuth)”](#option-2-app-key--secret-oauth)
Use your app’s credentials to trigger a browser-based OAuth consent flow. Blober receives a refresh token and automatically renews access tokens when they expire — no manual intervention needed.
**Credential fields:**
| Field | Description |
| -------------- | ------------------------------------------------------------------------- |
| **App Key** | Alphanumeric string from your app’s Settings tab (e.g., `3p6ac1pz2b3k7k`) |
| **App Secret** | Alphanumeric string — click **Show** to reveal (e.g., `3p6ac1pz2b3k6j`) |
#### Setup steps
[Section titled “Setup steps”](#setup-steps-1)
1. [Create a Dropbox App](#1-create-a-dropbox-app) and [configure permissions](#2-configure-permissions) (see below)
2. Copy your **App Key** and **App Secret** from the app’s **Settings** tab
3. In Blober, go to **Workflows** → **New Workflow**
4. Select **Dropbox** as source or destination
5. Enter your **App Key** and **App Secret** in the corresponding fields
6. Click **Authorize Dropbox Access** — a browser window opens for consent
7. Sign in with your Dropbox account and grant permissions
8. The browser redirects back to Blober automatically — you’re connected
After authorization, Blober stores a refresh token and will automatically renew access tokens in the background. You don’t need to touch Dropbox again unless you revoke the app.
***
## Required Scopes (Permissions)
[Section titled “Required Scopes (Permissions)”](#required-scopes-permissions)
Your Dropbox App must have these permissions enabled **before** generating an access token or authorizing via OAuth — tokens and refresh tokens inherit the scopes that were active at the time of creation.
| Scope | Purpose |
| ---------------------- | --------------------------------- |
| `files.metadata.read` | Browse and list files/folders |
| `files.metadata.write` | Create folders, move/copy files |
| `files.content.read` | Download files |
| `files.content.write` | Upload and delete files |
| `account_info.read` | Verify connection to your account |
## Setup Guide
[Section titled “Setup Guide”](#setup-guide)
### 1. Create a Dropbox App
[Section titled “1. Create a Dropbox App”](#1-create-a-dropbox-app)
1. Go to the [Dropbox App Console](https://www.dropbox.com/developers/apps)
2. Click **“Create app”**
3. Under **“Choose an API”**, select **“Scoped access”**
4. Under **“Choose the type of access you need”**, select **“Full Dropbox”** to access all files, or **“App folder”** to limit access to a single folder
5. Enter an app name (e.g., `Blober`)
6. Click **“Create app”**
Tip
Choose **“Full Dropbox”** if you want Blober to access your entire Dropbox. Choose **“App folder”** if you prefer to restrict Blober to its own sandbox folder — files outside that folder won’t be visible.
### 2. Configure Permissions
[Section titled “2. Configure Permissions”](#2-configure-permissions)
You **must** set permissions before generating a token or authorizing via OAuth. Tokens inherit the scopes that were active at the time of creation.
1. In your app’s page, click the **“Permissions”** tab
2. Under **“Individual Scopes”**, enable the following:
**Files and folders:**
* ☑️ `files.metadata.read`
* ☑️ `files.metadata.write`
* ☑️ `files.content.read`
* ☑️ `files.content.write`
**Account info:**
* ☑️ `account_info.read`
3. Click **“Submit”** at the bottom of the page
Caution
If you change permissions after generating a token or completing OAuth, the existing token/refresh-token retains its old scopes. You must generate a new token (or re-authorize via OAuth) for the updated permissions to take effect.
### 3. Choose your authentication method
[Section titled “3. Choose your authentication method”](#3-choose-your-authentication-method)
Continue with **[Option 1: Generated Access Token](#option-1-generated-access-token)** or **[Option 2: App Key + Secret (OAuth)](#option-2-app-key--secret-oauth)** above, depending on your needs.
## File Organization
[Section titled “File Organization”](#file-organization)
Dropbox uses a hierarchical folder structure with forward-slash paths:
```plaintext
/Documents/Work/report.pdf
/Photos/2026/January/IMG_001.jpg
/Videos/vacation.mp4
```
* Paths are **case-insensitive** but **case-preserving** (e.g., `/Photos` and `/photos` refer to the same folder, but the display name keeps its original casing)
* Folders are created automatically when uploading a file to a path that doesn’t exist yet
* The root of your Dropbox is represented by `/`
## How Uploads Work
[Section titled “How Uploads Work”](#how-uploads-work)
Blober automatically chooses the best upload method based on file size:
| Method | Max File Size | When Used | Memory Usage |
| -------------- | ------------- | ---------------------------------- | ------------------------------------- |
| Simple upload | 150 MB | Files ≤ 150 MB with known size | Streams directly — no extra buffering |
| Upload session | \~350 GB | Files > 150 MB **or** unknown size | One 10 MB chunk in memory at a time |
### Upload sessions in detail
[Section titled “Upload sessions in detail”](#upload-sessions-in-detail)
For large files, Blober uses Dropbox’s upload session protocol:
1. **Start** — Opens a session and sends the first 10 MB chunk in the same request (saves a round trip)
2. **Append** — Sends additional 10 MB chunks sequentially, reporting progress after each one
3. **Finish** — Closes the session and commits the file to its destination path
Key characteristics:
* **Memory-efficient**: Only one 10 MB chunk is buffered at a time, regardless of total file size. A 420 MB file uses \~10 MB of memory, not 420 MB.
* **Progress tracking**: The progress callback fires after each chunk, giving you real-time upload progress in the Blober UI.
* **Overwrite mode**: Both simple upload and upload sessions use Dropbox `overwrite` mode — if a file already exists at the destination path, it is replaced.
* **Folder creation**: Parent folders are created automatically before upload if they don’t exist.
## Rate Limiting and Retry
[Section titled “Rate Limiting and Retry”](#rate-limiting-and-retry)
Dropbox applies rate limits on API requests. When Blober receives an HTTP **429 (Too Many Requests)** response:
1. It reads the `Retry-After` header from Dropbox’s response (defaults to 1 second if not present)
2. Waits the specified duration
3. Retries the same request
4. Repeats up to **10 times** before giving up
This applies to all API operations: uploads, downloads, listing, copy, move, and delete. Most rate limiting occurs during large batch operations (e.g., uploading hundreds of files). Under normal use, you’re unlikely to hit rate limits.
## Error Handling
[Section titled “Error Handling”](#error-handling)
Blober maps Dropbox API errors to specific categories. This determines whether a failed operation can be retried automatically:
| Dropbox Error | Blober Category | Auto-Retry? |
| ---------------------------------------------- | ---------------- | -------------------- |
| `path_lookup/not_found` | Not Found | ❌ No |
| `invalid_access_token`, `expired_access_token` | Permission Error | ❌ No |
| `no_permission`, `disallowed_name` | Permission Error | ❌ No |
| `insufficient_space`, `over_quota` | Quota Error | ✅ Yes (with backoff) |
| HTTP 429 (rate limit) | Network Error | ✅ Yes (up to 10×) |
| HTTP 500, 503 (server error) | Network Error | ✅ Yes |
If you see “Permission Error” after previously working fine, your access token has likely expired. Either generate a new one (Option 1) or re-authorize via OAuth (Option 2).
## Troubleshooting
[Section titled “Troubleshooting”](#troubleshooting)
### ”Authentication failed” or 401 errors
[Section titled “”Authentication failed” or 401 errors”](#authentication-failed-or-401-errors)
* **Generated access token**: It likely expired (tokens last \~4 hours). Generate a new one from the App Console.
* **OAuth flow**: Try disconnecting and re-authorizing. If the refresh token was revoked (e.g., you disconnected the app from Dropbox settings), you’ll need to authorize again.
* Verify your App Key and App Secret are correct and belong to the same app.
### Missing credentials
[Section titled “Missing credentials”](#missing-credentials)
* **Generated access token**: Ensure the field is filled in with no leading/trailing whitespace.
* **OAuth flow**: Ensure both App Key and App Secret are filled in. If the authorization browser window didn’t appear, check that your firewall isn’t blocking localhost connections.
### ”Quota exceeded” errors
[Section titled “”Quota exceeded” errors”](#quota-exceeded-errors)
* You’ve run out of Dropbox storage. Free accounts have 2 GB.
* Empty your Dropbox Trash — deleted files still count toward your quota until the trash is emptied.
* Upgrade your Dropbox plan or remove files to free up space.
### Insufficient permissions
[Section titled “Insufficient permissions”](#insufficient-permissions)
* Verify all [required scopes](#required-scopes-permissions) are enabled in the **Permissions** tab.
* If you changed permissions after generating your token or authorizing via OAuth, the existing credentials retain their old scopes. You must generate a new token or re-authorize.
### Files not appearing
[Section titled “Files not appearing”](#files-not-appearing)
* Refresh the file list in Blober.
* If using **App folder** access, files outside the app’s folder are not visible.
* Check that the files exist in the Dropbox web app at [dropbox.com](https://www.dropbox.com/).
### Slow uploads
[Section titled “Slow uploads”](#slow-uploads)
* Large files are uploaded in 10 MB chunks — this is normal and ensures reliability and low memory usage.
* Check your network speed — uploads are network-bound, not CPU-bound.
* Dropbox may throttle uploads during high-traffic periods. Blober handles this automatically via retry.
### Uploads failing mid-way
[Section titled “Uploads failing mid-way”](#uploads-failing-mid-way)
* If an upload session fails partway through (e.g., network drops), the entire upload is retried from the beginning. Dropbox upload sessions cannot be resumed after an error.
* Check your network stability for very large files (400 MB+).
### How to revoke access
[Section titled “How to revoke access”](#how-to-revoke-access)
1. Go to [Dropbox account settings](https://www.dropbox.com/account/connected_apps)
2. Find your app and click **“Disconnect”**
3. In Blober, remove the existing connection
Revoking access invalidates all tokens immediately — both generated access tokens and OAuth refresh tokens.
## Limitations
[Section titled “Limitations”](#limitations)
### Storage quotas
[Section titled “Storage quotas”](#storage-quotas)
| Plan | Storage |
| ---------------- | -------------- |
| **Free (Basic)** | 2 GB |
| **Plus** | 2 TB |
| **Professional** | 3 TB |
| **Business** | 5 TB+ per user |
### API limits
[Section titled “API limits”](#api-limits)
| Limit | Value |
| ------------------------------------- | ------------------------------------------------------ |
| Simple upload max file size | 150 MB |
| Upload session append max per request | 150 MB |
| Upload session max total file size | 350 GB |
| Upload session expiry | 7 days (not a concern — uploads complete in minutes) |
| Rate limiting | Automatic retry with `Retry-After` (up to 10×) |
| Data transport (Dropbox Business) | Monthly API call quotas may apply — contact your admin |
### Path limits
[Section titled “Path limits”](#path-limits)
* Maximum path length: **260 characters**
* Individual file/folder names: up to **255 characters**
### Other limitations
[Section titled “Other limitations”](#other-limitations)
* **No cross-provider copy/move**: Copy and move only work within the same Dropbox account. To transfer files between Dropbox and another provider, use a workflow with upload + download.
* **Case-insensitive paths**: Dropbox treats `/Photos/IMG.jpg` and `/photos/img.jpg` as the same file. Be careful when migrating from case-sensitive storage providers.
Terms Compliance
Your use of Dropbox through Blober is subject to [Dropbox’s Terms of Service](https://www.dropbox.com/terms). See our [Terms of Service](/kb/docs/terms-and-privacy/terms-of-service/) for details.
## External References
[Section titled “External References”](#external-references)
* [Dropbox App Console](https://www.dropbox.com/developers/apps) — create and manage your app
* [Dropbox API v2 Documentation](https://www.dropbox.com/developers/documentation/http/documentation) — full API reference
* [Dropbox Plans & Pricing](https://www.dropbox.com/plans) — storage limits by plan
# Google Drive
Google Drive is Google’s cloud storage and file synchronization service. Blober connects to it using OAuth 2.0.
## Capabilities
[Section titled “Capabilities”](#capabilities)
* ✅ Browse folders and files
* ✅ Upload files
* ✅ Download files
* ✅ Create folders
* ✅ Delete files/folders
* ✅ Search files
* ✅ View file metadata
* 🚧 Move files (in progress)
* 🚧 Copy files (in progress)
## Prerequisites
[Section titled “Prerequisites”](#prerequisites)
* A personal Google account (`@gmail.com`) or Google Workspace account
* That’s it, the steps below walk you through everything else
## Setup (Google Cloud Console)
[Section titled “Setup (Google Cloud Console)”](#setup-google-cloud-console)
[]()
This guide shows you how to create and download a Google OAuth client credentials JSON file. The whole process takes about 5 minutes.
### 1. Create a Google Cloud Project
[Section titled “1. Create a Google Cloud Project”](#1-create-a-google-cloud-project)
1. Go to [console.cloud.google.com/projectcreate](https://console.cloud.google.com/projectcreate)
Note
Google Cloud has begun to enforce 2-step verification (2SV). Follow the instructions there to enable it if prompted.
2. If prompted, sign in with your Google account. Otherwise, you can switch accounts at the top right corner of the page
3. In the **Project name** field, enter a name (e.g., `Blober Drive Access`)
* Google will auto-generate a **Project ID** below the name field. You don’t need to change it
4. Leave **Parent resource** empty (unless you’re in an organization)
5. Click **Create**
6. Wait a few seconds. You’ll see a notification at the top-right confirming the project was created. Click **Select Project** in the notification to switch to it
Tip
If you miss the notification, click the **project picker** in the top-left of the console (next to “Google Cloud”), find your project in the list, and click it.
### 2. Enable the Google Drive API
[Section titled “2. Enable the Google Drive API”](#2-enable-the-google-drive-api)
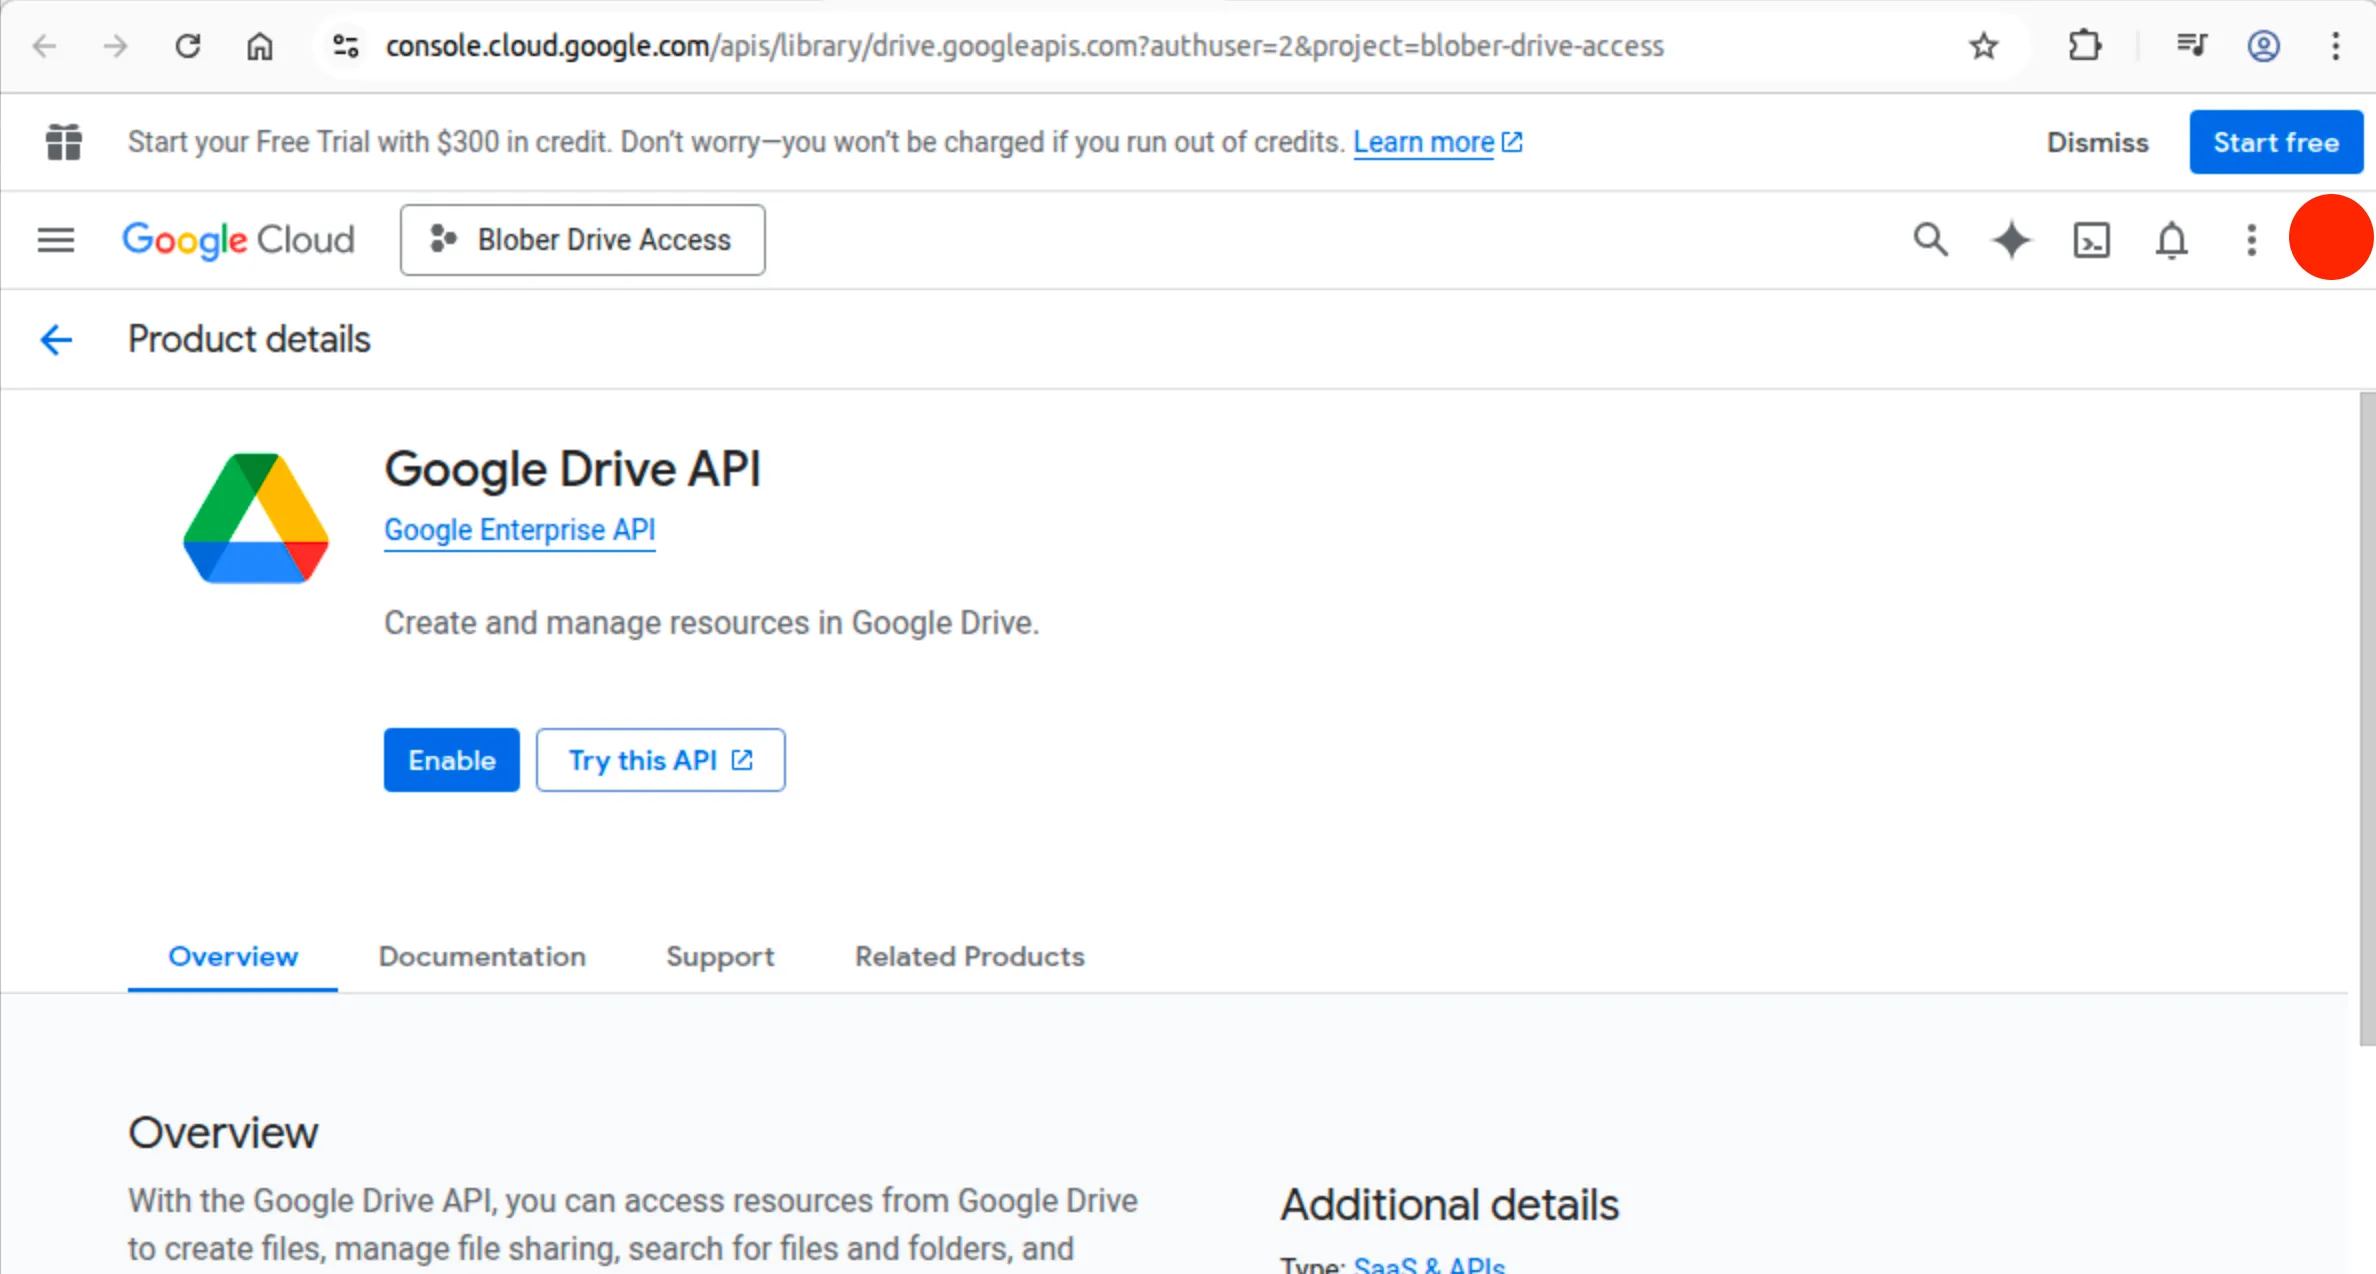
1. Go directly to [the Drive API page](https://console.cloud.google.com/apis/library/drive.googleapis.com) (make sure your new project is selected in the top-left)
2. Click the blue **Enable** button
3. You’ll be redirected to the API overview page. That means it worked
Caution
If you see **“Select a project”** in the top bar instead of your project name, click it and select your project first. The Enable button won’t work without a project selected.
### 3. Configure the Google Auth Platform (OAuth Consent Screen)
[Section titled “3. Configure the Google Auth Platform (OAuth Consent Screen)”](#3-configure-the-google-auth-platform-oauth-consent-screen)
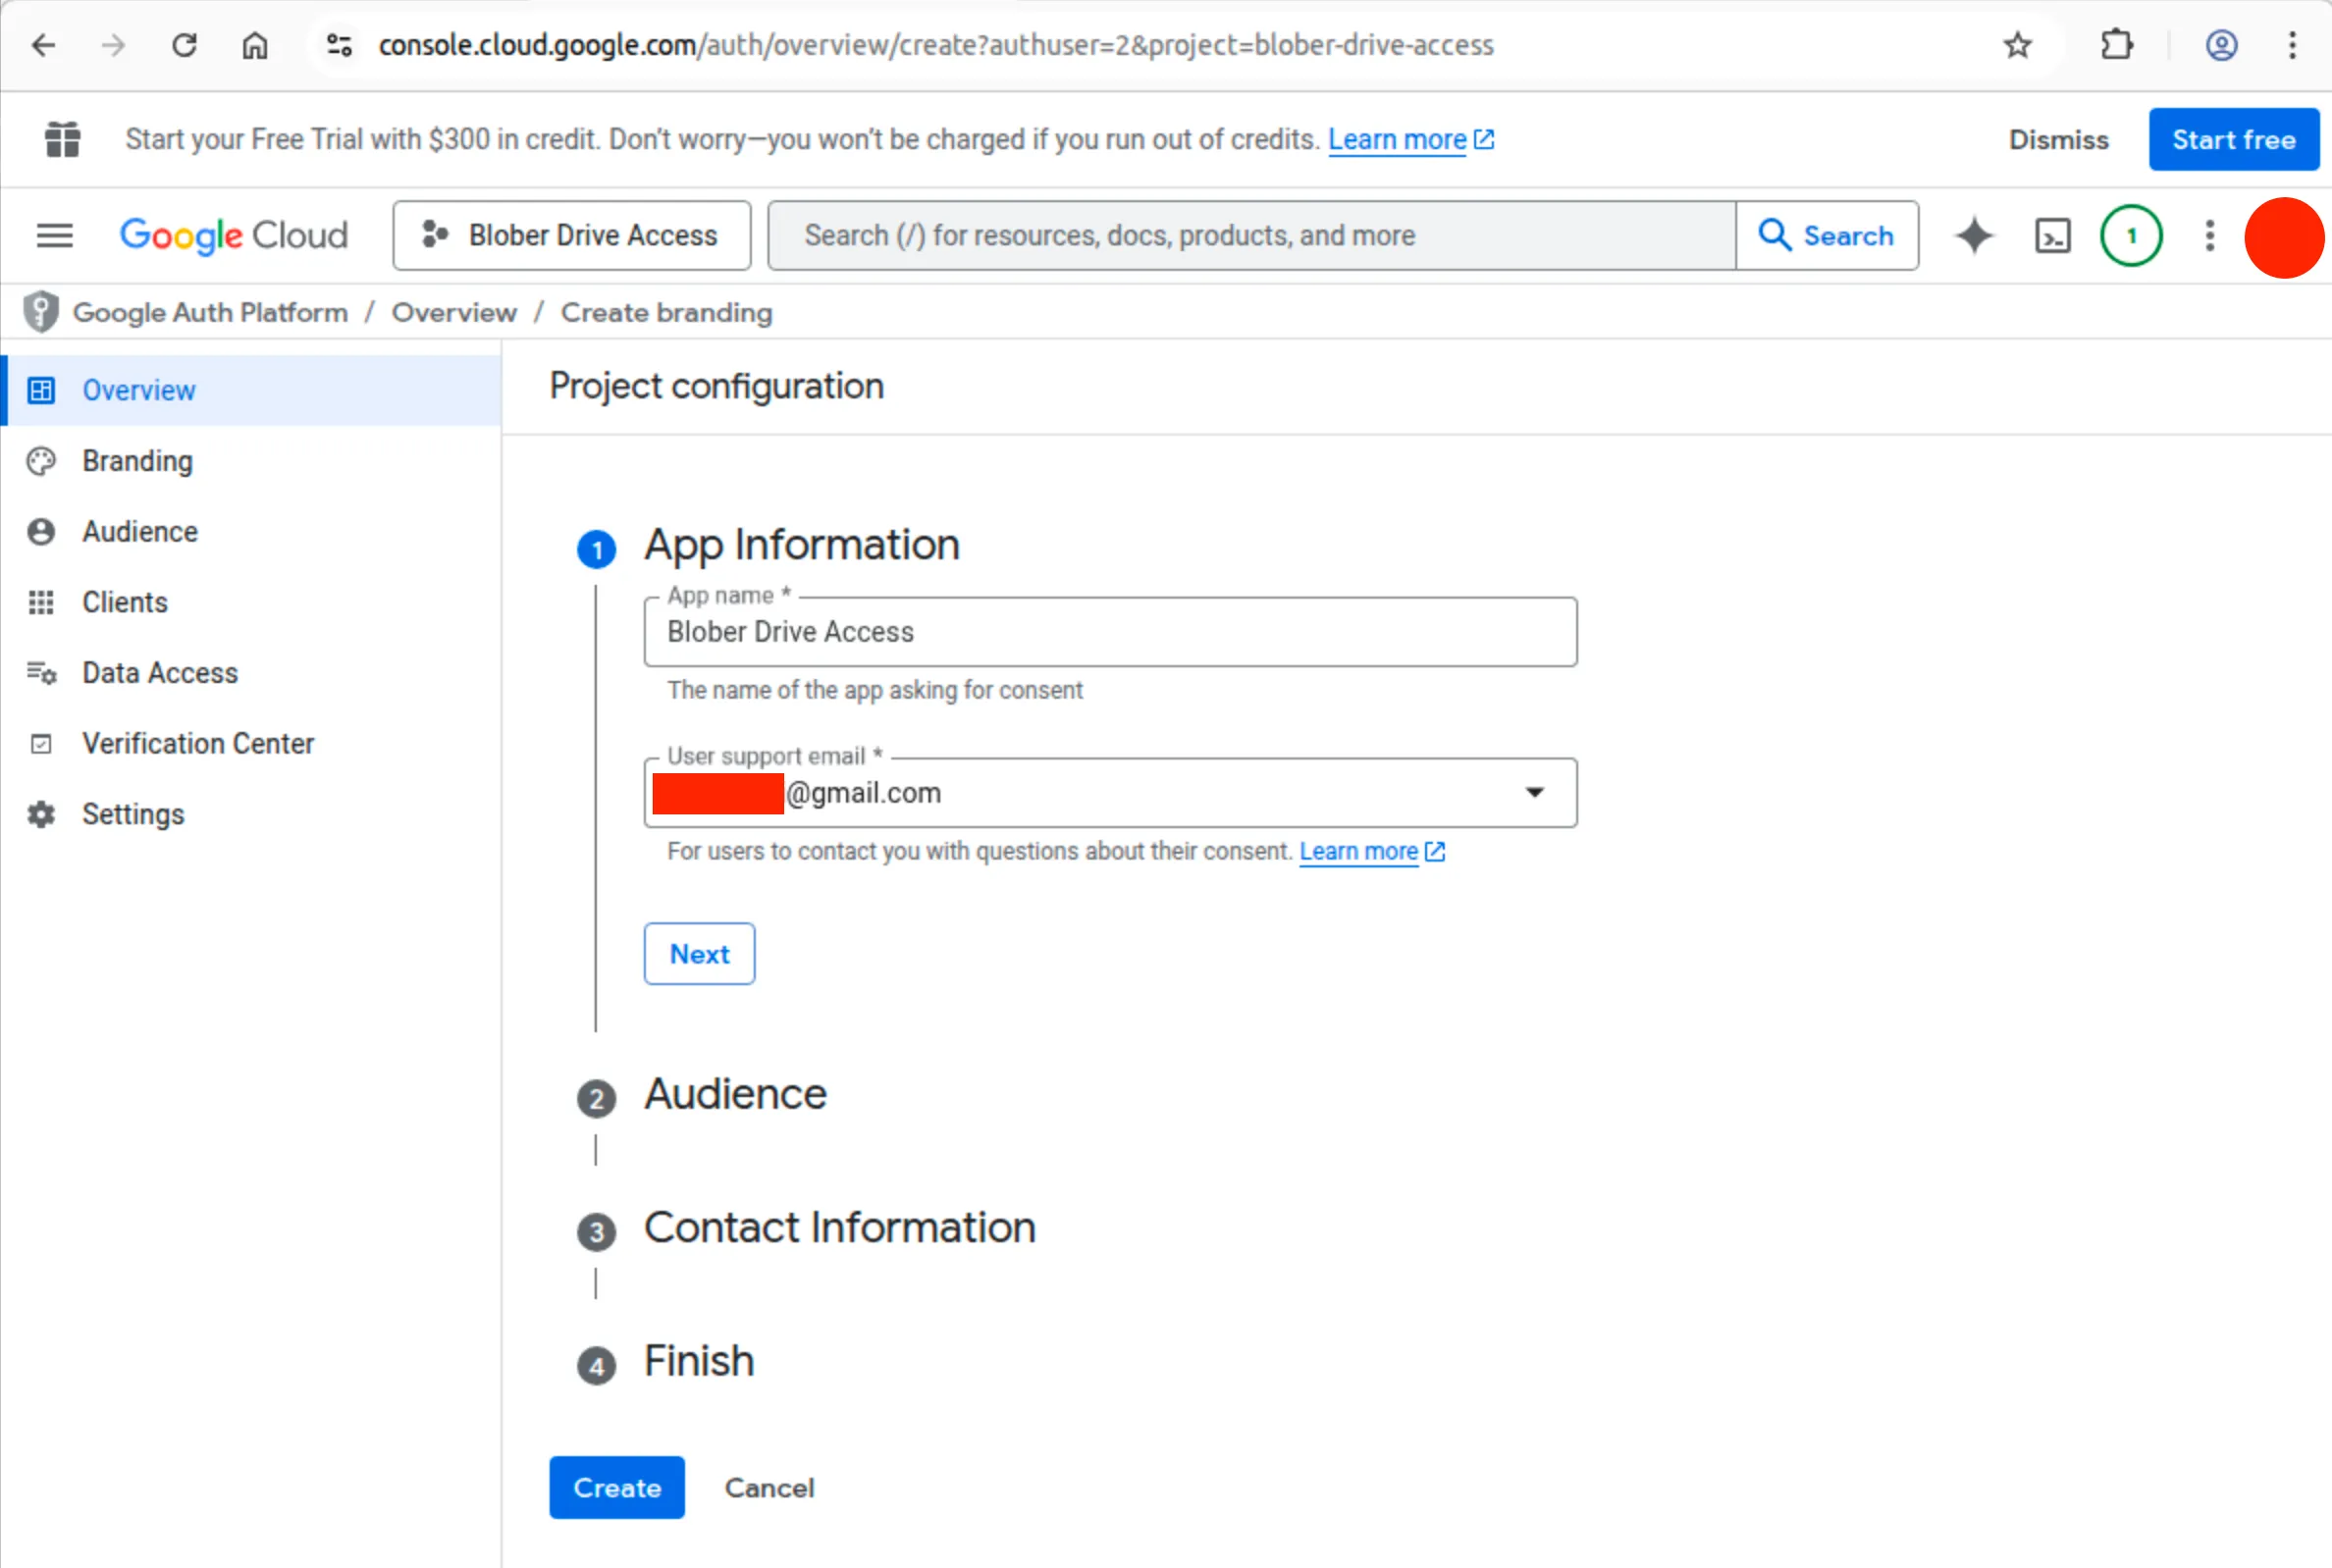
Google requires you to configure an “app identity” before you can create OAuth credentials.
1. Go to [Google Auth Platform Overview](https://console.cloud.google.com/auth/overview)
2. You’ll see a page saying **“Google Auth Platform not configured yet”** with a **Get started** button. Click it
3. This opens a **4-step wizard** called “Project configuration”:
#### Step 1: App Information
[Section titled “Step 1: App Information”](#step-1-app-information)
* **App name**: Enter any name (e.g., `Blober Drive Access`). This shows on the consent screen when you authorize
* **User support email**: Click the dropdown and select your Gmail address
* Click **Next**
#### Step 2: Audience
[Section titled “Step 2: Audience”](#step-2-audience)
* You’ll see two options: **Internal** and **External**
* If you’re using a personal `@gmail.com` account, **Internal is disabled**. Select **External**
* If you’re on Google Workspace, you can choose either
* Click **Next**
Note
**External** means anyone with a Google account *that you add as a test user* can authorize. Your app will start in **Testing** mode. This is normal and expected for personal use.
#### Step 3: Contact Information
[Section titled “Step 3: Contact Information”](#step-3-contact-information)
* Enter your email as the **Developer contact email** (your personal `@gmail.com` account)
* Click **Next**
#### Step 4: Finish
[Section titled “Step 4: Finish”](#step-4-finish)
* Review the summary
* Click **Create/Finish**
You’ll be redirected to the Google Auth Platform overview. The left sidebar items (**Branding**, **Audience**, **Clients**, **Data Access**) are now accessible.
### 4. Add Yourself as a Test User
[Section titled “4. Add Yourself as a Test User”](#4-add-yourself-as-a-test-user)
Because your app is in **Testing** mode, only explicitly added test users can authorize. If you skip this step, you’ll get a **“403 Access Denied”** or **“App not verified”** error.
1. In the left sidebar, click **Audience**
2. Scroll down to **Test users**
3. Click **Add users**
4. Enter the **exact Gmail address** you’ll use with Blober
5. Click **Save**
### 5. (IMPORTANT!) Add the Drive Scope
[Section titled “5. (IMPORTANT!) Add the Drive Scope”](#5-important-add-the-drive-scope)
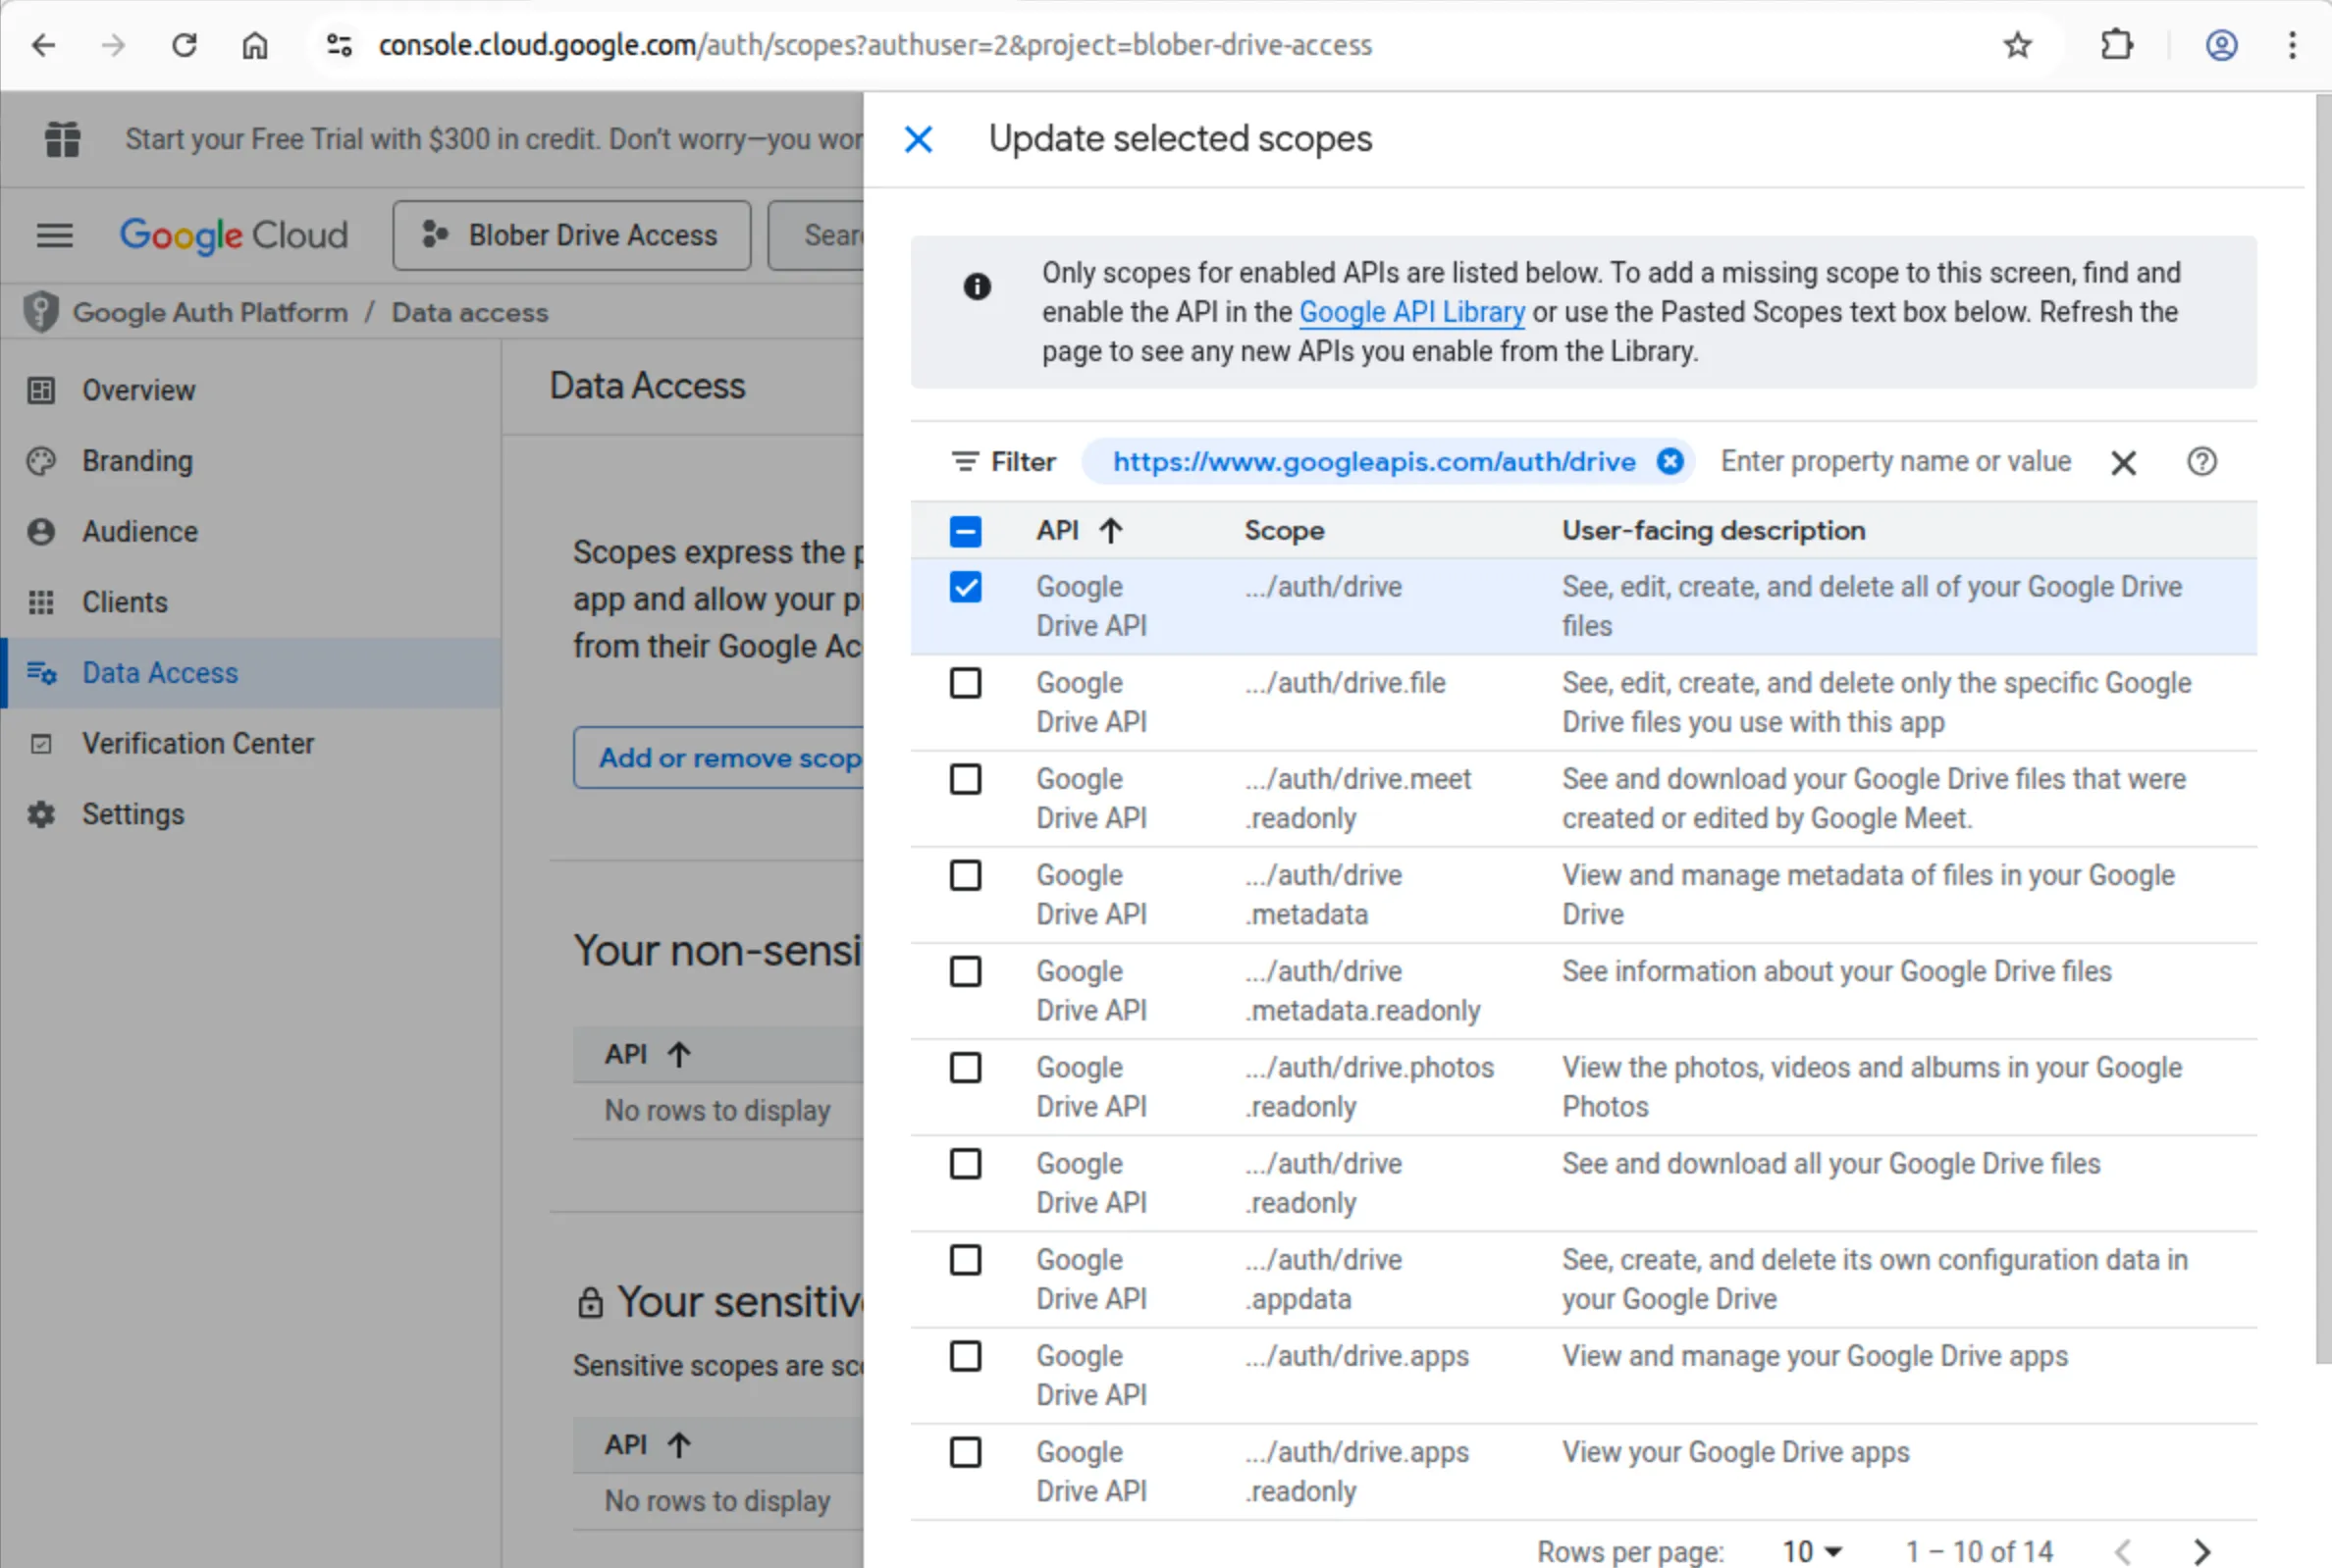
Blober requests scopes automatically during authorization, so this step is optional. But if you want to pre-configure them:
1. In the left sidebar, click **Data Access**
2. Click **Add or remove scopes**
3. Search for `drive` and check `https://www.googleapis.com/auth/drive` (Full access)
4. Click **Update**, then **Save**
### 6. Create Web Credentials
[Section titled “6. Create Web Credentials”](#6-create-web-credentials)
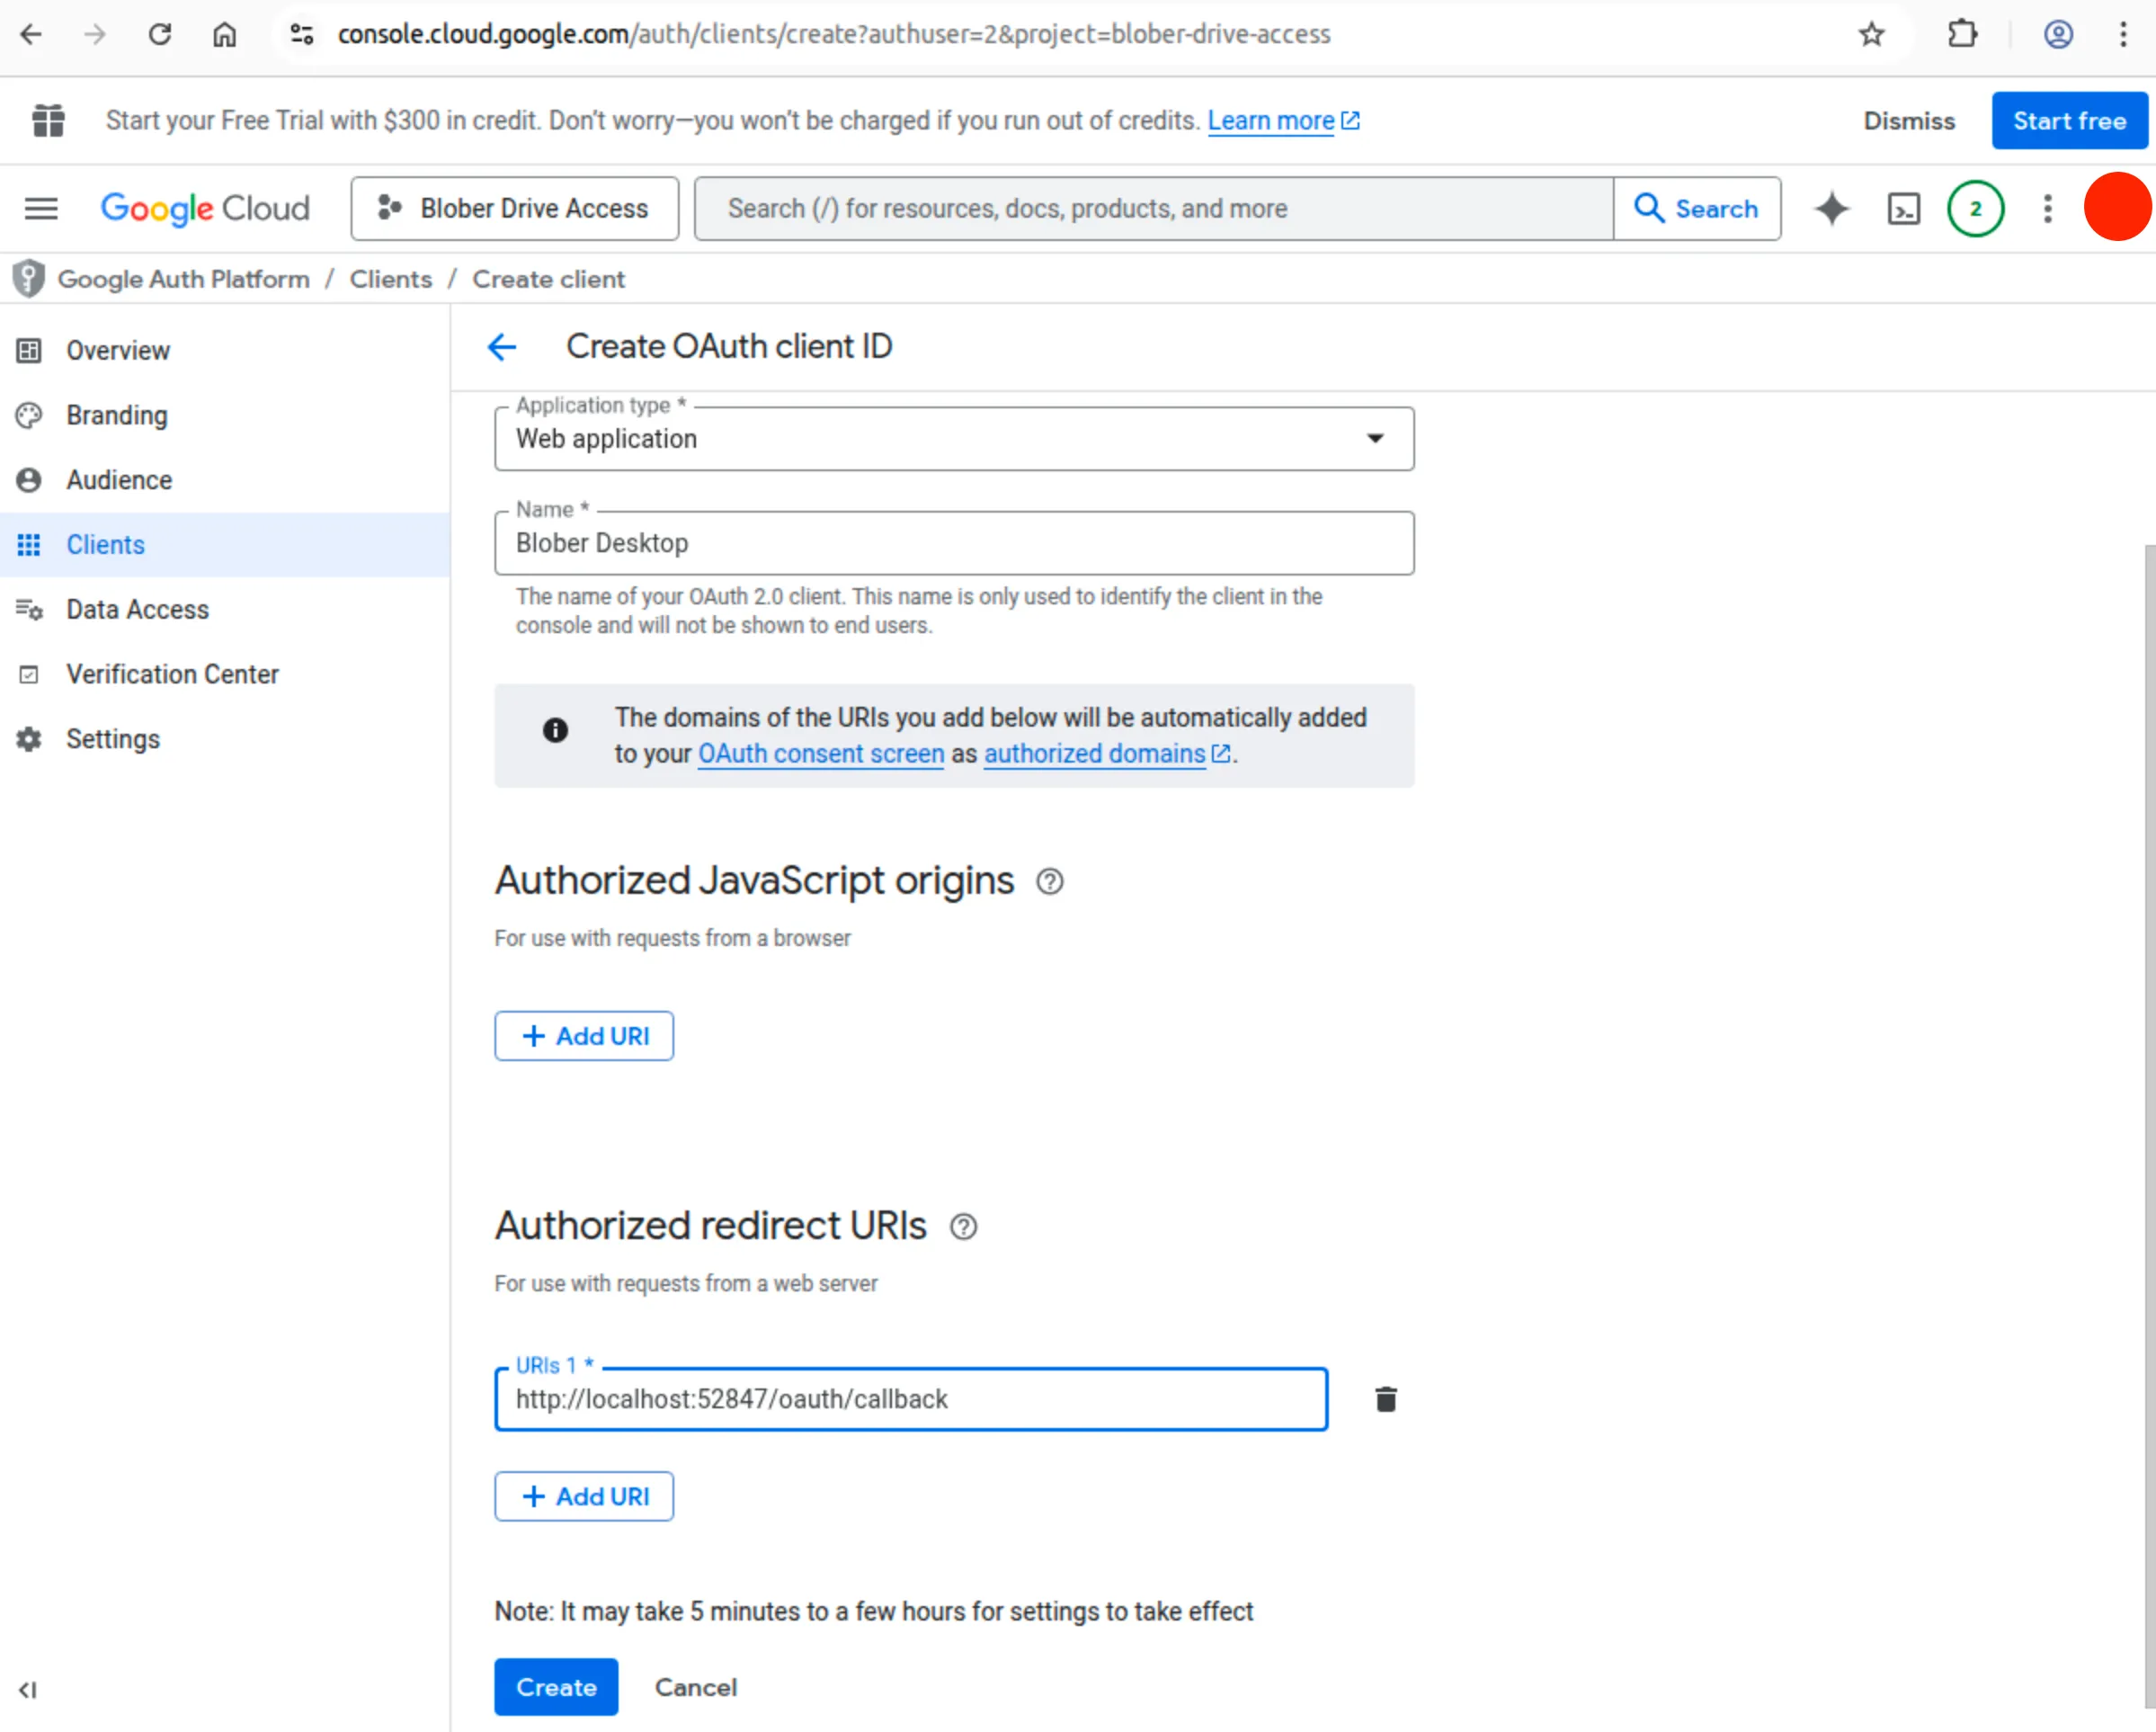
1. In the left sidebar, click **Clients**
2. Click **Create Client** (or go directly to [Create OAuth client](https://console.cloud.google.com/auth/clients/create))
3. For **Application type**, select **Web Application**
4. Enter a name (e.g., `Blober Desktop`)
5. Under Authorized redirect URIs, add:
>
6. Click **Create**
7. A dialog appears showing your **Client ID** and **Client Secret**
8. Click the **Download JSON** button (⬇️) to save the credentials file
Caution
Keep this JSON file safe. It contains your client secret. Don’t commit it to version control or share it publicly.
### 7. Configure in Blober
[Section titled “7. Configure in Blober”](#7-configure-in-blober)
1. In Blober, go to **Workflows** > **New Workflow**
2. Select **Google Drive** as source or destination
3. Upload the JSON credentials file you downloaded
4. Click **Authorize Google Drive Access**
5. A browser window opens. Sign in with the **same Google account you added as a test user**
6. You’ll see a warning: **“Google hasn’t verified this app”**. This is expected for test apps
7. Click **Advanced**, then click **Go to \[App Name] (unsafe)**
8. Grant the requested permissions
9. Return to Blober. You should now see your Google Drive files
Terms Compliance
Your use of Google Drive through Blober is subject to [Google’s Terms of Service](https://policies.google.com/terms). See our [Terms of Service](/kb/docs/terms-and-privacy/terms-of-service/) for details.
## File Types
[Section titled “File Types”](#file-types)
Google Drive handles these file types:
| Type | Description | Export Format |
| ------------- | --------------------------- | ---------------- |
| Regular files | Documents, images, videos | As-is |
| Google Docs | Google Docs documents | `.docx` |
| Google Sheets | Google Sheets spreadsheets | `.xlsx` |
| Google Slides | Google Slides presentations | `.pptx` |
| Google Forms | Form definitions | Not downloadable |
## Permissions & Privacy
[Section titled “Permissions & Privacy”](#permissions--privacy)
When you connect Google Drive, Blober requests these permissions:
* **View files:** Read file names and metadata
* **Download files:** Download file contents
* **Upload files:** Create new files
* **Delete files:** Remove files you own
**Blober will never:**
* Access files from other apps without permission
* Modify files without your explicit action
* Share your data with third parties
## The Authorization Screen
[Section titled “The Authorization Screen”](#the-authorization-screen)
When you first connect, your browser will show Google’s consent flow:
1. **Sign in** with the Google account you added as a test user
2. **“Google hasn’t verified this app”** warning: click **Advanced**, then **Go to \[App Name] (unsafe)**
3. **Permission grant**: review the permissions and click **Allow**
This warning is normal for apps in Testing mode and does not mean anything is wrong.
## Common Issues
[Section titled “Common Issues”](#common-issues)
### ”Google hasn’t verified this app” (blocked, can’t proceed)
[Section titled “”Google hasn’t verified this app” (blocked, can’t proceed)”](#google-hasnt-verified-this-app-blocked-cant-proceed)
* Make sure you click **Advanced** at the bottom of the warning screen, then click the small link **Go to \[App Name] (unsafe)**
* If you don’t see the “Advanced” link, you may be signed into the wrong Google account
### ”403 Access Denied” or “Error 403: access\_denied”
[Section titled “”403 Access Denied” or “Error 403: access\_denied””](#403-access-denied-or-error-403-access_denied)
* You forgot to add yourself as a **test user**. Go to **Google Auth Platform** > **Audience** > **Test users**, add your exact Gmail address
* Make sure you’re signing in with the same email you added as a test user
### ”redirect\_uri\_mismatch”
[Section titled “”redirect\_uri\_mismatch””](#redirect_uri_mismatch)
* The redirect URI your app is sending doesn’t match what’s configured. For Desktop app credentials, this is handled automatically, so you shouldn’t see this error
* If you do, make sure your credential type is **Desktop app** (not “Web application”)
### “Authentication Failed”
[Section titled ““Authentication Failed””](#authentication-failed)
* Try disconnecting and reconnecting in Blober
* Clear browser cookies for `accounts.google.com`
* Check you’re signing into the correct Google account
### ”Permission Denied” on files
[Section titled “”Permission Denied” on files”](#permission-denied-on-files)
* Re-authorize to refresh permissions
* Check if files are owned by you or shared with you
* Verify the Drive API is enabled for your project
### ”Files Not Showing”
[Section titled “”Files Not Showing””](#files-not-showing)
* Refresh the file list
* Check you’re in the correct folder
* Verify files aren’t in Trash
### Console shows “You need additional access”
[Section titled “Console shows “You need additional access””](#console-shows-you-need-additional-access)
* You’re viewing a project you don’t own. Click the **project picker** in the top-left and select the correct project
* This also happens if the project name in the URL doesn’t match your actual project ID
## Limitations
[Section titled “Limitations”](#limitations)
### Storage
[Section titled “Storage”](#storage)
* **Free tier:** 15 GB (shared with Gmail and Google Photos)
* **Maximum file size:** 5 TB per file
* **Daily upload limit:** 750 GB
### API Quotas
[Section titled “API Quotas”](#api-quotas)
* Google imposes rate limits on API requests
* Blober handles rate limiting automatically
* Large operations may take longer due to throttling
### Google Workspace Files
[Section titled “Google Workspace Files”](#google-workspace-files)
* Google Docs/Sheets/Slides are exported to Microsoft Office formats
* Some formatting may differ after export
* Google Forms cannot be downloaded
## Best Practices
[Section titled “Best Practices”](#best-practices)
### Security
[Section titled “Security”](#security)
* Never share your OAuth credentials JSON file with anyone
* Don’t commit the JSON file to version control (add it to `.gitignore`)
* Periodically review connected apps in [Google Account settings](https://myaccount.google.com/permissions)
* Revoke access for apps you no longer use
## Search Syntax
[Section titled “Search Syntax”](#search-syntax)
You can use Google Drive’s search from within Blober:
| Query | Description |
| -------------------- | ------------------------------- |
| `filename:report` | Files with “report” in the name |
| `type:pdf` | PDF files only |
| `owner:me` | Files you own |
| `modified:last7days` | Recently modified |
## External References
[Section titled “External References”](#external-references)
* [Google Auth Platform Overview](https://console.cloud.google.com/auth/overview): configure OAuth consent
* [Google Drive API Library Page](https://console.cloud.google.com/apis/library/drive.googleapis.com): enable the Drive API
* [OAuth for Desktop Apps](https://developers.google.com/identity/protocols/oauth2/native-app): how OAuth works for desktop apps
* [Google Drive API Documentation](https://developers.google.com/drive/api/guides/about-sdk)
* [Google Cloud Console](https://console.cloud.google.com/)
# GoPro Plus Cloud
GoPro Plus is GoPro’s cloud storage service, offering unlimited storage for GoPro camera media. Blober connects to your GoPro account through a simple browser-based login.
**Blober is the only tool that connects to GoPro Cloud.** rclone, MultCloud, and Flexify do not support GoPro as a source. GoPro’s own web portal limits batch downloads to 25 files at a time bundled as ZIPs, with no bulk export or “Download All” option. Blober removes these limits entirely.
## Capabilities
[Section titled “Capabilities”](#capabilities)
* ✅ Browse media (photos & videos)
* ✅ Upload files (up to 5 TB)
* ✅ Download files (highest quality, parallel downloads with automatic resume)
* ✅ Delete media
* ✅ View file metadata (resolution, camera model, capture date)
* ✅ Progress tracking for uploads
* ❌ Create folders (GoPro organizes by date/camera automatically)
* ❌ Move/rename files
## Prerequisites
[Section titled “Prerequisites”](#prerequisites)
* A [GoPro Plus](https://gopro.com/en/us/gopro-subscription) subscription (or GoPro Premium)
* Media previously uploaded from a GoPro camera or the GoPro app
## Setup
[Section titled “Setup”](#setup)
1. Go to **Workflows** → **New Workflow**
2. Select **GoPro** as source or destination
3. Click **Open GoPro Login**
4. A browser window opens - sign in with your GoPro account
5. Blober captures your session automatically and the window closes
6. Start browsing or transferring files
Note
Your session lasts approximately 20 hours. When it expires, Blober will prompt you to sign in again.
## File Organization
[Section titled “File Organization”](#file-organization)
GoPro automatically organizes your media into folders by date, camera, and type:
```plaintext
/2026-01-23/HERO13 Black/videos/GX015742.MP4
/2026-01-23/HERO13 Black/photos/GOPR0001.JPG
/2025-12-15/HERO12 Black/videos/GX014521.MP4
```
### Browse Modes
[Section titled “Browse Modes”](#browse-modes)
| Mode | Description |
| ------------ | ------------------------------ |
| Flat | All files listed at root level |
| Hierarchical | Date → Camera → Type → Files |
### File Selection
[Section titled “File Selection”](#file-selection)
When browsing your GoPro Cloud library, you can select:
* **Individual files** by clicking a single file
* **Multiple files** by checking several files across folders
* **Entire directory** by ticking the **/ (Entire Storage)** checkbox
After making your selection, click **Submit Selection** to add the files to your workflow. There is no file limit — transfer 10 files or 10,000 in one run.
## Supported File Types
[Section titled “Supported File Types”](#supported-file-types)
| Type | Extensions |
| ------ | ------------------------------ |
| Videos | `.mp4`, `.mov`, `.avi`, `.mkv` |
| Photos | `.jpg`, `.png`, `.raw`, `.dng` |
## Metadata
[Section titled “Metadata”](#metadata)
Each file includes the following metadata, available for use in Blober’s naming templates:
| Field | Example |
| ------------ | ------------------ |
| Camera model | HERO13 Black |
| Capture date | 2026-01-23 |
| Resolution | 5312 × 2988 |
| File size | 142.5 MB |
| Duration | 0:32 (videos only) |
## Uploads
[Section titled “Uploads”](#uploads)
Blober handles uploads to GoPro Plus automatically using multipart upload. Large files are split into parts and uploaded with progress tracking.
* Files up to **5 TB** are supported
* Upload progress is reported in real time
* If an upload fails partway through, simply retry - no partial files are left behind
## Best Practices
[Section titled “Best Practices”](#best-practices)
### Backup Your GoPro Cloud
[Section titled “Backup Your GoPro Cloud”](#backup-your-gopro-cloud)
Use GoPro as a **source** to back up your cloud media to local storage or another cloud provider. Combine with scheduled workflows for automatic backups.
### Migrate to Another Provider
[Section titled “Migrate to Another Provider”](#migrate-to-another-provider)
Transfer GoPro cloud media to S3, Azure, Dropbox, Backblaze B2, or any other supported provider. Blober always downloads the highest resolution variant to preserve original quality. Files move directly from GoPro Cloud to your destination — no manual downloads required.
### Browse Efficiently
[Section titled “Browse Efficiently”](#browse-efficiently)
Use hierarchical mode to browse by date and camera model, or switch to flat mode to see everything at once. Use Blober’s filtering to find specific media types.
## Troubleshooting
[Section titled “Troubleshooting”](#troubleshooting)
### Connection issues
[Section titled “Connection issues”](#connection-issues)
* **“Not authenticated”** - Your session has expired. Open the **GoPro Account** picker and click **+ New Account** to sign in again, or pick another previously connected account from the dropdown.
* **Downloads not working** - The file may still be processing on GoPro’s servers. Check that it shows as ready in the [GoPro web app](https://plus.gopro.com/).
### Upload issues
[Section titled “Upload issues”](#upload-issues)
* **Upload failed** - Simply retry the upload. Blober handles temporary errors automatically.
* **Slow uploads** - Large files are uploaded in 10 MB parts, which can take time. This is normal for GoPro’s upload process.
## Limitations
[Section titled “Limitations”](#limitations)
* **Storage:** Unlimited with GoPro Plus subscription
* **Session duration:** \~20 hours before re-authentication is needed
* **Multiple accounts:** Blober supports multiple GoPro accounts side-by-side. Use the **GoPro Account** dropdown in a workflow to pick which account to use, click **+ New Account** to connect another, **↻** to refresh the list, or **✕** to disconnect the selected account.
* **No folder management:** GoPro organizes files automatically - you cannot create, move, or rename folders/files
* **Rate limiting:** Large batch operations may be throttled by GoPro
Caution
GoPro does not provide an official public API. If something stops working after a GoPro update, check for a Blober update. Your use of GoPro Plus through Blober is at your own risk and must comply with [GoPro’s Terms of Service](https://gopro.com/en/us/legal/terms-of-service). Blober does not guarantee uptime or uninterrupted access to GoPro services. See our [Terms of Service](/kb/docs/terms-and-privacy/terms-of-service/) for details.
## Further Reading
[Section titled “Further Reading”](#further-reading)
[Play](https://youtube.com/watch?v=TLvZ4Xo9c-g)
* [Transfer GoPro Cloud Files in 45 Seconds with Blober](/kb/articles/gopro-cloud-workflow-setup-45-seconds/) — step-by-step tutorial with video walkthrough
## External References
[Section titled “External References”](#external-references)
* [GoPro Plus Subscription](https://gopro.com/en/us/gopro-subscription)
* [GoPro Web App](https://plus.gopro.com/)
# Local Filesystem
The Local provider reads and writes to your computer’s filesystem. This is particularly useful in the desktop app for backing up local files to cloud storage or syncing cloud files locally.
## Capabilities
[Section titled “Capabilities”](#capabilities)
* ✅ Browse folders and files via the desktop file picker
* ✅ Create directories
* ✅ Upload/copy files
* ✅ Download/copy files
* ✅ Delete files and directories
* ✅ Move files
* ✅ Get file metadata (size, dates, permissions)
* ✅ Real-time file change detection
## Prerequisites
[Section titled “Prerequisites”](#prerequisites)
* Blober Desktop App installed
* Read/write permissions to the directories you want to access
## Path Format
[Section titled “Path Format”](#path-format)
Local paths are standard absolute paths on your operating system:
**Windows:**
```plaintext
C:\Users\YourName\Documents
D:\Backups\photos
```
**macOS:**
```plaintext
/Users/YourName/Documents
/Volumes/ExternalDrive/backups
```
**Linux:**
```plaintext
/home/yourname/documents
/mnt/backup
/media/yourname/external-drive
```
## Configuration
[Section titled “Configuration”](#configuration)
No credentials are required for the Local provider. Access is based on the permissions of the user running the Blober desktop app.
### Browsing Files
[Section titled “Browsing Files”](#browsing-files)
1. In Blober, go to **Workflows** => **New Workflow**
2. Select **Local** as source or destination
3. Click **Browse** to open the file picker
4. Navigate to and select your folder
5. The path will be populated automatically
## Use Cases
[Section titled “Use Cases”](#use-cases)
### Backup Local Files to Cloud
[Section titled “Backup Local Files to Cloud”](#backup-local-files-to-cloud)
Create a workflow to automatically backup your Documents folder to Azure Blob, S3, or other cloud storage.
**Example:**
* **Source:** Local `/Users/you/Documents`
* **Destination:** AWS S3 `my-backup-bucket/documents/`
* **Action:** Copy
### Download Cloud Files Locally
[Section titled “Download Cloud Files Locally”](#download-cloud-files-locally)
Sync your Google Drive or cloud storage files to a local folder for offline access.
**Example:**
* **Source:** Google Drive `My Files/Projects`
* **Destination:** Local `/Users/you/Projects`
* **Action:** Copy
### Local-to-Local Copy
[Section titled “Local-to-Local Copy”](#local-to-local-copy)
Copy files between different drives or directories on your computer.
**Example:**
* **Source:** Local `/Users/you/Downloads`
* **Destination:** Local `/Volumes/ExternalDrive/Archive`
* **Action:** Move
### Testing Workflows
[Section titled “Testing Workflows”](#testing-workflows)
Use local storage to test workflow configurations before running against cloud providers.
## Important Safety Behavior
[Section titled “Important Safety Behavior”](#important-safety-behavior)
To avoid accidentally listing your entire filesystem, the Local provider will **not** list anything when no start directory is specified. Browsing is always done via the UI file picker.
## Permissions by Operating System
[Section titled “Permissions by Operating System”](#permissions-by-operating-system)
### Windows
[Section titled “Windows”](#windows)
* Access depends on NTFS permissions and UAC settings
* Run Blober as Administrator if you need access to system directories
* Right-click folder => **Properties** => **Security** to check permissions
### macOS
[Section titled “macOS”](#macos)
* You may need to grant **Files and Folders** or **Full Disk Access** permissions
* Go to **System Preferences** => **Security & Privacy** => **Privacy** => **Files and Folders**
* If prompted, click **Allow** when Blober requests folder access
### Linux
[Section titled “Linux”](#linux)
* Permissions are based on the user running the app and mount permissions
* Check permissions with `ls -la /path/to/folder`
* Fix permissions if needed:
```bash
chmod -R u+rw /path/to/folder
```
## Common Issues
[Section titled “Common Issues”](#common-issues)
### Slow Performance
[Section titled “Slow Performance”](#slow-performance)
* Exclude directories with many small files (1000s of files)
* Check if antivirus is scanning files during operations
* Ensure disk health is good (check SMART status)
* Consider using filters to exclude temporary files
### External Drive Not Showing
[Section titled “External Drive Not Showing”](#external-drive-not-showing)
* Ensure the drive is properly mounted
* On Linux, check `/media/` or `/mnt/` for mount points
* On macOS, check `/Volumes/`
* On Windows, check if drive letter is assigned
## Best Practices
[Section titled “Best Practices”](#best-practices)
### Path Selection
[Section titled “Path Selection”](#path-selection)
* Choose specific folders rather than entire drives
* Avoid system directories:
* Windows: `C:\Windows`, `C:\Program Files`
* macOS: `/System`, `/Library`
* Linux: `/bin`, `/etc`, `/usr`
* Create dedicated backup folders for organization
### Performance
[Section titled “Performance”](#performance)
* Local operations are generally faster than cloud operations
* For directories with thousands of files, use filters to limit scope
* Consider excluding temporary files (`.tmp`, `.log`, cache directories)
### Security
[Section titled “Security”](#security)
* Local storage never leaves your computer
* No data is sent to Blober servers
* Perfect for sensitive files that shouldn’t be uploaded to cloud
## Advanced Configuration
[Section titled “Advanced Configuration”](#advanced-configuration)
### Symbolic Links
[Section titled “Symbolic Links”](#symbolic-links)
Blober can follow symbolic links:
* Useful for organizing files across locations
* Be careful with circular links (A => B => A)
* Enable in workflow settings if needed
### Hidden Files
[Section titled “Hidden Files”](#hidden-files)
* By default, hidden files (starting with `.` on Unix) may be hidden
* Enable “Show hidden files” in settings to include them
* Useful for backing up configuration files (`.bashrc`, `.gitconfig`)
### File Filters
[Section titled “File Filters”](#file-filters)
Exclude certain file types from operations:
**Example filters:**
```plaintext
*.tmp # Temporary files
*.log # Log files
.DS_Store # macOS metadata
Thumbs.db # Windows thumbnails
node_modules/ # Dependencies
```
## Security Considerations
[Section titled “Security Considerations”](#security-considerations)
### Sandboxing
[Section titled “Sandboxing”](#sandboxing)
The desktop app respects OS-level sandboxing:
* Limited access to system files
* User explicitly grants folder access
* No access to other applications’ data
### Privacy
[Section titled “Privacy”](#privacy)
* Files stay on your computer (for local-to-local operations)
* Cloud transfers go directly to the destination provider
* Blober doesn’t store your files on its servers
## External References
[Section titled “External References”](#external-references)
* [Windows File Permissions](https://docs.microsoft.com/en-us/windows/security/identity-protection/access-control/access-control)
* [macOS Privacy Controls](https://support.apple.com/guide/mac-help/control-access-to-files-and-folders-on-mac-mchld5a35146/mac)
* [Linux File Permissions](https://wiki.archlinux.org/title/File_permissions_and_attributes)
# Wasabi
Wasabi is S3-compatible hot cloud storage with no egress fees. Blober connects using the standard S3 protocol.
Path format:
```plaintext
bucket-name/path/to/file.ext
```
## Capabilities
[Section titled “Capabilities”](#capabilities)
* ✅ Browse buckets and objects
* ✅ Upload files (multipart for large files)
* ✅ Download files
* ✅ Delete objects
* ✅ Copy/move objects
* ✅ S3-compatible API
* ✅ No egress fees
## Prerequisites
[Section titled “Prerequisites”](#prerequisites)
* A Wasabi account ([create one](https://wasabi.com/sign-up))
* At least one Wasabi bucket
* Access keys with appropriate permissions
## Required Credentials
[Section titled “Required Credentials”](#required-credentials)
[]()
### Access Key ID
[Section titled “Access Key ID”](#access-key-id)
* **Option key:** `accessKeyId`
* **Where to find:** Wasabi Console => Access Keys
* **Format:** 20-character alphanumeric string
* **Example:** `AKIAIOSFODNN7EXAMPLE`
[]()
### Secret Access Key
[Section titled “Secret Access Key”](#secret-access-key)
* **Option key:** `secretAccessKey`
* **Format:** 40-character string
* **Example:** `wJalrXUtnFEMI/K7MDENG/bPxRfiCYEXAMPLEKEY`
## Setup (Wasabi Console)
[Section titled “Setup (Wasabi Console)”](#setup-wasabi-console)
### 1. Create a Wasabi Bucket
[Section titled “1. Create a Wasabi Bucket”](#1-create-a-wasabi-bucket)
1. Log in to [Wasabi Console](https://console.wasabisys.com)
2. Go to **Buckets** => **Create Bucket**
3. Enter a unique bucket name
4. Select your preferred region
5. Configure bucket settings (versioning, logging, etc.)
6. Click **Create Bucket**
### 2. Create Access Keys
[Section titled “2. Create Access Keys”](#2-create-access-keys)
1. Go to **Access Keys** in the Wasabi Console
2. Click **Create New Access Key**
3. Choose **Root User Key** or create for a sub-user
4. Click **Create**
5. **Download or copy the keys immediately** (secret shown only once!)
### 3. Configure in Blober
[Section titled “3. Configure in Blober”](#3-configure-in-blober)
1. In Blober, go to **Workflows** => **New Workflow**
2. Select **Wasabi** as source or destination
3. Enter:
* Access Key ID
* Secret Access Key
4. Test by browsing your buckets
## Available Regions
[Section titled “Available Regions”](#available-regions)
Wasabi is available in multiple regions worldwide:
| Region | Location | Endpoint |
| ---------------- | ----------- | --------------------------------- |
| `us-east-1` | N. Virginia | `s3.wasabisys.com` |
| `us-east-2` | N. Virginia | `s3.us-east-2.wasabisys.com` |
| `us-west-1` | Oregon | `s3.us-west-1.wasabisys.com` |
| `us-central-1` | Texas | `s3.us-central-1.wasabisys.com` |
| `ca-central-1` | Canada | `s3.ca-central-1.wasabisys.com` |
| `eu-central-1` | Amsterdam | `s3.eu-central-1.wasabisys.com` |
| `eu-central-2` | Frankfurt | `s3.eu-central-2.wasabisys.com` |
| `eu-west-1` | London | `s3.eu-west-1.wasabisys.com` |
| `eu-west-2` | Paris | `s3.eu-west-2.wasabisys.com` |
| `ap-northeast-1` | Tokyo | `s3.ap-northeast-1.wasabisys.com` |
| `ap-northeast-2` | Osaka | `s3.ap-northeast-2.wasabisys.com` |
| `ap-southeast-1` | Singapore | `s3.ap-southeast-1.wasabisys.com` |
| `ap-southeast-2` | Sydney | `s3.ap-southeast-2.wasabisys.com` |
Blober automatically detects the region for each bucket.
## Troubleshooting
[Section titled “Troubleshooting”](#troubleshooting)
### ”Access Denied” error
[Section titled “”Access Denied” error”](#access-denied-error)
* Verify your Access Key ID and Secret Access Key are correct
* If using a sub-user key, ensure it has permissions for the buckets you need
### Buckets from certain regions not showing
[Section titled “Buckets from certain regions not showing”](#buckets-from-certain-regions-not-showing)
* Blober auto-discovers buckets across all Wasabi regions
* If a bucket was just created, wait a moment and refresh
## Best Practices
[Section titled “Best Practices”](#best-practices)
* **No egress fees** - Wasabi is great as a backup destination you may need to restore from
* Wasabi has a **minimum 90-day storage policy** - deleting files before 90 days still incurs the full charge
* Choose a region close to your primary location for best transfer speeds
* Wasabi pricing is flat: $7.99/TB/month (or lower by region) with no API call charges
Terms Compliance
Your use of Wasabi through Blober is subject to [Wasabi’s Terms of Service](https://wasabi.com/legal/terms-of-service/). See our [Terms of Service](/kb/docs/terms-and-privacy/terms-of-service/) for details.
## External References
[Section titled “External References”](#external-references)
* [Wasabi Documentation](https://wasabi-support.zendesk.com/hc/en-us)
* [Creating Access Keys](https://wasabi-support.zendesk.com/hc/en-us/articles/360019677192-Creating-a-Wasabi-API-Access-Key-Set)
* [Wasabi Regions](https://wasabi-support.zendesk.com/hc/en-us/articles/360015106031-What-are-the-service-URLs-for-Wasabi-s-different-storage-regions-)
* [Wasabi Pricing](https://wasabi.com/cloud-storage-pricing/)
# Terms & Privacy
By using Blober, you agree to our Terms of Service and acknowledge our Privacy Policy.
* [Terms of Service](/kb/docs/terms-and-privacy/terms-of-service/) - What you agree to when using Blober
* [Privacy Policy](/kb/docs/terms-and-privacy/privacy-policy/) - How we handle your data (short answer: we don’t collect it)
## Summary
[Section titled “Summary”](#summary)
**Blober automates what you can already do.** Every action Blober performs - uploading, downloading, copying, deleting - is something you could do manually through each provider’s own interface. Blober simply makes it faster and easier. The responsibility for how you use these services remains with you.
**Blober is a desktop app.** Your files, credentials, and transfers stay on your machine. We don’t run servers that touch your data.
**You’re responsible for your accounts.** When you connect a cloud provider, you’re using your own credentials and must follow that provider’s terms of service.
**Some integrations use unofficial APIs.** Providers like GoPro Plus don’t offer official public APIs. These integrations may break if the provider changes their service. We’ll do our best to fix things quickly, but we can’t guarantee uninterrupted access.
**We collect anonymized analytics only.** No file names, no credentials, no personal data - just feature usage and error types to help us improve Blober.
# Privacy Policy
*Last Updated: December 2025*
## Your Data Stays Yours
[Section titled “Your Data Stays Yours”](#your-data-stays-yours)
Blober is a desktop application. All file transfers happen directly on your machine or between your connected cloud providers. We do not have access to your files, and your data never passes through our servers.
## What We Don’t Collect
[Section titled “What We Don’t Collect”](#what-we-dont-collect)
### Your Files
[Section titled “Your Files”](#your-files)
All file operations (uploads, downloads, copies, moves) happen directly between your computer and your storage providers. Blober never intercepts, stores, or transmits your files to us.
### Your Credentials
[Section titled “Your Credentials”](#your-credentials)
Your cloud provider access keys, secrets, tokens, and connection strings are stored securely on your local device. They are never sent to Blober servers. Authentication happens directly between your device and the provider.
## What We Do Collect
[Section titled “What We Do Collect”](#what-we-do-collect)
### Anonymized Usage Analytics
[Section titled “Anonymized Usage Analytics”](#anonymized-usage-analytics)
We use [PostHog](https://posthog.com/) to collect anonymized product usage data such as:
* Which features are used (e.g., which providers, how often workflows run)
* Error types (not error content or file information)
* General app performance metrics
This helps us understand how Blober is used and where to improve. **No personal data, file names, file contents, or credentials are ever collected.**
## Third-Party Services
[Section titled “Third-Party Services”](#third-party-services)
### Paystack
[Section titled “Paystack”](#paystack)
Processes payments for Blober purchases. We do not store your payment information - it is handled entirely by [Paystack](https://paystack.com/).
### Tawk.to
[Section titled “Tawk.to”](#tawkto)
Provides the customer support chat widget on our website. They may collect usage data in accordance with their [privacy policy](https://www.tawk.to/privacy-policy/).
### PostHog
[Section titled “PostHog”](#posthog)
Collects anonymized product analytics as described above. See their [privacy policy](https://posthog.com/privacy).
## Storage Provider Privacy
[Section titled “Storage Provider Privacy”](#storage-provider-privacy)
When you connect a storage provider (AWS, Azure, Google Drive, etc.), Blober communicates directly with that provider’s API using your credentials. Blober does not:
* Store copies of your data
* Relay data through intermediary servers
* Share your credentials with any third party
* Access your accounts outside of the actions you initiate
## Contact
[Section titled “Contact”](#contact)
If you have questions about this Privacy Policy, please contact us via the support chat on our [website](https://blober.io).
# Terms of Service
*Last Updated: December 2025*
## 1. Introduction
[Section titled “1. Introduction”](#1-introduction)
Welcome to Blober. By downloading, installing, or using the Blober desktop application (“Software”), you agree to be bound by these Terms of Service. If you do not agree, do not use the Software.
## 2. License
[Section titled “2. License”](#2-license)
We grant you a limited, non-exclusive, non-transferable, lifetime license to use the Software on your personal or business devices for the purpose of managing and transferring files between storage providers.
## 3. Payment & Refunds
[Section titled “3. Payment & Refunds”](#3-payment--refunds)
### One-Time Purchase
[Section titled “One-Time Purchase”](#one-time-purchase)
Blober is sold as a one-time purchase with no recurring subscription fees.
### Updates
[Section titled “Updates”](#updates)
Your purchase includes access to future updates of the Software.
### Refunds
[Section titled “Refunds”](#refunds)
If you are not satisfied with the Software, please contact support within 14 days of purchase for a refund request.
## 4. Use of Third-Party Services
[Section titled “4. Use of Third-Party Services”](#4-use-of-third-party-services)
Blober is a tool that automates what is already possible through each provider’s own interface. Every action Blober performs - uploading, downloading, copying, deleting - is something you could do manually. Blober simply makes it faster and more convenient.
Blober connects to third-party storage providers (such as AWS S3, Azure Blob Storage, Google Drive, GoPro Plus, and others) on your behalf. Your use of these services through Blober is subject to the following:
* **You are responsible** for complying with each provider’s terms of service, acceptable use policies, and applicable laws.
* **Blober does not guarantee** the availability, uptime, or continued functionality of any third-party service. Providers may change their APIs, terms, or access policies at any time.
* **Some integrations** rely on unofficial or reverse-engineered APIs (such as GoPro Plus). These may break without notice if the provider changes their service. Blober will make reasonable efforts to restore functionality, but we cannot guarantee uninterrupted access.
* **You assume all risk** when using Blober to interact with third-party services. Blober is a tool that acts on your instructions - you are responsible for ensuring your actions comply with the terms of each provider.
## 5. Disclaimer of Warranties
[Section titled “5. Disclaimer of Warranties”](#5-disclaimer-of-warranties)
The Software is provided “AS IS”, without warranty of any kind, express or implied. While we strive for reliability, we do not guarantee that the Software will be error-free or that it will prevent data loss. **You are responsible for backing up your data before performing transfers.**
## 6. Limitation of Liability
[Section titled “6. Limitation of Liability”](#6-limitation-of-liability)
In no event shall the Blober team be liable for any claim, damages, or other liability arising from, out of, or in connection with the Software or the use or other dealings in the Software. This includes, but is not limited to:
* Data loss during transfers
* Service interruptions from third-party providers
* Changes to third-party APIs that affect Blober functionality
* Account actions taken by third-party providers
## 7. Changes to Terms
[Section titled “7. Changes to Terms”](#7-changes-to-terms)
We may update these Terms from time to time. Continued use of the Software after changes constitutes acceptance of the new Terms.
## Contact
[Section titled “Contact”](#contact)
If you have questions about these Terms, please contact us via the support chat on our [website](https://blober.io).
# Cloud File Transfer Made Easy
> See how Blober makes transferring files between cloud providers effortless — no subscriptions, no transfer fees.
[Play](https://youtube.com/watch?v=mFrAd4pwSVs)
An overview of Blober’s core features: connecting cloud providers, creating workflows, and transferring files — all from a single desktop app with no recurring costs.
# GoPro Cloud Workflow Setup in 45 Seconds
> Watch how to connect GoPro Cloud, browse your media, select individual files, multiple files, or an entire directory, and create a transfer workflow — all in 45 seconds.
[Play](https://youtube.com/watch?v=TLvZ4Xo9c-g)
A quick walkthrough showing how fast it is to set up a Blober workflow with GoPro Cloud as the source. In just 45 seconds, you’ll see how to connect your GoPro account, browse your cloud media, and select files for transfer — whether that’s individual files, multiple files, or an entire directory.
# Moving Media From GoPro to Dropbox
> Watch how Blober transfers GoPro Cloud media directly to Dropbox in minutes — no manual downloads, no ZIP files, no hassle.
[Play](https://youtube.com/watch?v=NTqqf4sKbpk)
This demo shows how Blober connects to GoPro Cloud and transfers your photos and videos directly to Dropbox. No batch downloads, no ZIP files, no manual work — just set up a workflow and let Blober handle it.